Site hosted by Angelfire.com: Build your free website today!
to the web design home page


adding fonts

the assets window

cascading style sheets

find and replace

fixing images

forms

go back buttons

hotspots

inserting Flash text

inserting Flash buttons

the library

navigation bar

page properties

rollovers

site management

tables


Forms

(taken in part from Lehigh University's Intermediate Dreamweaver site)

You can use Dreamweaver to set up forms which to take and process input. In order for forms to work, they must call on a computer program, called a script, to process that input. Lehigh has a few scripts set up on the main server. If you want to use other scripts, you will need to run them from another site or look into using space on cgi.cc.lehigh.edu (see the Advanced Web Authoring Seminar for more information).

Most people will be using the Lehigh form-processing script (pquery), unless they are using form-processing scripts from other servers. So we will be using the Lehigh form processing script, which simply takes input from the form and emails it to a specific address, as our example.

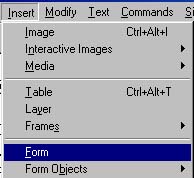
First, you have to set up the form: Choose Form from the Insert menu:
Menu: Insert, Form

The form will appear as a box outlined in dotted red lines:

Then you must set the properties of the form. Clicking inside on the red dotted line around the form makes the Properties panel display the form properties:
Form Properties

The Method should be Post; the Action is the URL (web address) of the form processing script, in this case:
http://www.lehigh.edu/cgi-bin/pquery

You can put a name in the 'Form Name' field, but our forms processor doesn't use it.

Inside the form, you will need to put fields. To insert a field, from the Insert menu, choose Form Objects, then the type of field you want: Menu: Insert Form Objects

After a field is created, you have to set its properties, including name and, if necessary, value.


Field types:

Hidden fields

Hidden fields don't display to the user. They are indicated in Dreamweaver by an icon: but when the page is displayed in a browser, there is no indication of the field. The value in the Hidden field is automatically passed to the script and the user cannot change it. Set the name and value properties:
Hidden Field Properties


Text fields

Text fields allow the user to enter in text. Single line text fields are for short answers. Text field properties
Text Field Properties
include:

  • Name: the field name
  • Char Width: how many characters wide the field is
  • Max Chars: the maximum number of characters that can be entered in this field-- this can be more or less than Char Width
  • Type: single line is the basic text entry field; multiline is a paragraph block text area; password does not display what is typed into the field, instead displaying *'s. (It doesn't encode the entry at all though, just keeps it from being visible.)
  • Init Val: the initial value to be displayed in the field, if you choose to have one. Users will have to select and type over this.

Multiline Text Fields (Textarea )

To create a textarea to type in a block of text: insert a Text field, and in the properties choose 'Multiline' and specify the dimensions of the resulting text block. Additional properties for a multiline text field (also called a textarea) include: TextArea Properties

  • Num Lines: is the number of lines long the field displays as. If this is two, two lines of text will be visible at one time as the user types.
  • Wrap: The way text wraps in the field. By default or with Wrap off, text typed in the field wraps when typed but is submitted to the script as separate lines; Hard wrap divides it into separate lines whereever the user hits return.

Radio buttons

Yes
No

Radio buttons allow the user to select one option among several by clicking on one button in a set of buttons. When the user clicks on a radio button, all the other buttons with that name are un-checked.
Radio Button Properties
Radio buttons have three values to set:

  • Name (under 'RadioButton')-- so you can tell what question is being answered.
    All the radio buttons for the choice must have the same name but different values. Both the buttons to the left are named Question.
  • CheckedValue: this is the value that is sent if the button is selected. The two buttons to the left have the Checked Values 'Yes' and 'No'.
  • Initial State: whether the button is selected (Checked) or not (Unchecked) when the page is first displayed. The button to the left next to No is set to Checked.

Note: the text next to the radio button is not inserted automatically-- you must type it in separately.


Checkboxes

Faculty
Staff
Grad Student
Undergraduate

Checkboxes allow the user to select one or more answers by selecting the checkbox(es) that apply. More than one checkbox of the same name can be checked at the same time.CheckBox Properties

Like radio buttons, Checkboxes have a Name, a CheckedValue, and an Initial State.


List/Menu (select)

Select options (called in Dreamweaver 'List/menu') lets you set up a list of options in a drop-down menu for the user to pick from. Menu/Select Properties

Once you have created the List/menu (by selecting it from Form Objects), you will have to go into the Properties panel and click on the List Values button to add selections to the list.

Click the + button to add items to the list, then fill in the When you have finished adding items to the list, click OK to close the List Values window.List Values window


Submit button:

Every form needs a submit button: Choose Button from the list objects listing. The default setting is for a Submit button.Submit Button properties

  • The Button Name has to stay 'Submit'
  • Label is what appears as the text on the button

Setting up a form to use the form processing script

Lehigh's form processing script, pquery, requires a number of fields to be present in every form: FORMNAME, RECIPIENT, and SENDER.

To insert the FORMNAME field (which should generally be a hidden field, and isn't the same as the 'Name' property of the form): Click inside the form. Choose Form Object from the Insert menu, then choose 'Hidden Field'. Click on the yellow tab that appears and change the properties so that the field name (under HiddenField) becomes FORMNAME and the value is the name you want your field to have (this will be the header of the e-mail that is sent with the contents: FORMNAME hidden Field properties

To insert the RECIPIENT field (which should generally be a hidden field): Click inside the form. Choose Form Object from the Insert menu, then choose 'Hidden Field'. Click on the yellow tab that appears and change the properties so that the field name (under HiddenField) becomes RECIPIENT, and the value is the e-mail address that you want the form contents sent to:Hidden RECIPIENT field

You will need a SENDER (the e-mail address of the person filling out the form) field, but you will want that filled in by the user. So you will have to add some information in the field, such as 'Your E-mail address:' and follow it with a visible field. You can type inside a form (type inside the red lines) as you would normally. Then to insert the SENDER field, click where you want the field, and choose Form Object from the Insert menu, then select 'Text field'. You will want to fill in the form's name as SENDER. You can set the width to be the width of the usual Lehigh e-mail address (17 characters) and give an initial value that looks like a complete e-mail address to encourage people to fill in their complete e-mail address.SENDER field

Now you just add fields and text to complete your form.


Example:

Your e-mail address 

Have you used a web page editor before?  Yes  No

Which editors have you used?
Dreamweaver 
Netscape Composer 
Frontpage 
Text editor 
Other 

Which college are you in? 

What made you interested in Dreamweaver?