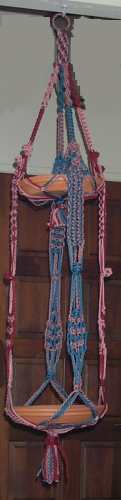
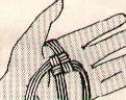
This could be used in many different ways, with one possibility being a bird feeder and bird bath. This started out as a single hanger and had cords added to it to make it a double one. It is 5 foot 6 inches in length, and has two different sized saucers in them they are 12 and 14 inches wide. The pictures were taken after it was completed.
The supplies you will need are as follows: 137 yards of variegated or other cord; 1 - 2 1/2" metal or wooden ring. Two saucers, I used 12 and 14 inch clay saucers.
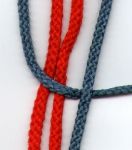
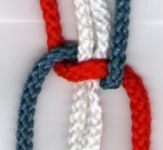
Step 1: Start by wrapping a 2 1/2 inch ring with a 1 yard cord of variegated cord.
Step 2: Cut 8 cords 10 yard long. 2 each of three colors in the variegated yarn and then 2 cords of variegated yarn.
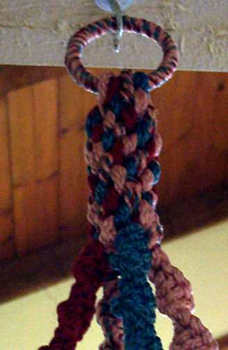
Step 3: Thread the cords into the ring and put ring to center of cords. Tie crown knot with 2 cords of each color alternating colors as you go. Tie 5 inches of these.
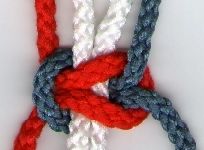
Step 4: Divide the cords into groups of four, dividing colors. Tie 6 1/2 inches of half knots keeping colors together.
Step 5: Reverse filler and working cords and tie 5 1/2 inches of Square knots.

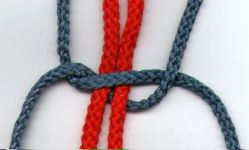
Step 6: Taking a dominate color and leaving about an inch, tie 4 square knots to make a square knot button. You are tying more than normal squares because of the thickness of the cords you are working with.
Step 7: Leaving about an inch tie another square knot button the same as the previous. Later, in step 15, you will add the cords to hang the first saucer or pot from above these square knot buttons.

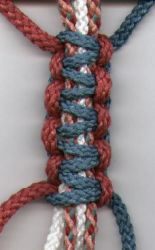
Step 8: Using a Lark's Head Knot, add two 5 yard cords to each of the filler cords between the two square knot buttons on each of the four sets of cords, this will make for 8 cords instead of four cords for each group.
Step 9: Using the cords just added tie 10 1/2 inches of Alternate square knots.

Step 10: Using the prominent color and leaving about 5 inches, tie 5 square knots to make a five square knot button. Again go down 4 1/2 inches.
Step 11: Tie a square knot to hold the cords, and then tie 6 inches of Alternate lark's head knots.


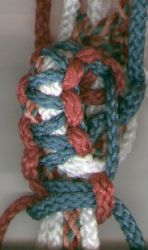
Step 12: Going down 3 inches tie two Square knot , use the longest cords of the same colors for these knots, as you start to make the bottom saucer holder.
Step 13: Going down 7 inches tie two Square knot , use the longest cords of two adjoining groups to bring the holder part together, as you make the bottom saucer holder.
Step 14: Now down 3 inches for the final Square knots to hold the saucer in. This will be all the cords, but two as fillers, to form basket to hold 14" saucer. Trim ends and separate and comb if desired.

Step 15: Using a Lark's Head Knot add two 2 yard cords dividing the cords above each of the square knot buttons to attach them, in steps 6 and 7. This will be adding a total of four new sets of cords to make the top saucer holder.
Step 16: Divide each group of new cords added in Step 15 into groups of four and tie a Square knot about 2 inches from the lower of the cords.
Step 17: Going down 2 inches tie two Square knot , use the longest cords of two adjoining groups to bring the holder part together, as you make the top saucer holder.
Step 18: bring all cords together and tie 6 Square knots to form basket to hold 12" saucer. Trim ends and separate and comb if desired.
Knot instructions:

This is the same as a Reverse Double Half Hitch knot and it is called an Alternating Lark's Head, only going in two directions. With the right cord take it over the center filler cords making a loop to the left and bringing it through to the front. First using the right cord, then the left. Keep cords even between knots.
Alternating Square Knots can be used to form a basket: Skip 4 inches, tie a row of alternating square knots, skip 3 inches, tie another row of alternating square knots. It can also be used when more than four cords are used as a wide pattern.

To make Crown Knots: The cords are held upside down, and are separated into equal groups, numbered counter clockwise, in this instruction there are four groups. Put one group behind the thumb, this will be group #1. Pick up group #1 and lay over group #2. Drop group #1 as you pick up group # 2. Lay #2 over #3 Drop #2 and pick up #3. Lay over #3 over #4. Drop #3 and pick up #4. Take #4 over the top and put down directly through the hole where your thumb is. Remove your thumb and tighten each group separately. This can be made with any number of groups just follow them around and tighten each group to finish each row.
With each group of four cords using the center 2 cords as filler cords tie half knots, they twist left or right depending which cord is overlapping. It will automatically twist when the proper number are made.


This is the most common method of mounting cords. Fold new working cord in half. Place the loop on top of mounting cord and pull ends through the loop. Tighten to complete knot.

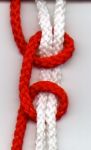
Using the outer cords as working cords and inner cords as the core cords. Place working cord to the left over core cords and under working cord on right. Place working cords on right under core cords and up through loop in left working cord. Place Left working cord over core cords and under Right working cord. Place Right working cord under core cords and through loop in Left working cord. Tighten cords.


To make a Square Knot Button: Tie three square knots. Then take the filler cords and thread them between the center of the filler cords at the top above the first square knot. Pull ends until it forms a ball. Tie a square knot directly under the button to secure it.
Good Knotting!
|
|
|||||
|
|
|||||
|
|
This page copyright © 1997-2003 tses
Last updated 9 /7/2003