|
In regard to links throughout this Site, you may see a word that is underlined but NOT highlighted blue like a link, It IS a link and these are words that can be found in our Dictionary. In case you're unfamiliar with some of the fishing lingo.
Other Websites
FUNdamentals
of Baseball
|
The Basics on How To Fish
Purchase a Fishing License
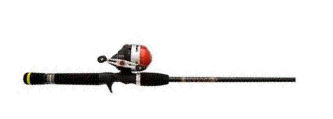
Fishing Pole or Rod and Reel
Fishing Line
Before
you can fish you
will need to purchase a Fishing License!!! You can purchase a fishing license online in your State, find out here.
You
may also want to be aware of fishing laws in your state.
Next, you are going to need something to catch fish with!
The
very basics you will need is an old fashioned cane pole
A
cane fishing pole is simply a long length of bamboo
cane that is cut and fashioned into a fishing pole with the use of
some basic terminal
tackle. The fishing
line is no longer than the length you
have put on it. Cane poles do not have a reel.
Cane poles are ideally suited for bank
fishing, as the bait
depth is limited by the line.
A
fishing rod and reel is simply a long flexible rod or
stick which holds a reel
at the handle to keep spooled up fishing
line. Therefor as opposed to the cane
pole and a limited length of fishing line, a rod and reel will allow
you to cast (throw as much line into the water) and reel it back in.
You can
learn more about different types of
Rods and Reels by visiting Our Rods
and Reels Page.
Fishing Line A fishing line is a cord or string that attaches to the end of your pole or rod and in turn holds the hook at the other end.
Important
parameters of a fishing line are its length, material, and weight
(thicker lines are more visible to fish). Factors that may determine
what line an angler chooses for a given fishing environment include
breaking strength, knot strength, UV resistance, castability,
limpness, stretch, abrasion resistance, and visibility. Terminal Tackle Now all the little things to add to your fishing line, like a hook and bait and other little doodads.
You
could get away with simply having a hook and line for your cane
pole. For a rod and reel however, you will need some weight to your
line in order for it to be casted out into the waters.
It would be
wise to purchase more than one of each piece of tackle, for you are
bound to lose, snag or break one or all of the pieces you tied to
your line. Fishing Hook
Let's start with the hook. You gotta have a hook in order to catch and secure the fish to your line.
It
would be in your best interest to purchase a small bag of hooks
ranging from size
2 up to size 3/0 to start off. You can even purchase a container of
assorted hooks. You want to purchase more than just one hook as you
are bound to lose one or more on your fishing expedition.
rule of thumb
You can
learn more about the different styles and sizes of hooks and their purpose
by visiting Our Hooks Page.
Sinkers
A
fishing sinker is a weight used to increase the hook and line's rate
of sink, anchoring ability, and/or casting distance.
All
you will need to start off are some BB sized split shot sinkers. A
small ball of lead of varying weights that is split open on one side
and can be placed by squeezing them directly on the line without tying. Or you can use Rubber Core Sinkers which are like a split shot, however split shot sinkers are not reusable and may nick or damage your fishing line. If you expect to be swapping out sinkers often, consider a rubber core sinker. It would be wise to purchase more than one sinker, for you are bound to lose one or more!
If you
would like to learn more about the use of sinkers visit Our Sinkers
Page.
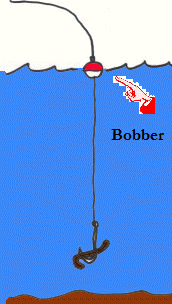
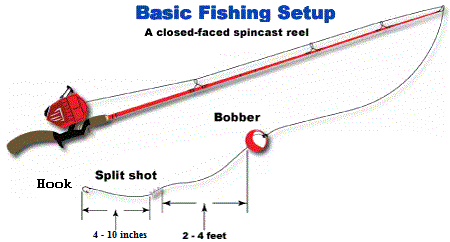
Bobbers
A bobber is a small piece of cork or light wood or plastic attached to your fishing line. It maintains bait at a given depth as well as indicates when a fish is biting at your hook. The most commonly employed bobber is the familiar round ball bobber, usually made of plastic. This bobber is often a combination of bright colors, including red, white and/or yellow. While there are multiple varieties of bobbers, spring bobbers that attach directly to the fishing line are most popular and the one I would suggest you use. It would be wise to purchase more than one bobber, for you are bound to lose, snag or break one or more of them!
You can
learn more about bobber styles and how to use them by visiting
Our Bobbers Page. Bait Bait is food or a food like substance that you will present to the fish by attaching it to the hook.
When
the fish see the food which is unknowingly to them attached to a
hook, they will attempt to bite at it and get caught on your hook or
more often you will have to pull on the hook and bait in order for
the hook to get caught into the fishes mouth. The Oh So Many Types of Bait To Use Live bait or Artificial bait
LIVE
BAIT
ARTIFICIAL
BAIT Artificial bait is simply as it indicates - artificial, fake, imitation, etc. Artificial bait would include Lures, plastic worms, spinners, spoons, etc.
You can
learn all about the different types of artificial bait and which
ones are best for catching a certain species of fish at Our Artificial
Bait Page.
Those
are the basic items needed to begin your fishing expedition.
Setting Up
Your Fishing Pole
Okay,
I am assuming you now have all the items mentioned above and now
you're probably wondering where and how they all go on the pole and line. How To Setup a Cane pole There is no "real way" to set up a cane pole however this is the method I was taught by my dad and uncles. This is knowledge that has been passed down from many vacations and weekends spent on The Lake in Evergreens, MO.
To
set up a cane pole start by wrapping several turns of line around
the base of the pole (the "handle" if you will) and
securing it with a good heavy knot, then run the line to the tip of
the pole and wrap the line around the pole a few times and tie
another good secure knot a few inches from the end. The wrapping
around the pole prevents the line from slipping. The reason for tying
the line to the base of the pole is in case a fish is hooked and the
pole breaks you will still have a chance to land
your fish. How To Setup a Rod and Reel
I have to say this! If you are new to a Rod and Reel and the fishing world, and you purchased a rod and a pre spooled reel, it will most likely have a plug attached to the end of the line. Cut it off, that is not needed.
Thread
the test
line
up through the ring
holes
of your fishing rod leaving a couple feet of slack so you can attach
the rest of the terminal
tackle.
Let's
start with the hook.
Start
off with a 3/0 hook and attach it to the end of your line opposite
of the pole or reel. Now you can simply tie and knot the hook to the
line but you would be risking loosing your hook and bait. A lot of
people will tell you that one of the most important things to
remember is to keep your hooks sharp. All I got to say is "If
the hook comes of the line, it doesn't matter how sharp it was." It's very simple and explained below:
See
Our Page on Knots for different
types of fishing knots. How To Attach The Sinkers or Weights If you are using an artificial lure a split shot is generally not required since they are already weighted down and designed to either float or sink as they are reeled in. As I mentioned above, a Split Shot Sinker is your best bet as you can simply clamp them onto your line, otherwise you will have to remove your hook and tie on any other type of sinker. Select the right weight of split shot for the situation.
For
more information on weights and sinkers
visit Our Different
Types of Sinkers Page The placement of the sinker can vary. Common arrangements include a single sinker between the hook and bobber for bait fishing, as well as a series of sinkers with different weights to control drift below a float. Use the lightest sinker possible for a given situation. Excess weight may discourage fish from taking the bait, and it can alter how the line feels as you cast and fish with it. Fishing in strong current may require multiple larger split shots to keep your presentation from going downstream too rapidly, while fishing where the water has no movement permits you to go with a much smaller and lighter split shot.
Find
the spot on your fishing line where you wish to attach your split
shot. When fishing in rocky, gravel-bottomed streams, a split shot
positioned about 18 inches below your hook keeps the hook off the
bottom, reducing the number of snags. Fishing on a muddy, soft bottom
allows you to put the split shot above the hook on the line, with the
distance from the hook usually set at least 12 inches. Here is how you attach a split shot sinker to your line: Pinch the two fins on the split shot together using a pair of needle-nosed pliers. Refrain from using your teeth to avoid chipping a tooth. Pinching the ends with the pliers forces open the opposite side of the split shot. Do not pinch the ends so tightly that they meet. Hold the split shot with your thumb and forefinger so that you have access to both sides of it. Run your fishing line through the opening created by your pinching action on the split shot's opposite side. Hold the line in the crevice created so that it is as close to the center of the split shot as possible. Wrap the line around the split shot so that it runs between the two fins on the other side and back through the crevice once again. You should have two wraps of line in the crevice now. Pinch the split shot closed with your pliers, keeping the line in the now-shut crevice. By wrapping the line twice around the split shot, you prevent it from being able to slide up and down your line when you cast and retrieve. Hopefully this gives you an idea on how to utilize sinkers for positioning the hook in water and as weight to cast your line.
Again, if
you would like to learn more about the use of the different
sizes and styles of sinkers and their purpose,
visit Our Sinkers
Page. How to Attach a Bobber If you are using an artificial lure a bobber is generally not required since the whole principle of a lure is to cast the line out and then lure the line back in to imitate a bait swimming in the water. Set a bobber above the hook (how far depends on the water depth). Because the Bobber is lightweight it will float on top of the water while the rest of the line with your hook will stay at a certain depth in the water.
Determine how far into the water you want the bait to go. If you want to hang the bait 3 feet into the water, then the bobber should be set 3 feet above the hook and bait. To attach a spring bobber, press the piece of plastic on top of the bobber, which will release a small clip on the bottom of the bobber. Thread the line through the clip and release. The bottom of the bobber now is affixed to the line. Place a finger where the line is attached to the bottom of the bobber, then press down on the outside edge of the plastic piece on top of the bobber. This will reveal a small clip, like the one on the bottom of the bobber. Thread the line through the clip and release. The bobber now is attached to the line. To change the bobber's placement on the line, detach one end of the bobber from the line. One end still will be attached, but you can slip the bobber up and down. When you're satisfied with the bobber's placement, secure the other end.
Now you are ready to go fishing!
Which
fishing pole did you decide on using?
The
old fashioned cane pole or Fishing
Rod and Reel How to fish Using a Cane Pole If you are using a basic cane pole simply lower the hook and line into the water until the bobber floats. Hold your pole steady.
Now
wait for the fish to bite. When your bobber goes completely under water, set the hook. This is done by raising the pole quickly. Reel in the fish with care. Once the fish is landed, handle it with care. Most fish don't have sharp teeth but may have spiny fins. Hold the fish firmly and remove the hook. Needle-nose pliers may be needed.
Once
you have caught a fish there are certain procedures in handling your
caught fish.
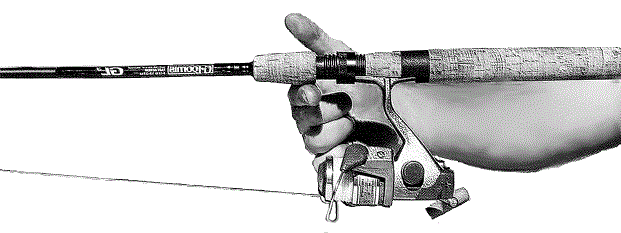
How to
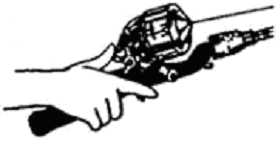
fish Using a Spincast Reel How to Cast The Spincast Reel When learning to cast a fishing rod for the first time, you can first practice casting in your yard by tying on a casting plug or a small non-sharp weighted object without hooks to your line, using knots that you can learn at our Fishing Knots Page. Get a feel for the equipment . . . Hold the rod out in front of you to get a feel for how the spincast reel works. Reel up the line until the bobber is about four inches from the tip of the rod. Now, press down firmly on the release button and hold it there.
Notice how the bobber stays in the same place. Now let the release button go. The bobber should fall to the ground.
If
line does not come out, pull line slightly to start.
You
have just learned how to release the line from the reel,
To
prevent loops that can become tangles from forming in the line,
carefully add tension to the line with your thumb and forefinger
while reeling in the line. Final Check Your line is ready and your hook and bobber are tied on. Place your bobber 6-12" from your rod tip and make sure your line is not wrapped around your rod. As safety is an important habit to establish, you should check the immediate area around and above you to be sure you have plenty of space.
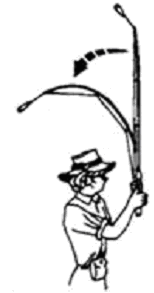
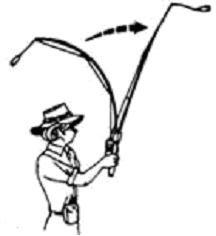
Before
you cast, look behind you to be sure no one else is there. Casting Face the target area with body, with your feet and shoulders square to the target. This is accomplished by pointing the toes of both feet at the target area. Aim the rod tip toward the target, an object on the horizon with the hands comfortably at the waist. (Some youth may have difficulty holding the pole with one hand, so the rod may be held with one hand or two.) This is the 3 o'clock position. Press and hold down the reel's release button with your thumb. Swiftly and smoothly, bend your arm at the elbow, raising your hand with the rod until it almost reaches eye level. You should still be holding down the release button with your thumb at this time. When the rod is almost straight up and down, it will be bent back by the weight of the practice plug. As the rod bends, move your forearm forward with a slight wrist movement. You should still be holding down the release button with your thumb at this time.
Next, gently sweep the rod forward, causing the rod to bend with the motion. You should still be holding down the release button with your thumb at this time. As the rod moves in front of you, reaching eye level, about the 10 o'clock position, release your thumb from the button.
The bend in the rod casts the bobber and bait out. Stop the fishing rod with it pointed slightly above the original target. You have just made a cast!
Holding
The Pole
The
way you hold your pole will depend on which type of Rod and Reel you have.
Holding this type of Rod and Reel in this manner for one, allows you to easily press the release button. Secondly, should you cast it upside down the line will shoot straight to the ground. Are ya a lefty? Many reels have the ability to switch the handle of the reel to the other side if you are left handed.
To
learn more on how to use this a Spincast (Closed Face) Reel, visit
the section on Spincast Reels at Our Page on Rods
and Reels.
The Fishing Part First you have to realize that fish are wary creatures. This is especially true in shallow water near the shore. Anglers must walk carefully because vibrations from their footsteps can be transmitted to the water and sensed by fish, spooking them away. Vibration is less of a problem when fishing rivers and streams because the water's current conceals most bank vibrations. When wading, avoid dislodging rocks that might make sounds that scare fish. Vibration isn't a problem when fishing from breakwaters, jetties, and piers. When you fish still waters, these tips will help you avoid being seen by fish. You should stay as low as possible, stay close to shrubbery, and wear dark or camouflage clothing. These are important since fish near the surface can easily detect movement on shore. Cast your line into a place where you think the fish might be and reel in the slack. If you're using live bait, let your bobber do the work for you, keeping the worm wiggling where it ought to be. If you've got plastic worms or a lure, reel in ever so slowly, then stop; reel again, and so on. This will attract the attention of the fish. Hold your rod at about a 45-degree angle to the water, with the tip up. Wait a few minutes, and then reel in. Cast again, here or nearby, until you see your bobber start to bounce on the surface and you feel a tug. You'll know you're feeling a fish (as opposed to just the current pulling on your bobber or a snag on the bottom) if the tugging comes in energetic bursts. Wait a moment for the fish to take the bait and hook into its mouth!
Retrieving
This
is the act of bringing a bait or lure back to the angler. To learn more about different styles of Retrieving Techniques visit our How To Retrieve A Fishing Line Page Setting the Hook
"Setting
the hook" refers to the method of forcing a hook into a fish's
mouth. When the fish bites, the fishing rod should be quickly pulled
up to set the hook into the fishes mouth.
Learning
to fish is easy. When a fish feels the hook, it struggles to get free. This might involve jumping, making a long run, swimming back against the line or swimming around obstacles.
After setting the hook, the line should be kept tight so the fish will not shake the hook loose. The fishing rod should be held between a 10 o’clock and a 12 o’clock position. It's possible to land many small fish just by reeling them in. They'll fight, but this can be easily overcome by the strength of the line and the fishing rod. Much of the enjoyment of fishing, though, is gained by using lighter tackle that allows the fish to fight. Properly adjusted drag will allow the line to release prior to breaking.
Fighting
larger fish requires a technique called "pumping the rod." To reduce the risk of injury to a fish you plan to release, don't "play" the fish more than a couple of minutes (it can take a toll on the little creature). Do not fight it so long that it becomes exhausted and later dies.
To learn
more techniques in playing a fish visit Our How
To Play The Fish Page Landing a Fish Fish can be landed by hand or with landing tools such as a net. When you fish from the shore, beaching fish is a popular way to land them. This method, however, should only be used if you plan to keep and eat the fish because it will harm the coating on its body which is not good for survival of the lil' guy if your plans are to release him anyway. To beach a fish, lead it into increasingly shallower water, gradually sliding the fish on its side onto dry land. In saltwater, time your retrieve with an incoming wave. As the wave recedes, quickly grab your beached fish and pull it ashore. Landing nets are commonly used for landing fish. Long-handled nets are used for boat or shore fishing and fishing from docks and jetties. Short-handled nets are used for stream fishing. The size of the net depends on the size of the fish you plan to catch. Some people use a circular net with a long rope instead of a handle; this is used for pier and bridge fishing. To net a fish, you must first have the fish under control as much as possible. Next, lead the fish to the net. Place the net in the water and lead the fish into the net head first. Then if the fish should try to escape, it will swim into the net. Once the fish is completely in the net, raise the net by the handle. If you have a heavy fish, also grasp the net's rim to prevent the handle from bending or breaking.
You
can also simply land your fish by hand, Carefully avoiding the hook. How To Handle A Caught Fish Once you have caught a fish there are certain procedures in handling your caught fish. Land fish quickly and handle them as little as possible. Get a wet net under the fish while it's still in the water and gently lift it into the holding bucket. It is always a good idea to attempt to remove the hook once you have landed a fish. Unless the fish has totally swallowed your bait, you can trace the line down to the shank of the hook with some pliers (or a hook-remover tool) and remove the hook manually. If even the shank of the hook is no longer visible, you may have to cut the line as a last resort. Cut as close to the hook on the line as you possibly can, and let the fish go. There is a good chance that the fish will survive. The fish's stomach acids will dissolve the hook. It is always better to release undersized fish. The law protects them for a reason, and people who ignore wildlife-management laws have little understanding of why they exist: to ensure that we and our children after us are able to fish good waters. Handling fish properly protects both you and the fish. Some fish have sharp fins or teeth that can cut you if you don't hold them correctly. Thus, different fish species need to be handled in different ways. Hold some fish by the jaw, such as bass or trout, and others along the body, such as a catfish. Learn about Handling certain species of fish at Our How To Handle Fish Page, but in the meantime keep the following rules in mind:
This
is a cheap piece of gear that is very easy to use, and it should be
in every tackle box. Kids often develop a powerful attachment to their first fish. Having finally caught one, they don't want to just let it go. They may even want to bring it home to eat. A holding bucket represents a nice middle ground. Fill it with pond water and put in the unhooked fish. This lets kids identify, admire and bond with their catch. When you're ready to go home, gently pour the fish back in the pond. You can safely keep the fish in a large bucket for as long as an hour. Why keep your fish alive? One: It's the humane thing to do. Especially if your fishing just to release them back into the waters. Secondly: It avoids spoilage and loss of quality of your fish. At the end of the day, toss your keepers into an ice chest and surround them with ice. Freezing the fish will kill them cleanly, with a minimum of thrashing, and they are already prepared for transport back home! Keeping them on ice will make it far easier for you to clean them back home; usually, it is too difficult to bother cleaning them in the field.
Do
not stab at the fish prior to cleaning them at home, this is just
going to make an awful mess for you to enjoy on your way back (and
cause some violent thrashing by the fish) and there is simply no need
to "bleed" a fish out before you put it on ice. Cutting its
head off is also a bad idea for many of the same reasons, and because
- for many fish - this isn't going to be easy to do at all. Why
mangle your hard-won catch? You destroy its value as a trophy, and
you probably severely detract from its value as a meal. This is a good time to get a picture of your catch. Assure your picture-taking session go as fast as you can. One of the most rewarding things you can do is to photograph your trophy. Make time out of water as short as you can. Obviously, the impact you have on the fish will depend on how long it is not in the water.
Now we must decide if we are going to
There are several scenarios that have to fall in place in order to be successful at catching fish.
The
right bait or lure . . . and the fish have to actually be there.
Change tactics to catch more Fish Fish at night As lakes heat under the hot summer sun, they get more crowded and fish become less active. Human commotion and lower oxygen levels make fish more nocturnal. Fish that hide during the day in deep water cruise shallow flats at night. Take advantage of the night feed and don't fish until just before dark when everyone else is going home. Target unpopular species Stop fishing where everyone else is fishing. Try fishing for catfish, carp, buffalo or even suckers. Never fish weekends or holidays Fishing public water on weekends and holidays has been appropriately termed "combat fishing." Anglers are forced aside by pleasure boaters and spend more of their time fending off inconsiderate jet skiers than actually catching fish. Fish know when the waves above them are caused by constant boat traffic and as a result lay low. Take a day off during the week to fish this summer. Travel to better water Save up some money and drive to Ontario, Lake Erie, Minnesota or a bunch of other places where even a bad fisherman on a bad day can catch fish. Beg your way onto private water If you can't afford to travel out of state to fish, ask permission to fish someone's private lake or pond. Even if there is a small fee involved, it might be worth the opportunity to consistently catch big fish. Get to know farmers. They often have ponds hidden on their farms that don't get a lot of fishing pressure. Fish alone I enjoy fishing with kids as much as anyone, but when I really want to catch fish, I go alone. Solo anglers are more focused, stay longer and don't give up as easily. Use live bait I trust my Husky Jerk to catch fish as much as anything in my tackle box, but a live worm trumps it every time. When fishing gets tough, a worm is the best bet for walleye, bass, catfish and just about everything else that swims. Even turtles aren't immune to the lure of a lively night crawler dangled on the end of a hook. Watch the weather Don't waste time fishing hot, sunny days that are typically dominated by high pressure. Fish can be caught on these days, but will require a lot of hard work. Save vacation days for overcast or even rainy days, especially if the weather has been consistently bad for several days in a row. Fish hunting season Because a lot of fishermen are also hunters, the start of deer season signals the official end of open water fishing season for many of them. That's a mistake. Early fall is one of the most productive times to catch fish. Fish are less pressured in October and start feeding heavily to prepare for winter. Time your outings with the best bite Know the peak fishing dates and times for every type of fish. For example, hit white bass hard in April when the dogwoods are blooming, chase blue catfish in February when they are feeding voraciously, in July when steelheads are in close. All fish have their peak feeding seasons and times. Learn them and be ready to fish at a moment's notice. There really are better times to fish. And they're affected by sunlight, warming trends, water depth, storm and weather patterns, wind and tidal flows, topography, geography and season differences. The best times for fishing can also be affected by the type of weather during a particular day and in a particular location. Weather can affect specific locations and bodies of water within a particular geography. So when to fish and where to fish are always interrelated, and are always influenced by changing weather conditions. You'll soon learn that when it's a bad day for fishing in one location, it could be a good day in another; and the locations may not be that far apart.
Visit Our When
To Catch Fish Page to find
out the best times to catch certain species of fish. Keep A Journal
If you
plan to make fishing a regular hobby then it would be a good idea to
keep a journal.
Simply following the techniques above will surely put you in the right start to begin fishing, however, catching fish depends on many other factors such as where and when you're fishing, the time of day, the season and weather, your experience level and your equipment. While anyone can wet a line and eventually get a bite, learning some basics about fishing technique will greatly increase your chances. You can have the best fishing rod and reel in your hands, but unless you know how to rig your tackle, how to cast, and work your lure or bait in the specific waters your fishing, at the end of the day, you'll just have a nice rod and reel in your hands.
We'll
go into more detail about fishing strategies later in this site, but
for now let's move on to what kind of Fishing Gear one will need to
get started.
If
you have
any hints, suggestions, techniques or anything that you would like to share
or
have me put onto this web page,
Copyright © This website is the composition of many hours of research. Information contained within this site has come from numerous sources such as websites, newspapers, books, and magazines. No animals were harmed in the making of this site.
DISCLAIMER: PLEASE READ - By printing, downloading, or using you agree to our full terms. If you do not agree to the full terms, do not use the information. We are only publishers of this material, not authors. Information may have errors or be outdated. Some information is from historical sources or represents opinions of the author. It is for research purposes only. The information is "AS IS", "WITH ALL FAULTS". User assumes all risk of use, damage, or injury. You agree that we have no liability for any damages. We are not liable for any consequential, incidental, indirect, or special damages. You indemnify us for claims caused by you. Please be advised that the content of this site is a source of information only. The FUNdamentals of Fishing Website cannot take responsibility for animal welfare or actions taken as a result of information provided, and if in doubt you should seek the advice of a qualified physician or veterinarian.
I do not suffer from insanity; I enjoy every minute of it! |
||||||||||||||||||


 Jon's Images, Inc.