
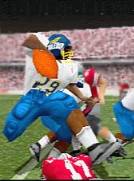
 Toledo's Mace Freeman hurdles a Ohio State defender on a WR screen. Toledo's efforts were in vain, as they get blasted 0-49.
|
The Offense
 Basic Tips Basic Tips |
 Use the "juke move" (R2) only when going north to south, never when moving laterally east to west. Follow it with a "speed burst" (X). Use the "juke move" (R2) only when going north to south, never when moving laterally east to west. Follow it with a "speed burst" (X).
Avoid what I call "hero syndrome". Do not depend on one or two offensive players to carry the load on 80 yard drives. Distribute the ball occasionally. This will help confuse linebackers and create greater gains for your star players at their designated time. "It's in the game."
Play the Fullback, especially from the option. Hand off to the fullback frequently when running an option play (no matter what formation). This may only get 2-5 yards at best, but losses are rare. It forces your opponent to respect the middle running game, thereby opening up the rest of the field for other offensive opportunities.
Push "speed burst" (X) right before catching a pass. This takes a bit of anticipation. By default, the game switches your control to the nearest receiver, thereby allowing you to anticipate pressing "speed burst" (X) about a half a second before the ball reaches its destination. This has no bearing on your receiver's ability to catch the ball, it only gives him that momentary break-away from a defender. Use primarily for passes to backs in the flat and to tght ends in short passing routes.
If time permits when passing, pump fake (L2) the ball with your quarterback to the opposite side of the field you intend to pass. This sometimes can make the intended receiver's defender pull off to assist in defensive pursuit, and leave your intended receiver wide open. This works best against one on one situations when a defensive back's "awareness" is suspect.
Use the "stiff arm" (L2) when confronting defensive backs deep in the secondary. Sure, a "juke move" will also suffice, but it can slow your speed down. When confronting safties and cornerbacks with a strong running back on the loose, a stiff arm sometimes mows them right over without impeding your progress for gold in the end zone.
| Formation Overview |
If you need to score, you need to understand the formation. Here is a run-down of a few basic formations/sets, What They Do, and When They Work Well. Linemen are shown in white, backs in red, tight ends in orange, and receivers in yellow.

GOAL LINE:
What It Does: Stacks just about every one of your players on the line of scrimmage. Receivers are taken out in favor of bulkier tight-ends, and usually two big backs are in the backfield.
Works Well When: You're at the goal line. Best used against a defense that doesn't have enough men up front. Goal line is best implemented when there is a need for a hard fought three or four yards, and to run the quarter back sneak.
|

I-FORM:
What It Does: Provides a multiple run threat formation. It's a basic offense that is "best" suited for the power running since both of its backs are lined up between the tackles in the middle of the formation. Provides an option ground game attack.
Works Well When: You have a strong offensive line (esp. interior) and fullback that can batter defensive lines and create holes for the running back. Don't run it if you don't have the personnel.
|

SPLIT:
What It Does: Provides the best "balanced" formation in NCAA Football 99. There is a back on either side of the QB who can get out into pass patterns fast. Considered a good passing formation with a run threat to both sides of the field.
Works Well When: You want to keep the defense guessing as to what your next play will be. You can run the ball thanks to the FB and TE or you can pass deep to either of your WRs.
|

SINGLE BACK:
What It Does: Spreads the field out with three WRs. Even without a FB, it is still an effective offense for running the ball since it has a bulky TE and because this offense makes the defense think of pass first.
Works Well When: You still want to be able to run the ball inside even with three wide receivers. Also, if you have a weak FB you might want to use this formation more often.
|

SHOTGUN:
What It Does: Gives you more time to throw the ball. At least three receivers are implemented, and usually a TE is thrown in to pass block for good measure. Sometimes the running backs block, but they are best used as "safety valves".
Works Well When: Defenses are blizting the heck out of you. Now that you have more time to react, start throwing in the spots vacated by the blizting defenders.
|

4-WIDE:
What It Does: Gives you the best pure passing formation in the game by putting in your best four wide receivers. It also leaves your quarterback with a minimum amount of protection since there is only one HB and no TE. Also has the capability to spread defenses out with varied WR routes.
Works Well When: Teams have a soft secondaries. Going to 4-wide is only going to expose them further since they usually put in their second-string DBs to keep up.
|
| Passing - 5WR Hooks |
A Guarantee?
Looking for a pass play with 5 WRs that will guarantee a touchdown against any defense? Well find another page, it doesn't exist here. Not unless you still believe in the "Tooth Fairy". In the meantime I will share one of my more versatile passing plays. Everyone has that one "pass play" they love to use, and when I need desperate yardage through the air, I love to call this one up to the television gridiron. My stiff competition DbLLungr@aol.com, has said I am going to the well when I over use this favorite.
Works Best When
The play 5 WRs Hooks works best when audibled into out of another formation such as strong, weak, etc., anything that has the regular single TE, HB, FB, and two WRs out wide. It is best to audible quickly into this play as to disguise the formation when the personnel line up. You hope to find yourself confronting a defense with a few more players playing up close to the line, such as a 4-4 or goal line. This puts the defense at a immediate disadvantage because of the extra distance they have to cover to match up at the snap of the ball. Hopefully for you your opponent is sold on the "run", not noticing the immediate audible. It all plays out as follows:
| In Figure 1 the default WR is out wide with a FB replacing the 1st string TE. This should be the short side of the field (if you not centered between the hashes). Use (R1) if you need to flip the play at the play call screen to get the overload on the strong side. | 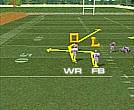 Figure 1
|
| In Figure 2 the 1st string TE replaces the default 2nd string TE, the 1st string HB replace a 3rd string WR, and the default WR is out wide. This is crucial personnel for these routes. The HB goes into the flat and will get Y.A.C. (yards after contact), the TE is slower than the WR that crosses him, allowing the defense in pursuit to tangle up. The WR has the wheels cutting across the middle for a well timed play. | 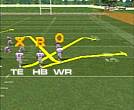 Figure 2
|
| In Figure 3 the HB is the 1st option. The pass must be blind and immediate. Make this instantly after snapping the ball. Four yards is almost a guarantee, and he has the big TE blocking for him for good Y.A.C.. This works best in a 3rd and 7, or even as a 2pt. conversion. | 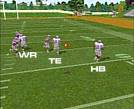 Figure 3
|
| In Figure 4 The pass to the TE should be made on a two second count after the snap. This is a good first option if you have already passed up the "insta pass" to the HB. Watch the strong safety to read the potential of this play. This option is a KILLER against most 4-4 defensive schemes. | 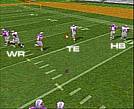 Figure 4
|
| In Figure 5 the WR pass should be made on a three second count after the snap (depending on WR's speed and release). If he catches the ball, and loses the single defender, he is gone. Again timing is crucial, as well as the defensive play your opponent chose. This WR option is a killer against any goal line. | 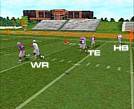 Figure 5
|
| NEXT SECTION > |
MAIN |
User Profiles |
Analog Passing |
Bluff Mode |
The Offense |
The Defense |
Special Teams
Substitutions |
Play Submission |
2000 Wish List |
Rosters |
Game Codes |
EA Faqs |
Sermon Archive
Message Board |
Chat Room |
Links
|

