|
Updated 2003/06/10
Get
to know your crew
Select one of your
crew and the correponding ship station to know more:
SCIENCE:
Commander
Julia Molinari
TACTICAL:
Lieutenent
Keith Langley
ENGINEERING:
Lieutenent
Jeff Bradley
HELM:
Lieutenent
Abe Takahashi
COMMUNICATIONS:
Ensign Yun
Baek
TRANSPORT:
Middleman
Nicola Thölke
More questions? Click
here to send us an e-mail or
report bugs.
|
Stats/Bio
Name: Bradley, Jefferson
Height: 189 cm
Weight: 84 kg
Rank: Lieutenent
Assignment: Chief
Engineer
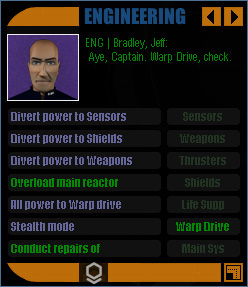
This is the captain's
interface with Lt. Jeff Bradley, the ship's
chief engineer.
DIVERT
POWER TO SENSORS:
Mr. Bradley will try to redirect all available power to maximize the viewing
range of the sensors.
DIVERT
POWER TO SHIELDS:
ask Mr. Bradley to redirect all available power to the shields capacitors.
DIVERT
POWER TO WEAPONS:
Mr. Bradley will try to redirect as much power as possible to the plasma
capacitors and to reduce torpedo reloading time.
OVERLOAD
MAIN REACTOR:
direct your chief engineer to disengage the main reactor's safety protocols
to boost available power. See warning note on ENGINEERING section.
STEALTH
MODE: ask Mr.
Bradley to minimize power usage to avoid radar detection.
CONDUCT
REPAIRS OF:
set up the repair schedule with your chief engineer.
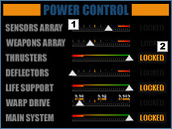
 SYSTEM POWER LEVEL BARS:
Click and move the slider to set the desired power level usage by that
system. Trying to use more than 80% of the nominal capacity will overload
that system.
 POWER LEVEL LOCK TOGGLE BUTTON:
Click on to lock and unlock the power level sliders to allow or prevent
changes to the current power usage setting to a particular system.
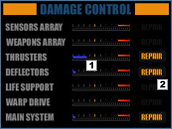
SYSTEM DAMAGE BARS:
Graphical representation of the total damage sustained by each system.
Systems damaged over 85% can only be repaired in starbases.
REPAIR SYSTEM TOGGLE BUTTONS:
Click on to toggle a system's repair on and off. Some systems become unoperative
while underdoing repairs. When active, the buttons show the current damage
level in percentual form.
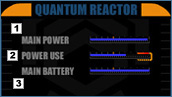
MAIN POWER BAR:
Graphical representation of the current power output of the quantum reactor.
POWER USE BAR:
Graphical representation of the current power usage levels in comparison
with the reactor's output. If the 80% usage threshold is crossed, the
excess charge will gradually overload the reactor.
 MAIN BATTERY CHARGE:
Graphical representation of the available power stored in the emergency
batteries.

REACTOR OUTPUT / USAGE STATUS:
Shows the total power output of the reactor less the current total power
usage, and the duration of the battery charge in seconds at the current
power usage levels.
SAVE / LOAD POWER SETTINGS:
Right-click to save the current power levels in one of the 3 available
slots. Click to load the settings recorded in the desired slot.
TOGGLE REACTOR OVERLOAD / EMERGENCY BATTERY BUTTONS:
Click on the overload button to engage or disengage the core safety protocols
and allow overloading the reactor. Click on the emergency button to use
the power from the batteries instead of from the reactor.
 SPEED AND FUEL INDICATORS:
Show the current speed and the remaining fuel.
 SELF-DESTRUCT BUTTON:
Double-click to self-destruct your vessel. It will only work if at least
one subsystem is damaged beyond repair.

OVERALL DAMAGE DISPLAY:
Displays the amount of damage sustained by each particular subsystem.
The green color means that the subsystem is operating under acceptable
conditions; the yellow color translates into poor operational conditions;
the red color means the subsystem in on the verge of collapsing, and the
blue color refers to a disabled subsystem.
ENGINEERING LOG:
Keeps a log of the latest changes in the engineering section.
PURGE LOG BUTTON:
Click on to clear the engineering log text field.
|