 Main Board And Lower half of the head.
Here you see a picture of the main board in the bottom of the machine which holds the main motor switch and main relays. And below that, the lower half of the head or backbox.
To restore the main board, I unmounted everything from the wood, dusted and lightly sanded it, and remounted everything. I then took the main motor apart, which involved unmounting all the switch stacks and then taking the cam off the motor shaft. I had to use a hammer to tap it loose and pry it off the shaft (very carefully). I then cleaned the cam and switch mounting plate. They were covered by a dried white gunk. I believe someone sprayed some kind of lubricant or insectiside all over the inside of the machine at some point. Over the years it had dried and froze up a lot of the moving parts. I used rubbing alcohol and a small can of a spray cleaner called 'Break Free' with an old toothbrush to brush the gunk off. The Break Free has a strong dirt remover and protectant for preventing rust, and I have found it a lifesaver for removing the most stubborn buildup.
After cleaning the plate and cam, I oiled the motor mechanism and then reassembled the motor and cam.
I then cleaned all the switch blades and cleaned the contact points of all the switch stacks, checked the solder connections and soldered a wire that had come loose.
I then remounted all the switch stacks, one at a time, checking the gaps and adjusting them before mounting the next stack.
I then cleaned and adjusted the main relays- checking gaps and proper open- close contact and cleaned the points.
At some point, someone had rewired the switches to the coin slots. I found a loose wire and from the color coding of the wire, figured out where it was supposed to be connected and unsoldered the changed wiring and soldered the original wire back in place.
I also replaced the main power cord. This involved unsoldering the 3 connections, cutting and untying the cable wrap twine, and cutting and pulling out the old cord. For the new cord, I bought a black 3- prong 15 foot heavy duty outdoor extension cord for $7.50, cut off the female plug, stripped the outside insulation off to the length I needed, fed the cord in with the other wiring and rewrapped the cables together and soldered the 3 wires to the proper places on the transformer, main fuse and ground.
Also, the main on- off switch is missing, and I will have to replace that.
All this work took about 10 to 12 hours over about 7 days.
The lower half of the head or backbox.
There is no back door on the head, so the internals have been exposed for quite a while and needed a thorough cleaning.
I moved the back box into the house on 1/28 and stashed it in the corner and started working on it at night after the kids were in bed. Here you see it minus the replay unit and ball count unit, which I had pulled out to clean, adjust and replace missing or broken parts.
The ball count unit was missing the wiper. I did some research and had some help from Dan Schindler, who sent me a picture of the unit, in case I needed to try to make a replacement, or put an ad up for a replacement part. Fortunately, though, I called Steve Young at Pinball resource. He did some research, found a used part that could be modified to the right configuration, and made the part for me! It was $20, but it was worth it- I wouldn't be able to even try to fire up the machine without it.
The replay unit was taken apart and cleaned and missing or broken parts replaced. I have since the picture was taken, reassembled both units and re-installed them.
The score reels have been taken completely apart and cleaned and reassembled.
|
 The machine and playfield.
As you can see from the picture, the cabinet of the machine is in pretty bad shape. I had to use 2 brackets to screw the front panel back on, as it had come completely off. The 2 brackets plus mounting the legs on it were enough to reinforce it until I can either build a new cabinet or replace it with a good used one. Fortunately, the cabinet artwork is intact enough for me to make a stencil so I can paint the original artwork on the replacement cabinet when I get it. The chrome door and coin slot panel were completely rusted over. To get the rust off, I used a fine metal brush from my dremel kit and brushed it with the brush pattern on the metal. This took the rust right off. I then polished it using Millwax, the same stuff used to polish and wax the playfield. The coin slot and front panels looks great!
The playfield will be the big challenge. It is in pretty bad shape, as you can see from the picture. It also has a couple of missing bullseye targets and all of the plastic posts need to be replaced. I also need to replace most of the plastic light shields. I also need to replace the stickers on the flippers. I can scan these into the computer and make reproduction stickers. They read from left to right: Flankerback, Quarterback, Fullback and Halfback.
I have recently found and am buying a good condition playfield and hope to have it within a week. At that point, I will have to borrow parts from the beat-up playfield to install on the new one to get everything replaced and functional, as the person I'm buying it from says it is missing some coils and 2 of the flippers.
|
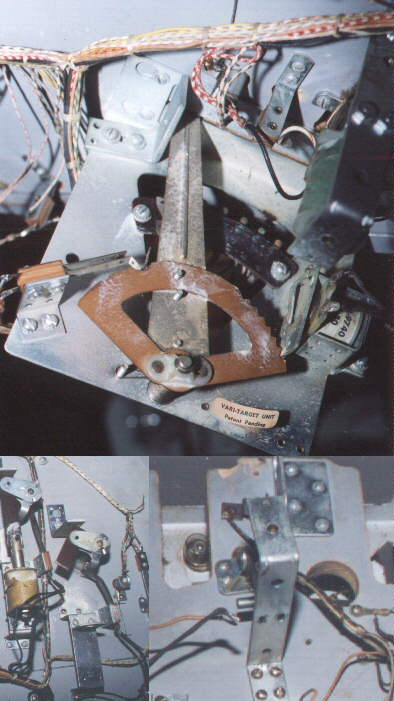 Underneath Playfield
I needed to clean all the parts, (as you can see from the picture of one of the Vari-targets), and make sure all the coils are still good, and clean the 3 relays mounted under the playfield.
For further details of the Restoration process of this machine,


Links to other pages:


|

