
|
|
||
|
16. Weight Maps |
||
 I showed you how to create weight maps in part 3 of chapter 13. If you haven't already done the tutorials in chapter 13, you should go there now. 13.1 Skelegons - Part 1 ('Fill Weight Map')This tutorial will show how to taper weight maps so one gradually blends into the next. I won't say many words about it as pictures speak better than words in this case. I'll also mention an editing program which is built into LightWave called 'Vertex Paint' to paint Weight Maps instead of having to create them point-by-point, but as there are many tutorials on the use of vertex paint out there, I'll merely mention it in passing. When using Vertex Paint, you should delete any Weight Maps you may have accidently created if you've been experimenting with the creation of weight maps using different methods. WITH WEIGHT MAPS, BONE MOVEMENT AFFECTS POLYGONS Weight Maps are a type of Vertex Map (also called VMap in LightWave). A Vertex Map (VMap) is, "Additional data that a user can add to each point in an object." It's important to realize that Weight Maps are an aspect of points in the geometry of an object rather than being an aspect of Skelegons (Modeler) or Bones (Layout), themselves. IMPORTANT - Weight Maps are ASSIGNED to skelegons or bones, but they are not a 'part of' them. Although LightWave has conveniently added the ability to automatically generate a Weight Map's name the same time you create a Skelegon, that still doesn't mean that the Weight Map is part of a Skelegon. Also, it's important to know that although you can highlight a polygon and add it to a Weight Map, it is actually the points of that polygon which are added to the Weight Map. Since you are often gradating weight maps so that the percent of influence tapers off (so polygon edges don't protrude when something bends), you will generally be defining this taper to a row of points rather than to polygons, which would create a crude taper. When you define a Weight Map, each point that you define is given a weight value determined by the % value you give when you defined that point. If you add a polygon to a Weight Map, LightWave just adds every point in that polygon to the Weight Map, giving each point the same weight value. DELETE or RENAME WEIGHT MAPS Delete any Weight Maps you may have automatically created in the last tutorial. You do that by going to the bottom right of your Modeler window where it says  and click on the 'W' (Which will let you select Weight Map names from the dropdown menu to the right of where it says 'W, T, M). and click on the 'W' (Which will let you select Weight Map names from the dropdown menu to the right of where it says 'W, T, M).Select a Weight Map Name from that list (if there are any), and from the 'Map' tab, the 'General' section and choose  . The Weight Map name will disappear from the list. . The Weight Map name will disappear from the list.IMPORTANT - When working with Skelegons in Modeler, the Weight Map name must match the Bone Name which you want that Weight Map to be associated with. When you start playing with Weight Maps, it's easy to create Weight Maps with names that you don't want such as the default name of 'Weight'. You can easily either delete, or  these weight maps. these weight maps.LAYOUT, VERTEX PAINT You don't need to have selected a skelegon before entering 'Vertex Paint' and it makes no different how skeleongs are chained, or whether they all connect with each other. Before envoking 'Vertex Paint', you should have already properly named all skelegons, welded together skelegons which need to be welded, adjusted the chain order so it's proper, created all weight map names, and ensured that weight map names equaled skelegon names. You enter 'Vertex Paint' by going to the 'Map' tab, selecting  from the 'Weight & Color' section. from the 'Weight & Color' section.LAYOUT, TAPERING WEIGHT MAPS Every point in your figure must be included in one of the weight maps. It must have a value of some sort (even if the value is zero) or it will remain behind when you move your figure. Also, you should taper one weight map so it overlaps another a little bit. Here are the weight maps that I did for the figurine. Figurine_Head:  Figurine_LeftArm:  Figurine_RightArm:  Figurine_Torso:  Figurine_RightThigh: 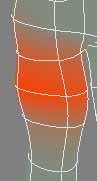 Figurine_LeftThigh:  Figurine_RightShin:  Figurine_LeftShin:  I'm not going to be moving 'Figurine_RightHip' or 'Figurine_LeftHip', but so they don't cause problems I highlight all points in the entire figurine and put a zero value for those two weight maps. LAYOUT, MORE ABOUT WEIGHT MAPS I've explained much more about Weight Maps' in the animation tutorials using the 'Leroy the Hawk' object. 37.1 Cartoons - Leroy the Hawk, Animation 1 37.2 Cartoons - Leroy the Hawk, Animation 2 37.3 Cartoons - Leroy the Hawk, Animation 3 To keep from repeating myself I also won't explain how to animate here. For more on using the Layout program for animating please see Chapter 41. |
||
