
|
|
||
|
17. Intro to 3D Studio Max |
||
 In this tutorial I will introduce a different 3D Sculpture program called '3D Studio Max' to you. If you are going to be in the 3D Sculpture world, it is almost imperitive that you also learn 3D Studio Max. However, I have a particular reason to be doing this tutorial. Sometimes developers will create a plug-in that does something for 3D Studio Max, but they don't create one for LightWave. Thus, one way around that is you can create things in LightWave, then export the object as a 3D Studio Max scene, then import it into 3D Studio Max, then use the plug-in. That's what we're going to do here, so those who have 3D Studio Max, please fire it up. This tutorial will introduce you to 3D Studio Max, teaching you how to create a pyramid object which will then be used in the next tutorial on using a Java 3D applet to display your 3D objects on the internet using Java, Java 3D, and a special Third-Party Applet (Java Application). If you follow me, I will show you you can put your 3D Objects on the internet so others can rotate them and see them in 3D space. 3D STUDIO MAX When you run 3D Studio Max, it will look remarkably like LightWave 3D. And, many of the things that you have learned in LightWave translate over to 3D Studio Max. In the top left view you'll find 'Top', bottom left, 'Left', upper-right is 'Front', and the view at the lower right is 'Perspective' view rather than being the upper-right as in LightWave (although remember that you can set up the views any way that you feel comfortable in LightWave). Thus, one small difference is that the order of the views is different. Also, you'll note 'Front' and 'Left' rather than 'Back' and 'Right' so the annoying problem with LightWave's world being 'backward' relative to you is gone.  Lets first talk about panels. If you right-click anywhere in any solid gray area at the top of the interface you will get this menu... 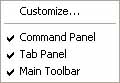  Along the top of the Command Panel you will see six icons.   . .When you click on that icon, the area just below it would then be called the 'Create Panel'. This area of the Command Panel includes settings and parameters that are associated with that function. The Command Panel dynamically fills with what are called 'Roll-outs' when you choose one of the six icons at the top of the panel. The create panel has five roll-outs, one called 'Object Type', another 'Name and Color', 'Creation Method', Keyboard Entry' and 'Parameters'. If you click on the plus or minus sign to the left of the Roll-Out name, that particular roll-out will collapse and expand. If there isn't enough room to show all Roll-Outs at once, you can point to a plain gray area of the Roll-Out area until the cursor changes into a hand, then click the left mouse button, hold it, and move the mouse up and down to scroll the Roll-Outs. The 'Create Panel' allows you to create ten different kinds of simple scene objects such as a sphere or a box. You select which type of shape you wish to create by clicking on the gray buttons in the 'Object Type' section at the bottom part of the Command Panel.   Turn off the checkmark to the left of where it says 'Tab Panel' and the panel which has the primative shapes disappears. If the checkmark was already turned off beside 'Tab Panel', turn it on, then off to see which panel disappears.  You will notice that they are pretty much the same as what were in the Command Panel'. In fact, you can almost match up the tab names with the panel types in the Command Panel'. The 'Objects' tab is another way of selecting primitive objects. However, where you can only select ten different object types from the 'Commnand Panel', you can select 29 different object types from the 'Tab Panel'. If you click on the 'Shapes' tab, you will see 13 different shape types you can use. That is equivalent to the 'Shapes' Sub-Category in the Command Panel's 'Create Panel', but that button only lets you pick from 11 shapes.  Note that you don't just select shapes and objects from the tab panel. If you look towards the tab names to the right you can see that you even render your scene from the tab panel. As well as the 'Tab Panel' having equivalents in the 'Command Panel' area, the 'Tab Panel' is also the icon equivalent of the 3D Studio Max drop-down menus. For example, if you go to the 'Create' menu, and choose 'Standard Primitives'...   Third, uncheck the 'Main Toolbar' checkmark and the 'Main Toolbar' at the very top of the interface disappears. The Toolbar is where you pick functions such as 'Select and Move', 'Select and Rotate', 'Undo', 'Redo', etc.  And, I just want to mention one more important thing in 3D Studio Max. It is what is probably the major difference between LightWave 3D and 3D Studio Max. If you go back to the 'Command Panel', and select the second panel, which says 'Modify' when you roll the mouse over it. You use the modify panel to apply modifiers to the selected object. These modifiers can be controlled via parameters displayed in the Command panel'. All modifiers that are applied to an object are displayed in what they call the 'Modifier Stack'. This 'Modifier Stack' is probably the most powerful difference between LightWave and 3D Studio Max. It means that you can create an object, then add modifications one by one WITHOUT ACTUALLY CHANGING THE ORIGINAL OBJECT AT ALL. However, it also means that it makes things far more awkward to deal with, hard to understand, and difficult to keep track of which stack level does what. Since the purpose of this tutorial is just to show how a person can place a 3D object in an interface on the internet that allows you to rotate the object, I will not delve into the use of the Modifier Stack in this tutorial; know, however, that this is a powerful aspect of the 3D Studio Max program. In 3D Studio Max, there is none of the powerful capabilities that LightWave has to zoom, move, and rotate your world just by moving or clicking your mouse in the Perspective view as there is in LightWave. In LightWave you can hover the fingers of your left hand over the ALT key to rotate the Perspective view at will. And, you can use the middle mouse button and right mouse button to rotate things around to whatever angle you wish. AND THEN YOU CAN MODIFY THINGS RIGHT IN THE PERSPECTIVE WINDOW. So, it ends up that 3D Studio is FAR less fun to work with and is much more difficult to control. To move around in the Perspective viewport, you will constantly have to switch between the 'Viewport Navigation Controls' at the bottom right of the interface. (Actually, you absolutely have to use keyboard equivalents, as it is far too slow and awkward to use icons all the time).  Suffice to say that the awkwardness of having to switch back and forth between 'zoom' and 'rotate' in 3D studio Max, combined with the inability to actively work in the Perpective view cause 3D Max's capabilities to, in no way, equal LightWave's abilities to model organic objects. If a person knows both programs? My suggestion would be to use LightWave's modeler in 'Subsurface mode', convert the Nurbs to polygons, then convert to all three-sided polygons (tesselated) and export to 3D Studio Max. With that, I'll get all the 3D Studio guys whining at me, but it's true. In my opinion, 3D Studio Max has a far more techie feel with much less artistic freedom. Now, lets begin. First we'll draw a shape which will be easy to see as being '3-Dimensional' when you actively rotate it. I choose a pyramid. Select the 'Create Panel' from the 'Command Panel'. Make sure the 'Geometry' sub-category is selected and click on the 'Pyramid' button.    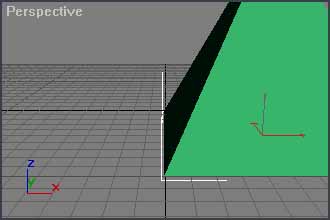 To move the pyramid to the center of the Perspective viewport, click on the hand icon in the Viewport Navigation Tools'  . .Click in the Perspective viewport with the left mouse button, hold the mouse down and drag to the left. The pyramid will pan to the left. Next, I wish to rotate the pyramid. If an icon has a small black triangle to the lower-left of the picture, it means there are more than one choice you can make from that icon. Left-click with your mouse button on the 'Arc Rotate' icon and a small menu will appear.  Choose the topmost choice, 'Arc Rotate'  (Unfortunately, it doesn't tell you what it is until after you've selected it, and after you've selected it you have to roll over another icon, then back to that one or it won't list the name of the icon correctly). In this case, after you have selected it it should say 'Arc Rotate' when you roll over that icon. Arc Rotate now will let you rotate your world in the Perspective viewport. A round yellow control will appear with four squares at the top, bottom, left and right. You right-click the Perspective viewport to make the 'Arc Rotate' tool stop working and make this yellow circle go away. If you click in the top or bottom square around the yellow circle, the cursor will change to a black vertical circular indicator and if you then click with your left mouse button you can rotate the pyramid as if there were a pivot passing through it from left to right, parallel to your computer monitor. Move your mouse down, then release the button. 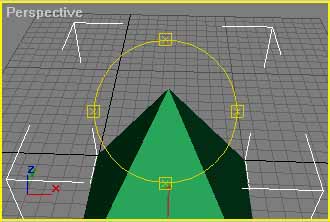   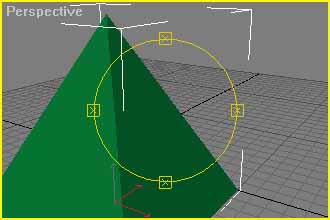 tool to center the pyramid. tool to center the pyramid....then pick the 'Zoom' tool  (or press the 'z' key) to get the distance right. (or press the 'z' key) to get the distance right.You might have to switch between the 'z' key for going in and out, 'CTRL-p' for moving the view sideways/up/down, or 'CTRL-r' to rotate it. In this case, you might have to switch many times before you finally have the angle and size you wish the pyramid to be.  But, with 3D Studio Max, it is absolutely imperitive that you learn the keyboard equivalents to perform these operations. Still, instead of it feeling like a fluid process, it feels like you are forced to enter into and out of a door all the time. From the 'File' menu, choose 'Save As...' and save the scene as 'pyramid.max' Here are the 3D studio Max file, the ADG file, the two texture JPEGS and the background image. 3D Studio Max Files |
||
