
|
|
||
|
13.2 Skelegons - Part 2 |
||
 If you have closed the last version of the arm that we did in the last tutorial do a 'File->Close All Objects' (to make sure that multiple objects aren't accumulating), then do a 'File->Open Object...' and choose arm_02.lwo. And, as usual, it is best to instantaneously do a 'File->Save Object As...' and bump the number to arm_03.lwo. That way, the old version remains unchanged. In the Modeler program, if you select a skelegon, then click 'Edit Skelegon' you will see a set of handles for setting the bank angle (Called 'Bank Rotation Handles' or 'Lollipops'). Bank Rotation Handle: When you edit skelegons, a bank rotation handle will appear. The default angle for the handle is perpendicular to the viewport the skelegon is first drawn in. Drag it to change the bank rotation to apply when it's converted into a bone. 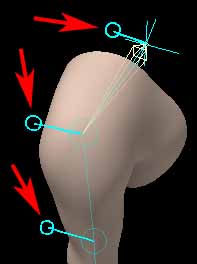 I'll create a ball to orient myself so I'll be able to tell when I rotate the perspective viewport what direction is what. I create and place a ball so it is 'in front of' the arm in the 'Back' viewport (since I always turn around objects, front-to-back, then the ball is really 'behind' the object relative to the 3D World).  I enter 'Select Polygons' mode with CTRL-h, dragging my mouse across the shoulder's skelegon edge while in 'WireFrame' view type.   button from the 'Other' section of the 'Detail' tab. button from the 'Other' section of the 'Detail' tab.I can now see that all three 'Bank Rotation Handles' point towards the front of the 3D World (back of my 3D arm). 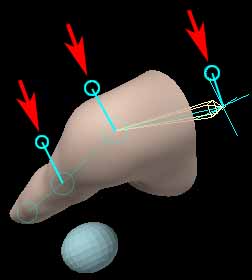 (By 'Away from the Creator', I mean the direction that the 'Bank Rotation Handle' points relative to the person drawing it at the moment he draws it from the viewport's point of view). This agrees with the manual, which states that 'Bank Rotation Handles' are created perpendicular to the viewport that you drew them in. However, the manual doesn't state in which direction they point. I press the SPACE bar to exit from the 'Draw Skelegons' mode. The cyan color disappears. I select that skelegon like I would a polygon, pressing DELETE to remove it. I do a second experiment, again selecting 'Skelegons' from the 'Elements' section of the 'Create' tab. This time I create a skelegon in the 'Top' viewport.  I press the SPACE bar to exit from the 'Draw Skelegons' mode. The cyan color disappears. I select that skelegon like I would a polygon, pressing DELETE to remove it. I do a third experiment, again selecting 'Skelegons' from the 'Elements' section of the 'Create' tab. This time I create a skelegon in the 'Right' viewport.  MODELER & LAYOUT, BANK ROTATION HANDLE SECRETS Now that I did all of that there are many who have used skelegons before going, What do 'Bank Rotation Handles' have to do with anything? I've created chains of skelegons lots of times and I've never had to worry about 'Bank Rotation Handles'?" And, for the beginners, I realize that this section might confuse you... so if you feel like you're completely in the dark, let that feeling ride for the time being. Know that you will be coming back to this section one day once you've understood a little bit about skelegons. You'll return here when you get real frustrated that the angles that you wished the bones would rotate in aren't the ones the program chooses for you. For those who are more advanced with skelegons, and are now starting to suspect that you are finally hearing that final missing piece of the puzzle that you've been waiting for... If you're starting to hope that this is the answer to the problems you had with skelegons, read on... MODELER & LAYOUT, WHY ARE THEY IMPORTANT? Adjusting the angles of the 'Bank Rotation Handles' on a skelegon is a VERY important thing to do. Unfortunately, the manual glosses over the importance of these handles. So, here it is. When you enter the Layout program, converting the skelegons that you created in the Modeler program into bones, the 'Bank Rotation Handles' tell Layout how to orient the rotation gadget. If you don't carefully watch the positions of bank rotation handles while in Modeler, and do a certain sequence of steps when you're converting skelegons to bones in Layout, the rotation gadgets won't be oriented properly and all three planes (pitch, bank and heading) won't be at right angles to each other. Know that almost all tutorials, all books, and even professionals are all confused about the use of skelegons and the proper way to use bank rotation handles. If you have repeatedly gotten confused every time you've tried to use skelegons, know that much of the confusion lies in the fact that those who are teaching you don't understand them. MODELER & LAYOUT, THE SECRET, REVEALED Have you been struggling with skelegons forever? Have you torn your hair in frustration? Has each tutorial book skimmed over skelegons, making you even more confused? I'll now outline the proper sequence of 20 steps that makes skelegons succeed: 1. Create skelegons in the Modeler program, chaining them together.Those who carefully follow this sequence of steps and who have been struggling with skelegons for years suddenly will be shaking their heads in disbelief. You might have even given up on using skelegons because every time you used them, they'd twist in directions you didn't expect or desire. Or, possibly, the rotate gadget's heading, bank or pitch angles might not have been at right angles with each other. Or, possibly two of the gadgets were parallel with each other so you lost the ability to rotate the bone in one of the three directions. Particularly if your bones are at strange angles, the instant that you choose 'Pivot->Record Pivot Rotation', you will see the rotate gadget suddenly reflect the angles relative to the bank rotation handle. In the Layout program, when the 'Rotate' gadget is selected, a small blue arrow points in the direction the bank rotation handle pointed when you were in the Modeler program MODELER & LAYOUT, EXPLAINING HOW THE SECRET WORKS What were the secrets to success? Well, first, I'll quickly outline the problems people oftentimes have with skelegons. First a few facts... Bank rotation handle directions are dictated in Modeler by which viewport you draw them in. The bank rotation handle is created so that it either points toward you or away from you relative to the viewport you drew the skelegons in. Few people even notice bank rotation handles when they draw skelegons, and they don't understand their purpose because the manual skims over their importance. Second, once you enter the Layout program, bank rotation handle information isn't used to determine the orientation for the rotate gadget unless you do a 'Record Pivot Rotation', which zeros the heading, pitch and bank for that gadget and allows the heading, pitch and bank gadgets to be arranged at right angles with each other. Third, unless you create a key for every bone after doing a 'Record Pivot Rotation', the newly zeroed heading, pitch and bank will be forgotten for that bone once you do the next bone (thus the reason you ensure that 'Auto Key' is turned on, and that it actually is performing a 'Create Key' by ensuring that 'Modified Channels' is turned on. If you forget to create a key for every bone you record its pivot rotation for (or if you have 'Auto Key' turned on, but don't have 'Modified Channels' turned on under 'General Preferences'), the arm would twist at strange angles the instant you did a 'Record Pivot Rotation' on the next bone. Fourth, you must set the rest position for the bone and turn it on by pressing 'r'. And, finally, even if you do all of these steps, unless you understand what heading, pitch and bank mean, this information will not make your bones rotate in the directions you wish them to. MODELER & LAYOUT, THE KEY TO USING SKELEGONS I can't emphasize this point more. You may not understand what I am telling you right now, but know that this sequence of steps is the key to fixing your skelegon headaches. These steps are the key to using skelegons. Many people might have even stopped using skelegons because they never turned this key. Next, I'll explain each step. I'll explain the meaning of 'Heading', 'Pitch' and 'Bank'. I'll explain how to modify bank rotation handles while in the 'Modeler' program. When you work with skelegons more, you'll find that generally (except for when you do a 'Record Pivot Rotation' on a bone) a bone or skelegon uses the Modeler program's 'Bank Rotation Handle' setting from the PREVIOUS bone or skelegon to determine what the rotation gadget will allow. So, that is only true if you DO NOT use the Layout program's 'Items->Tools->Pivot->Record Pivot Rotation' for all bones right after you do a Layout program's 'Items->Add->Bones->Convert Skelegons to Bones'. Have I repeated it enough for you to remember its importance yet? ...let me highlight that. If, when in the Layout program, you DO go to the 'Tools' section of the 'Items' tab, and from the  drop-down menu select 'Record Pivot Rotation'... drop-down menu select 'Record Pivot Rotation'... After doing this, the relative position of the rotate gadget will be all zeros. Then, whatever rotations you do on that bone will be offset from that new zero position and it will be easy to reset a bone to its rest position and angle by just entering zeros into the H, P and B gadgets for that bone if it gets hopelessly twisted as you animate your object. Now that I've said it a hundred times, let me say it a hundred more... make sure that you understand it fully. You should make that series of steps a permanent part of your skelegon to bones routine. So, what was it again? Do a 'Record Pivot Rotation in the Layout program, right after you do a 'Items->Add->Bones->Convert Skelegons into Bones', and right BEFORE pressing 'r'. Also, you MUST create a key for that bone after having done the 'Record Pivot Rotation'. Pressing 'r' does two things... It records the rest position and it activates the bone. Layout sets the rest position by copying the bone's current position and rotation values to the Rest Position and Rest Direction values (Bones panel). From then on, any changes to the bones will deform the object. Repetition is how the brain remembers. You must do these things before setting up IK relationships. There are only a couple shortcomings using this method. 1. There's no exact angle numeric in the Numerics Panel for the 'Edit Skelegon' tool - so when you move the bank rotation Handles you'll have to eyeball their angle.Thus, adjust the 'Bank Rotation Handles' with the 'Edit Skelegon' feature, and paint and adjust the weights in Vertex Paint (or by using the 'Weights' and 'Airbrush' tools, to be explained later). For those who don't have the foggiest idea what I'm talking about, at least you should know that even though you may not understand the importance right now, some day this will be very handy information to look up and better understand. LAYOUT, HEADING PITCH AND BANK I'll now attempt to explain what 'Heading', 'Pitch' and 'Bank' are. (Labeled H, P and B at the lower left of your Layout screen when you have the 'Rotate' button selected). In the 'Layout' program, you will encounter these three new terms... heading, pitch, and bank. They are words which derived from the world of airplane flight. I created this 3D sculpture to better illustrate the concepts of Heading, Pitch and Bank. I've used the same color coding of these three directions as LightWave uses. Red means Heading', Green means 'Pitch' and Blue means 'Bank'.  Heading is when an airplane changes its direction and heads to a new city. 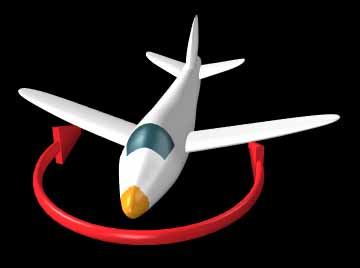 Bank is when an airplane tips its wings down or up. As one wing goes down, the other goes up of course. An airplane has to change its bank when it turns.  Pitch is when an airplane tips its nose towards the ground or points it towards the sky as when the plane takes off.  MODELER & LAYOUT, HOW THIS RELATES TO BONES This same color scheme, where red indicates Heading, green indicates pitch and blue indicates bank is used in the 'Layout' program. The 'Bank Rotation Handle' in Modeler both tells the Layout program what 'Up' is relative to pitch and what 'no sideways bank' is relative to its bank angle. The red heading gadget is always perpendicular to the bank rotation handle's direction. In the case with the airplane, if the rotation gadgets of the airplane were a the rotation gadgets of a bone its 'Bank Rotation Handle' would have to be sticking straight out of the top of the plane, and the bank rotation handle would be pointing upward. And, you are seeing that things are beginning to meld together, Modeler into Layout and Layout into Modeler. There's no getting around starting to talk about the Layout program. Skelegons were created to supplement some of the problems people saw with bones, so to separate Layout from Modeler becomes very difficult when speaking of skelegons. |
||
