All my larger images are stacked on top of this text. The order does not matter. Mouse over the images to the left.
<<<<<
<<<<<
Displaying Images
This page gives examples of the various ways you can display fixed images on your site.
- Place the image directly on the page
- Place the image on its own page
- Link directly to the image
- Use a popup
- Use a mouseover
Place the Image Directly on the Page
This is good for smaller images. You probably already know how to do this. Hint: click on the Mona Lisa icon on the left hand toolbar. You can resize the image by:
This is good for smaller images. You probably already know how to do this. Hint: click on the Mona Lisa icon on the left hand toolbar. You can resize the image by:
- Dragging its edges. Hold down the CTRL key to maintain the proportions (aspect ratio)
- Entering scale factors in the Quick Editor > Object tab
- Entering scale factors in the Object Editor Transformations tab
Bruceee's Sandpit
Web Design with SiteSpinner
Web Design with SiteSpinner
home
home
home
images
images
images
Because all the large images have to be loaded before the page works properly, take these steps. This helps avoid a slow loading page:
- make the large images as small in terms of file size as possible
- for photos, use jpg with the maximum quality reduction possible
- ensure you scale down the smaller images
- reuse images from other pages. Some of the images here are are also used on other pages on this site. Because of this they can be extracted if available from your browser cache, and do not have to be reloaded
- For more on all this see Bandwidth
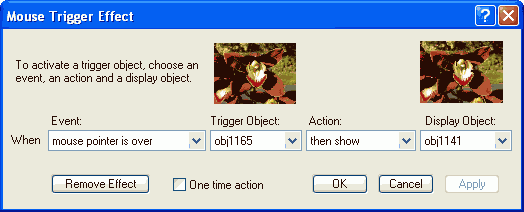
Control the positioning of the images on the workpage in the usual way. Don't forget the front/back buttons on the bottom toolbar which allow you to set whether the objects appear on top of or behind other objects. Here is a SpecialFX window for an effect like this:

If you resize the image, you can control whether SiteSpinner generates a new image, or allows the published HTML code to create a resized image from the source image. More details on this in Scaling Images.
Here is another style of border: place a colored background rectangle behind the image If you set re-render off on the rectangle you can make this very economically in terms of bandwidth. You can have the rectangle with or without its own border. This one has the default one pixel black border. I also placed a one pixel black border around the image. For more, see Colored Rectangles.
You can place a border around the image. Use the Quick Editor > Outline tab to control the thickness and color of the border. This border partly overlaps the actual image. From this example it seems that the center of the border marks the edge of the original image
This is the same image, but this time with re-render on. This creates another image file. Note the unattractive 5-o'clock shadow effect which appears around the caption. Jpg text does this at higher levels of compression.
You may think the overhead is worth it. Generally don't rerender if you can avoid it.
You may think the overhead is worth it. Generally don't rerender if you can avoid it.
Place the Image on its Own Page
Placing the image in its own page is useful if you want to place images in i-frames. For i-frame use, you will probably want to reuse the existing window. Other times, when creating the link, consider opening it in a new window. This is controlled by a checkbox in your link editor window.
Notice what happens to the Back button for a new window. As there can be no 'Back' for a new window your browser disables that button. If you use a new window, you rely on the viewer eventually manually closing the window.
This page forms part of a basic slideshow. More about this on the basic slideshow page.
Placing the image in its own page is useful if you want to place images in i-frames. For i-frame use, you will probably want to reuse the existing window. Other times, when creating the link, consider opening it in a new window. This is controlled by a checkbox in your link editor window.
- Unchecked: Show image in this window.
- Checked: Show image in new window.
Notice what happens to the Back button for a new window. As there can be no 'Back' for a new window your browser disables that button. If you use a new window, you rely on the viewer eventually manually closing the window.
This page forms part of a basic slideshow. More about this on the basic slideshow page.
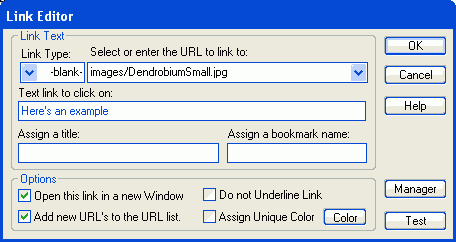
Link Directly to the Image
The previous requires a separate page for each image. Hence a lot of images equals a lot of pages. Instead you can link directly to the image and rely on the viewer's browser to generate an appropriate window.
Here's an example opening in a new window. Because it is a new window which is opened, the back button does not work. Also because the link is directly to an image, you can't add captions or Prev and Next buttons.
Creating a link like this may be a little non-intuitive first time you meet it:
Link Type: -blank-
Link URL: imagefolder/myimage.jpg (or maybe myimage.jpg)
The URL includes the folder where the image lives. My images all live in a folder called 'images' -- not to be confused with the SiteSpinner default named 'image'. Here is my link for the example:
Use a popup
This is one of my favorite techniques for larger images which is very easy to do. This is covered in greater detail in the photo album page. But here is a summary:
This is one of my favorite techniques for larger images which is very easy to do. This is covered in greater detail in the photo album page. But here is a summary:
- Find the full-size image to display
- Place the the full size image on your workpage (Mona Lisa icon)
- Resize the image down to thumbnail size. How do I do this?
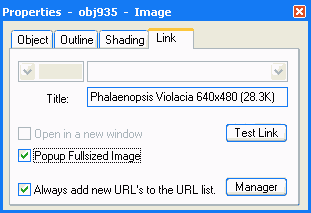
- In the Quick Editor > Link tab for the scaled down image, check the box "Popup Fullsized Image". Add a title too. Your Quick Editor link tab should look something like this:
Click the small image on the right to see how this works.
There are other ways you can make popups too. For more details see the old popups page.
There are other ways you can make popups too. For more details see the old popups page.
Mouseover
If you are not familiar with mouseovers, take some time out to look at this SiteSpinner tutorial. The mouseovers here are very similar: Mouse over the small image to the right and make the larger one visible.
If you are not familiar with mouseovers, take some time out to look at this SiteSpinner tutorial. The mouseovers here are very similar: Mouse over the small image to the right and make the larger one visible.
<< Click the image
Because the large images will always be present when the page is loaded, there is no need create small images. Instead we can arrange for the HTML to do the scaling from the larger images. See image scaling.
Here is a slightly more complex example. This time there are four sets of images with all the large images stacked on top of each other.
Here is a slightly more complex example. This time there are four sets of images with all the large images stacked on top of each other.


When you are making your own mouseover effects, start simply with just one pair of images first. Then when you have that working the way you want, extend it to a second pair of images and so on. When you have multiple images on top of one another, it can be useful to make them slightly non-overlapping so you can easily select them and see exactly what is happening in preview.
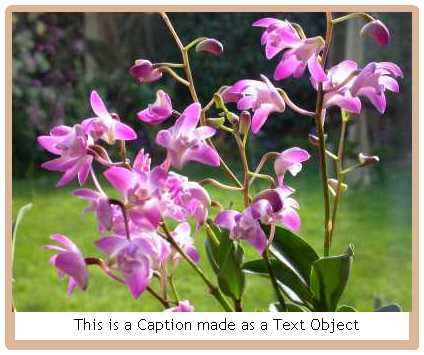
This is a Caption made as a Text Object
This is an image with a caption under. The image and caption together are a permanent group. The group then has a ten pixel border around it. This looks quite attractive on the workpage -- looks ok in Netscape, but looks horrible in Opera and Internet Explorer (SP1). This is not a bug in SiteSpinner -- rather it is a bug in IE and Opera. (I think!)
|
This is a Caption made as a Text Object
|
This is is the same group, (image plus caption) placed in a table. There are many effects possible with tables. When you place a group in a fresh table, make sure you set re-render off for the group.
See also: Making a photo album
See also: Making a photo album
Summary
There are many decorative effects possible, only some of which I have covered here. Remember that when you re-render, you create a new image. Sometimes, when making thumbnails, this is what you want. Generally avoid re-rendering photos which include a caption as part of the image.
These effects are useful for smaller images that can fit comfortably onto your web page. For larger images, let's consider some other techniques.
We'll continue the mouseover theme on the next page, getting more into the area of slideshows.