Include File
These slideshows are all based on a separate include file: slideshows.js. (2K, latest version is V1.1 of 22 Oct 2004. )
If you can't download the file with a left click, try a right click then 'Save Target As...'.Or extract it from your browser cache. Include the file in the root directory of your published site. Also place it in your preview folder along with the preview HTML files -- this allows you to preview your slideshow.
The code in that file is structured as a Javascript 'Object' which allows you to run several independent slideshows at the same time. It provides features to hide any old image that is already displayed and instead display a new one. And has other useful features covered below. On any page that needs a slideshow, include this code object on your page:
Bruceee's Sandpit
Web Design with SiteSpinner
Web Design with SiteSpinner
home
home
home
images
images
images
Clickover
This is a term I have just invented -- a mouseover you click on instead of mousing over. Here is the mouseover example from the ImageDisplay page -- but this time click on each of the small images.
This is a term I have just invented -- a mouseover you click on instead of mousing over. Here is the mouseover example from the ImageDisplay page -- but this time click on each of the small images.
All my larger images are stacked here. The order does not matter. Click on the images to the left.
<<<<<
<<<<<


To create this effect, take these three extra steps:
- Make the large images invisible on load and after load
- Place a code object on your page to set up a slide show
- Enter a special link on each of the small images
All my larger images are stacked here. The order does not matter.
To display a large starting image in this place, just remove the 'Hidden when playing' attribute for the large image. (Object Editor > Options tab). Send that image to the back so that it does not obscure other images.
Click the Prev and Next links below.
To display a large starting image in this place, just remove the 'Hidden when playing' attribute for the large image. (Object Editor > Options tab). Send that image to the back so that it does not obscure other images.
Click the Prev and Next links below.
Here the new commands -- entered as links (URLs):
javascript:Show3.prevslide() Go back to the previous slide
javascript:Show3.nextslide() Go forward to the next slide
The example above uses simple text links for the Prev and Next commands. If you want fancier buttons, you can substitute images -- but the links are the same for both text and images. As with the other slideshows, leave the link type blank. If you hover your mouse over the links above, you will see the link URLs echoed in the status bar at the bottom of your browser.
If you get to the last slide, and click 'Next', you will go back to the first slide. Similarly if you move to the first slide and click 'Prev', you will go to back to the last slide. The whole idea of this is that the slide show is a circular show -- it has no beginning or end. So the Prev and Next links always work the same. As the designer, you know which is the first slide -- it is the first entry in the slide list -- but your viewers need not know that.
Make the large images invisible
There are two ways you can do this. First:
There are two ways you can do this. First:
- Select a large image
- Open the Object Editor > Object tab
- Check the two boxes 'Hidden when loading' and 'Hidden when playing'
- Select a large image
- Open the main menu SpecialFX > Loading Option
- Check the two boxes 'Hidden While Loading' and 'Hidden After Loading'
Special Link
Add a link to each small image like this:
Link type : -blank-
Link URL : javascript:SlideshowName.show(ObjectNumber)
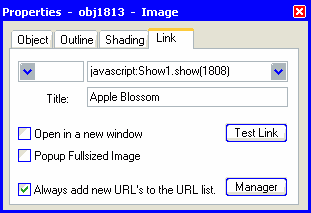
The ObjectNumber is the number of the object which is the corresponding large image. E.g. if the large image has an object name of 'obj1808', just include the number part -- the 1808. My actual link URL for one image is this:
javascript:Show1.show(1808)
This is my Quick Editor link window for my small image which happens to be a small obj1813 linked to the larger obj1808:
Add a link to each small image like this:
Link type : -blank-
Link URL : javascript:SlideshowName.show(ObjectNumber)
The ObjectNumber is the number of the object which is the corresponding large image. E.g. if the large image has an object name of 'obj1808', just include the number part -- the 1808. My actual link URL for one image is this:
javascript:Show1.show(1808)
This is my Quick Editor link window for my small image which happens to be a small obj1813 linked to the larger obj1808:
This all supposes that you have not renamed your objects. The code here expects that they will have names like the SiteSpinner defaults.
In-Page Slideshows
Use a slideshow when you want to display a series of images in the same place. Advancing to the next slide can be controlled by the viewer or can be automatic. Here is a very basic slide show. Other techniques can:
- embed the slides in the current page (covered here); or
- place the slides on other pages, but use an i-frame to give the illusion that the slideshow is part of the current page.
- Use a clickover (like a mouseover but you click it)
- Use a mouseover clickover (like clickover but you mouse over it)
- Use an in-page slideshow with manual advance
- Use an in-page slideshow with automatic advance
Haaalp! It doesn't work
Usually, if it is not working, you will see a Javascript error message on the status bar of your browser. Often this will not tell you much. Here are some things to check:There is an error check built-in to report missing images. But even so, if you get a situation where you have no images displayed and your browser reporting javascript errors, check that all the object numbers you have listed actually exist on the page. And make sure they are the images you want to display.
When setting up your links, make sure you leave or set the link type to blank.
When you hover over a link, look at what the status bar says at the bottom of your browser.
Usually, if it is not working, you will see a Javascript error message on the status bar of your browser. Often this will not tell you much. Here are some things to check:
-
Make sure the code that loads the javascript is at the back (top of your page). The javascript file must be downloaded before other code tries to set up a slide show -- thereby using the code in that file. To send it to the back, click the 'To Back' button on the bottom toolbar.
- Javascript is case sensitive.
In-Page Slideshow (automatic advance)
Instead of a manual advance, you can use a timer to automatically advance to the next slide. For this kind of show you don't need the Prev and Next buttons. But I've included Start and Stop buttons here in case you want to provide manual control. They are not essential.
Instead of a manual advance, you can use a timer to automatically advance to the next slide. For this kind of show you don't need the Prev and Next buttons. But I've included Start and Stop buttons here in case you want to provide manual control. They are not essential.
Timed Slideshow
Possible changes
Name of show
I have used Show4 for my sample here -- change yours to anything you like. But remember, your visitors will see it in their browser status bar.
Slides in show
As for the manual slideshow, set the list of slides comprising the timed slideshow by adjusting the values in setup code for the actual object numbers you want to show. You can have more or less than the four I have used.
Manual start
If you don't want the slideshow to start automatically, omit the code line which says:
Show4.starttimer('Show4',2); //Auto run Show4 with 2 sec
Change interval
My slideshow is set for a two second interval between slides. Change this by amending the same line:
Show4.starttimer('Show4',2); //Auto run Show4 with 2 sec
Start timed slide show
To start the slide show manually, enter the following as a link (done on 'Start' above):
javascript:Show4.startTimer('Show4',2)
A very similar line of code starts the timer automatically (see Manual Start above)
Stop timed slide show
To stop the slide show, enter the following as a link (done on 'Stop' above):
javascript:Show4.stopTimer()
Mouseover Clickover
Sorry about the terminology -- but, lacking in imagination, it is the best I can come up with.
A mouseover clickover is like a clickover that you mouse over. The effect is quite like a regular SiteSpinner mouseover, except that the large image remains visible after you mouse away from the small image. Here it is in operation -- mouse over a small image and notice that the large image remains, even after you mouse away:
All my larger images are stacked here. The order does not matter. Mouse over the images to the left.
<<<<<
<<<<<
The only difference in this version is that link URL takes a different form. For the clickover, the URL had this form:
javascript:SlideshowName.show(ObjectNumber)
For the mouseover clickover, change that link URL to be this:
javascript:void(AnythingYouLike)"onmouseover="SlideshowName.show(ObjectNumber)
The AnythingYouLike will appear on your browser status bar so it is reasonable to make it the name of the image. But you could also omit it altogether to give:
javascript:void()"onmouseover="SlideshowName.show(ObjectNumber)
Here is an actual example of a link from one of my small images above:
javascript:void(Cymbidium)"onmouseover="Show2.image(1733)
Notice that I have created a new slideshow, similar to Show1, this time calling it Show2.
Code Object
As well as the included Javascript file, which is used for all these slideshows, add the following extra code object to create a slideshow of a given name. I called mine Show1, but I'm sure you can be more imaginative than that.
As well as the included Javascript file, which is used for all these slideshows, add the following extra code object to create a slideshow of a given name. I called mine Show1, but I'm sure you can be more imaginative than that.
This generates a specific instance of a slideshow, using the properties and methods defined in slideshows.js. Include this code for each new slideshow using a different name.
<script language=Javascript SRC="slideshows.js">
</script>
</script>
Consumer Warning
This method for making slideshows has the same problem as mouseovers -- all the large images have to be preloaded. If you are not careful, this can make for a slow-loading page. See Mouseover warning
.
This method for making slideshows has the same problem as mouseovers -- all the large images have to be preloaded. If you are not careful, this can make for a slow-loading page. See Mouseover warning
.
Use the 'To Back' button on the bottom toolbar to ensure that the object is published at the top of the html page. This code includes the file slideshows.js just as if it were a code object at the top of your page. It is important that this code is at the top of your page as there is other setup code here that can run before your page is fully loaded. This code depends on the contents of that file. More on Javascript include files.
<script language="Javascript">
Show1=new SlideShow(); //Show1 is the name for this slideshow
</script>
Show1=new SlideShow(); //Show1 is the name for this slideshow
</script>
This includes a list of object numbers -- the full list of large images comprising this slideshow. Change those numbers to suit your objects -- you can have fewer or more as you wish. Just separate each object number with a comma as I have done here. Your list can extend over more than one line -- break your lines after a comma.
<script language="Javascript">
Show3=new SlideShow('1819,1820,1821,1822');
</script>
Show3=new SlideShow('1819,1820,1821,1822');
</script>
<script language="Javascript">
Show4=new SlideShow('1180,1181,1183,1186'); //Create slideshow 4
Show4.starttimer('Show4',2); //Auto run Show4 with 2 sec intervals
</script>
Show4=new SlideShow('1180,1181,1183,1186'); //Create slideshow 4
Show4.starttimer('Show4',2); //Auto run Show4 with 2 sec intervals
</script>
Again hover over the Start and Stop links to see what they say. For this example I chose to auto-run the slide show. Here's my code to do that:
Full setup code
For the sake of completeness, here is a list of all the slide show creation code on this page. This is the exact code I used on this page as a code object. I set up all the slideshows for this page in one code object.
For the sake of completeness, here is a list of all the slide show creation code on this page. This is the exact code I used on this page as a code object. I set up all the slideshows for this page in one code object.
<script language="Javascript">
Show1=new SlideShow();
Show2=new SlideShow();
Show3=new SlideShow('1819,1820,1821,1822');
Show4=new SlideShow('1180,1181,1183,1186');
Show4.starttimer('Show4',2); //Auto run Show4 with 2 sec intervals
</script>
Show1=new SlideShow();
Show2=new SlideShow();
Show3=new SlideShow('1819,1820,1821,1822');
Show4=new SlideShow('1180,1181,1183,1186');
Show4.starttimer('Show4',2); //Auto run Show4 with 2 sec intervals
</script>
Summary
To include a slide show like one of these on your page:Add the full-size images to your page
Add a code object to your page to set up the slideshow
Create the special links to the full-size images
To include a slide show like one of these on your page:
- Include the file
As for the manual slideshow, set up a list of slides which comprise your show. In addition to that, add a line like this:
Show4.starttimer('Show4',2); //Auto run Show4 with 2 sec intervals
Show4 appears in two places. Just change that to suit the name for your slideshow.
2 represents a 2 second interval (approx) between slides. Change this number to suit your slideshow.
Show4.starttimer('Show4',2); //Auto run Show4 with 2 sec intervals
Show4 appears in two places. Just change that to suit the name for your slideshow.
2 represents a 2 second interval (approx) between slides. Change this number to suit your slideshow.
In-Page Slideshow (manual advance)
An in-page slideshow is another extension of the clickover idea except there are no thumbnail images. Instead we issue a javascript command to move forward or back in a list of slides.
As before, we need to set up the slide show before we use it. Because the code does not know which image to use for the next slide, this time we tell it in advance the numbers of the objects comprising this slideshow. So to create Show3, I used this code: