Bruceee's Sandpit
Web Design with SiteSpinner
Photo Album with SiteSpinner
This page describes how to make a photo album using only SiteSpinner -- other than an image editor (maybe), you need no third-party tools. The basic steps are:
- Find or create the full-size images
- Create thumbnail images from the full-size ones
- Add a popup link to each thumbnail
- Add captions (optional)
- Group the thumbnail and caption (optional)
- Place the group in a suitable table (optional)
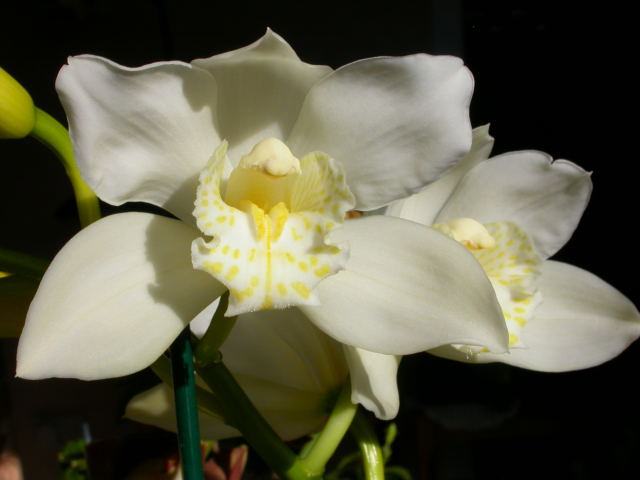
Here is a very small album of just two pictures. A real album would have more pictures than this -- but this is enough to show the effect. Click on either image to popup the relevant full-size image.
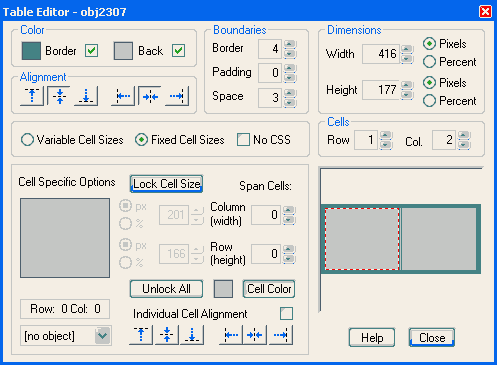
Place the group in a suitable table
You can make many nice effects with tables, so it is worth experimenting to see what you can do. Here are the details of my table:
Find or create the full-size images
In many ways this is the hardest part -- and you usually have to do it outside of SiteSpinner. At this stage you should do any cropping, resizing and jpg compression needed. Plan ahead too. Consider what treatment (caption, link style etc) you will use for each image -- then plan to apply that same treatment to all.
Gather all the full-size images into one folder called 'mymages' or something similar. More details. You don't have to do it this way -- but it does make backups and other operations easier.
Create thumbnail images from the full-size ones
Click the Mona Lisa icon on the left-hand toolbar to show the full-size image on your workpage. If you have placed all your source images in one folder, you can select several all at the same time. Use the Shift and CTRL keys while you click on the files in the folder -- normal windows practice. Repeat for all the images. As these images will likely be largish, you will find it easier if you keep them all stacked on top of each other.
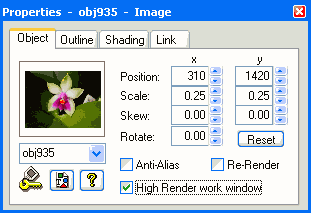
Select all the large images on your workpage, go to the Object Editor and apply the same transformation to all images. My images are 640x480 pixels so I normally transform them to 0.25 times full-size height and width. You need apply the transformation only once and it will stick to all selected images. Neat feature!
You can also drag the edges of an image to resize it. If you have multiple images selected, you can resize several at once.
Make sure you have Re-Render selected (default, see Object Editor > Object tab ). This will cause SiteSpinner to save the smaller images you have just created. If you are dealing with photographs, use jpg file rendering format, and apply the maximum compression you can. More details.
You should now have a group of images looking like this. Now spread them apart. Sorry, only two images do not make an impressive spread!
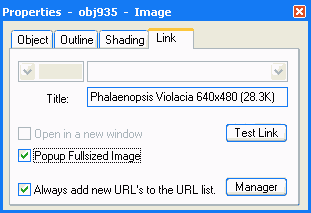
Set the properties of each thumbnail
For each thumbnail, open the Quick Editor > Link tab and check the box PopUp Fullsized Image. Fill out the title field too. I did think it a good idea include the image dimensions and file size of the image. But I see those details also appear on the title bar of the popup -- so now I'm not so sure. Anyway this image shows the settings for one of my thumbnails above:
Add captions
Captions can be just simple text objects as I have done here. I used a different font from my usual Arial 12pt -- Verdana 10pt.
Group the thumbnail and caption
Drag each caption under the correct thumbnail, then make a permanent group of each pair. To do this, select the caption and thumbnail together, then click the 'Group' icon on the bottom toolbar. Making a group like this serves two purposes:
- You can drag thumbnail and caption together as a unit
- You can place only one object in a table cell, but that object can be a group like this
Final Suggestions
- Consistent. Be consistent. If you use a caption for one image, do so for all. If you use title text, use the same style everywhere. If you specify image or file size, do it in the same style for all images.
- Load times.
If you are concerned about page load times, limit the number of thumbnails per page to about 16. If you want more thumbnails, make them smaller, or apply more compression. See Bandwidth.
Uncheck Anti-Alias and Re-Render
At this point, you can preview -- click on the thumbnails and the pop-ups should work the same as the ones below. If you have only blank popups, try copying your images folder into your SiteSpinner preview folder.
Your popups are now good enough to use as they are. But if you want some extras, read on.
The final step is to drag-and-drop the groups into the table cells. They should center automatically.
On the first group you place into a fresh table, Open the Object Editor > Objects tab and select Re-Render off. Do it after placing the group into the table. If you don't do this, you may find the link won't work.
The table has a memory, and will remember this same setting for additional groups you place.
Haaalp! There is a problem!If you are previewing, you need, in your preview folder, a copy of your images folder. This should be in the same relative position as it will be in your published folder.
Link in table won't work. If you find that a link does not work when you place a group in a table, make sure you have Re-Render off for the group. (Object Editor > Object tab). Do this while the group is in the table -- don't try to move the group outside the table to do it. This is a secret property of the table not the group -- and you need do it only once for each table.
No thumbnail image created (or thumbnails very slow to load). If you are creating your thumbnails by scaling down larger images, make sure you have Re-Render on for the thumbnail. This tells SiteSpinner to create the extra (smaller) image file. (Object Editor > Object tab).
Band along an edge of thumbnail. If you are reusing an existing geometry or clone for your thumbnail, you may find a band appearing along one edge of the thumbnail when published (but not in workpage view). If so, make sure you have Anti-Alias and Re-Render off for the image. (Object Editor > Object tab). This is the opposite of the previous case where you want to create a new image. See Extra step for clones.
Thumbnails very slow to load. Make sure that you have used jpg format for photo thumbnails. You should have each image at or under 5K file size each. The thumbnails I used here meet this requirement. If you use png, you can find your thumbnails are about 10 times bigger, but don't look any better.
Extra step for clones
If your image is a clone, or you are reusing an already existing geometry, open the Object Editor > Object tab and uncheck the Anti-Alias and Re-Render boxes. This may not seem to do much, but it does prevent the possibility of bands appearing on the edges of your thumbnails when you publish. My thumbnails on this page are clones --they all reuse the same two geometries, so this step was necessary for me.