
|
NP Computer Hardware page Understanding Hard
Disks Source : PowerQuest Corporation |
When the computer is booted from Windows 95, Windows 95 first
assigns the drive letter
C: to the active primary partition on the first hard disk.
Next, Windows 95 assigns the
letter D: to the first recognized primary partition on the
second hard disk (i.e., the FAT
primary partition). Windows 95 then assigns drive letters
to each logical partition that it
recognizes. Therefore, it assigns drive letter E: to the
first logical FAT partition on the first
disk, but skips the second logical partition because
Windows 95 does not recognize the
NTFS file system. On the second disk, it skips the first
logical NTFS partition, assigns
drive letter F: to the second logical partition (a FAT
partition), and assigns drive letter G:
to the third logical partition (also a FAT partition).
In this second example, it is important to notice that the
drive letter assigned to the first
logical partition on the first hard disk changed, even
though the computer was booted with
the same OS as in the first example, and the partitioning
of the first disk did not change.
The drive letter change is the result of a second drive
being installed in the computer;
Windows 95 must assign a drive letter (D:) to the first
recognized primary partition on that
second drive before assigning one to the first
logical partition on the first drive.
In a final example, consider how drive letters are
assigned on the same computer, with
exactly the same hard disks and partitions as used in the
previous example; however, this
time the computer (Figure 8) is booted with a
newly-installed version of Windows NT
(installed in the first logical partition on the second
disk).
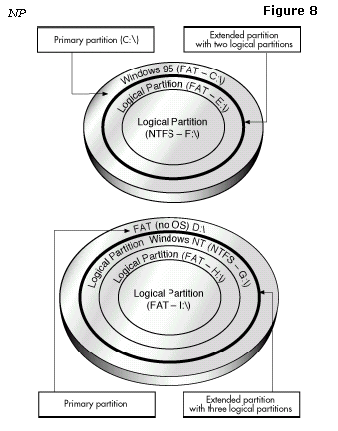
Computer with
two hard disks, booted from Windows NT
First, because Windows NT recognizes the FAT file system,
it assigns the drive letter C: to
the primary partition on the first hard disk. The letter
D: is assigned to the primary
partition on the second hard disk, which is also FAT.
Windows NT then assigns drive
letters to each logical partition in order, because all these
partitions contain file systems
Windows NT recognizes (either FAT or NTFS). On the first
disk, Windows NT assigns E:
to the first logical partition and F: to the second
logical partition. Windows NT then
assigns G: to the first logical partition, H: to the
second logical partition, and I: to the last
logical partition.
It is important to notice in this example that the drive
letters assigned to the recognized
logical partitions changed from those assigned in example
two, even though the number
of hard disks and partitions are exactly the same. The
only difference is that the computer
was booted with a new installation of Windows NT, which
recognized the file system on
all partitions and thus assigned them all letters.
TIP:
After Windows NT is installed, its assigned drive letters
do not change,
regardless of changes to the hard disks or partitions in
your system. The “sticky”
drive letters remain permanently assigned to the same
partitions.
Drive letter changes can occur for other reasons than
those illustrated in the above
examples. Adding, deleting, hiding/unhiding, or
reformatting a partition can also cause
changes in drive lettering.
Changes in your computer’s drive letters can disable your
application configurations. For
example, suppose you install several programs to a logical
partition with the drive letter
D:. You decide to create icons for these programs, so you
can start them from your
Windows 95 OS. Each time you double-click an icon, Windows
looks on drive D: to find
and launch the corresponding program. If the drive letter
for the logical partition changes,
however, your icons will no longer point to the correct
partition. When you double-click
an icon, Windows 95 continues to look on drive D: for the
program files, even though D:
now identifies a different partition.
Changing the drive letter of a partition also affects all
system configurations that are based
on the original drive letter of the partition. For
instance, commands based on a drive letter
that are entered in your AUTOEXEC.BAT, CONFIG.SYS,
WIN.INI, SYSTEM.INI, or
other system files might be invalidated by drive letter
changes. Likewise, Windows 95/98
registry entries that include drive letter references may
become inoperative if those letters
change.
Using the following partitioning strategies can help you
avoid unwanted drive letter
changes when using DOS, Windows 3.x/95/98/Me, and OS/2.
To avoid drive letter assignment changes caused by adding
a primary partition, add
primary partitions only to hard disks that already have at
least one primary partition. The
additional primary partitions can be hidden, thus keeping
only one primary partition
visible on each drive. While not always possible, this
strategy prevents changes in
partition letter assignments.
Whenever possible, add a new logical partition as the last
logical partition on the last hard
disk. By doing so, you ensure that the drive letter
assignments for all existing partitions
remain the same. If the partition must be added to a hard
disk other than the last, try
adding it as the last logical partition on the target
disk. The drive letter assignments for the
logical partitions on that disk remain unchanged, as do
the drive letters for any previous
hard disks; however, all the logical partitions on
subsequent disk drives are assigned new
drive letters.
TIP:
If there is unallocated space between existing partitions
on a hard disk, move all
the partitions to the left until all the unallocated space
is shifted to the right end
of the disk. You can then use this space to create a new
logical partition at the
end of the disk.
You can prevent many drive letter changes caused by
booting different operating systems.
If you have partitions formatted with file systems
recognized by only one or two of your
OSs, simply place them after any partitions with file
systems recognized by all your OSs.
For example, suppose you use both DOS and Windows NT. Some
of your partitions are
FAT partitions, while others are NTFS partitions. Because
both DOS and Windows NT
recognize FAT partitions, place these partitions first on
your disk drives. The NTFS
partitions can then be positioned at the ends of the
drives. Now whenever you boot up, the
drive letters assigned to your FAT partitions remain the
same, regardless of whether you
boot with DOS or Windows NT.
FAT partitions are recognized by the largest number of
OSs. Therefore, we recommend
placing all FAT partitions before any FAT32, NTFS, or HPFS
partitions.
An OS’s boot code is stored in both the master boot record
(MBR) and the partition boot
record, enabling the OS to boot properly. In some OSs,
however, this boot code is written
in such a way that it inadvertently imposes a limit on the
location of both the partition
boot record and the files needed to boot the OS.
DOS (versions 6.x and earlier) and Windows NT (versions
4.0 and earlier), and Windows
2000 are both affected by this boot code limitation. When
booting these two operating
systems, the cylinder-head-sector (CHS) address of the
beginning boot code sector must
be calculated in order to retrieve the sector’s
information and load and execute the next
part of the boot process. The CHS value for the needed
sector is calculated as follows:
Sector Number / Sectors Per Track
Because of the way the boot code is written, the product
of this calculation must fit in a
16-bit register. The largest value a 16-bit register can
contain is 64K. If the number is
larger than 64K, the number is truncated, resulting in an
incorrect value that skews the
remaining calculations. The boot process fails to load and
execute the needed sector, thus
preventing the OS from booting.
Most current hard disks have 63 sectors per track,
creating a 64K boot code boundary at 2
GB.
If your disk is older or uses drive overlay software, this
boundary may be lower.
If a partition begins or extends beyond this boundary, the
CHS value of the partition’s
boot code sector cannot be correctly calculated;
therefore, the partition and its OS cannot
boot.
This same limit applies to the DOS IO.SYS file and the
Windows NT file,
NTLOADER.EXE. If either of these files are installed or
moved beyond the 64K boot
code boundary, the corresponding OS fails to boot.
IMPORTANT!
To boot properly, DOS requires that the first three
sectors of IO.SYS are
below the 2GB boot code boundary.
WARNING!
Never change the LBA mode in your system BIOS once data is
present on
any hard disk. Changing this setting may cause data
corruption and loss.
Most modern system BIOS designs support LBA or Logical
Block Addressing. The LBA
mode setting, whether enabled or disabled on your system,
determines how your computer
translates logical cylinder-head-sector (CHS) addresses.
If you change this setting, the
resulting shift in CHS values may corrupt all the files
and partitions on your hard disks.
If you must change the LBA mode setting in your system
BIOS, first back up all data on
your hard disks. Contact the BIOS and/or disk
manufacturer’s technical support
departments to ensure you understand how to proceed
safely.
© PowerQuest Corporation
