 |
|
Type Tool 2 While you're in type edit mode, you can hold down the Ctrl key and the cursor will change to the move tool allowing you to reposition text without leaving type edit mode. You'll also notice when you're in type editing mode, that the standard Enterkey begins a new line. You can accept you type and exit type editing mode one of three ways:
To exit type editing mode without adding the text you can press the Esc key or click the X on the options bar.
A type layer can be moved with the move tool and further manipulated in free transform mode. Unlike ordinary layers, when you transform a type layer, the text remains crisp and sharp. When scaling type in free transform mode, remember to hold down the Shift key while dragging a corner handle to maintain the type proportions. Of course, you can make your text taller or wider using free transform mode to distort the proportions.
In Photoshop 6, when you want to paint on text or apply filters to it, the type has to be converted to pixels. This is called rasterizing or rendering the text. To rasterize text in Photoshop 6, you can right click (Windows) or Control-click (Mac) on the type layer name in the layers palette and choose Rasterize Layer from the pop-up menu. You can also rasterize type by choosing Layer > Rasterize > Type. When you rasterize type in Photoshop, you lose the type editing and formatting options and it is no longer scalable. Before rendering a type layer, it's not a bad idea to make a duplicate of the layer first and hide the duplicate unrendered copy. This way, if you decide you need to make changes to the type, you will not have to recreate the type completely from scratch. Here's a brief exercise that will demonstrate the differences between type layers and rendered type:
When you use the type mask tool instead of the type layer tool, the options are the same, but when you click in your document the document fills with a mask overlay—just as if you were in Quick Mask mode. As you type, the text is punched out of the mask. When you accept the text, you end up with a type selection rather than a filled type layer. Once you have created a type selection, it functions just like any other selection. When you create vertical type, the type is placed with the characters upright reading from the top down. The alignment buttons change in the type dialog screen to indicate vertical alignment options. If you want to create type that can be read by tilting your head sideways, you will need to create horizontal type and then use the free transform command to rotate the type as needed. Or you can select the text and choose rotate from the character palette's menu. Continue on for an overview of the paragraph and character palettes and type warping in Photoshop 6.0. Next > Type Palettes and Warping |
|

 Once you've placed some text in your document, you will notice a
new layer that contains the text. All type layers have a T in the thumbnail
area of the layers palette. Double-clicking on the T thumbnail icon
will return you to text editing mode with the text automatically selected
for making changes. If you select the type tool and click on some existing
type in the document, it will automatically activate the type layer
and put you in type edit mode.
Once you've placed some text in your document, you will notice a
new layer that contains the text. All type layers have a T in the thumbnail
area of the layers palette. Double-clicking on the T thumbnail icon
will return you to text editing mode with the text automatically selected
for making changes. If you select the type tool and click on some existing
type in the document, it will automatically activate the type layer
and put you in type edit mode.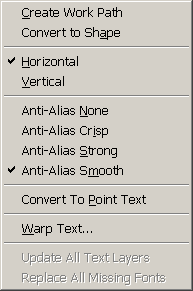 When a type layer is active, you'll also find some additional options
on the Type submenu of the Layer menu. You can create a work path from
the text, convert the text to a shape, convert between horizontal and
vertical type, change the anti-aliasing, convert line text to paragraph
text and vice-versa, and warp text.
When a type layer is active, you'll also find some additional options
on the Type submenu of the Layer menu. You can create a work path from
the text, convert the text to a shape, convert between horizontal and
vertical type, change the anti-aliasing, convert line text to paragraph
text and vice-versa, and warp text.