Type Tool
The shortcut key for the type tool is T. In Photoshop 6, most
of the type tool options are available from the options bar once the
type tool has been selected. The first thing you'll see in the options
bar is a set of four buttons.
 The two buttons in the first group toggle between
creating a new type layer, or creating a type mask. The two buttons in
the second group toggle between horizontal text and vertical text. The two buttons in the first group toggle between
creating a new type layer, or creating a type mask. The two buttons in
the second group toggle between horizontal text and vertical text.
To create an ordinary type layer, you would select the type tool, make
sure the type layer button is depressed, then click in your document
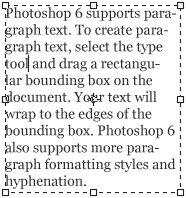
and begin typing. Alternatively, you can click and drag a rectangle shape
with the type tool to create a column of text that fits the rectangle.
This is useful when you need to create large blocks of text. Before you
click in your document, take a moment to look at the I-beam cursor that
appears when you move you mouse into the document area:  Notice the small horizontal line that intersects the I-beam
This line indicates the baseline of
the type. It is useful when you need to align the baseline of your type
with another object in your document, or for aligning type to a guideline. Notice the small horizontal line that intersects the I-beam
This line indicates the baseline of
the type. It is useful when you need to align the baseline of your type
with another object in your document, or for aligning type to a guideline.
 Now click in your document, type some text, and we'll take a look
at the Type Tool options. You can set your type options via the options
bar before you begin typing, or you can use the options bar to selectively
edit text while you are in type edit mode. You can change the formatting
of individual words or characters by dragging over them in the preview
area to select them, then changing options. Now click in your document, type some text, and we'll take a look
at the Type Tool options. You can set your type options via the options
bar before you begin typing, or you can use the options bar to selectively
edit text while you are in type edit mode. You can change the formatting
of individual words or characters by dragging over them in the preview
area to select them, then changing options.
 The first two menus in the options bar allow you to
choose the font and style. If you're not sure what font you want to use,
you can highlight the text in the document area, activate the font menu,
and use the arrow keys to browse all your available fonts. The styles
available will be dependent on the font selected. The first two menus in the options bar allow you to
choose the font and style. If you're not sure what font you want to use,
you can highlight the text in the document area, activate the font menu,
and use the arrow keys to browse all your available fonts. The styles
available will be dependent on the font selected.
 The next two menus allow you to change the text size
and anti-aliasing. Some common point sizes are available from the font
size menu, or you can swipe over the numbers in the field and type any
number. The anti-aliasing options have already been discussed. The next two menus allow you to change the text size
and anti-aliasing. Some common point sizes are available from the font
size menu, or you can swipe over the numbers in the field and type any
number. The anti-aliasing options have already been discussed.
 Next up are the alignment options, color picker, text
warp and the palettes button. The alignment options from left to right
are: left aligned, centered, and right aligned. Additional alignment
options are available through the paragraph palette which we will discuss
later. Next up are the alignment options, color picker, text
warp and the palettes button. The alignment options from left to right
are: left aligned, centered, and right aligned. Additional alignment
options are available through the paragraph palette which we will discuss
later.
To change the type color, click on the color swatch and choose a new
color from the color picker, or you can pick a color from your document
by moving the cursor outside of the color picker window while it is open.
Unlike previous versions, Photoshop 6.0 allows you to select individual
characters and apply multiple colors to text in a single text layer.
The next button is for creating warped text. The palettes button opens
the paragraph and character palettes. We'll discuss warped text and the
type tool palettes later. |
