|
|
Previous
Table of Contents
Home
Next
JAVA vs JAVASCRIPT?
People get confused between Javascript and Java. With Java, a small program called an 'Applet' needs to be downloaded from the website along with any other support files the applet might need. The person running the applet needs to have Java turned on in their browser, and they need to have proper files on their computer.
Javascript, on the other hand, is an interpreted computer language. It is also a programming language whose interpreter is built-in to the browser (both Netscape and Internet Explorer have a Javascript interpreter). You need nothing but the browser, itself, for Javascript to work and a programmer can get by with just a text editing program to write Javascript code.
JAVA APPLETS
Java is a programming language which needs a separate compiler to create what are called 'Applets' which are like small computer programs that must be downloaded from the website before they can be run.
After they download from the website, they run like any computer program would run. However, an applet, if properly done, can run on MULTIPLE PLATFORMS like the Macintosh, Sun or IBM without needing a different applet for each computer.
The user sees the program as if it were integrated into the website page, though. So, it allows fast action interfaces. However, files that that applet is looking for, called 'Class Files', must be found on that person's computer or the Java program won't work properly. Thus, Java must be installed on that person's computer or Java won't work.
WHAT IS JAVA 3D?
Java 3D is an API (Programming Interface) that lets programmers in Java display 3D objects.
It contains functions which allow you to detect mouse clicks so that you can create 3D interfaces that display 3D information.
Realize that if the developer has implemented Java 3D, the user will not only need to install the 'Java Runtime Environment' or JRE to view Java applets, but he also will have to install the 'Java 3D for JRE'.
WHY AM I EVEN TALKING ABOUT THIS?
Well, for the artist, generally Java and Java 3D is far too complex a tool to use. However, I am not only an artist, I am a programmer so Java and Java 3D are very interesting to me. If you do not wish to experiment with Java 3D, then you won't have to download and install these files. Not only is Java a programming language, but Java 3D uses intensive mathematics such as Matrices algebra, Sine/Cosine manipulation, and all things that any programmer would have to know to build a program such as LightWave or 3D Studio Max.
However, remember me talking about applets? 'Third Party Software' programmers are out there helping you. They create applets which do things, and then you can use those applets. I will be talking about an applet that a company called 'Albatross Design' created. At least by their instructions, it doesn't look like you will have to install the full version of Java or Java 3D in order to make their applet work, but if you do run into any problems you will know where to find the Java Runtime (JRE).
Because it takes a while for an applet to download, the best places to use applets is where people don't mind waiting. A university setting is generally a condusive environment for Java 3D applets. In that case, the user is a student, and if any software needs to be installed, there is an adminstrator who can do it.
Whenever it can be assured that the user will be an administrator, then you will do fine.
ARE JAVA AND JAVA 3D FREE?
Both Java, and Java 3D are free. They can be found on the Sun website.
Both you, (the 'Developer') and they (the 'User'), have to download what is called the 'J2SE' version (Standard Edition) of Java, and also 'Java 3D'.
The user has to download what is called the JRE (Java Runtime Environment) and the developer downloads the SDK (Software Developer's Kit).
Current versions, and instructions for downloading as of November, 2002 are:
WHAT A USER HAS TO DOWNLOAD
If Java isn't already installed on their computer, the user has to go to http://java.sun.com/j2se/1.4.1/download.html and he has to download the 'J2SE v1.41_01 Windows (U.S. English Only) JRE'. (At the moment there is no version other than the English version of version 1.4.1)
JRE 1.4.1 - At the present time the file name is called j2re-1_4_1_01-windows-i586.exe and it is 8,015,928 bytes big.
Next, the user has to go to http://java.sun.com/products/java-media/3D/download.html and he has to download 'Java 3D version 1.3 Java Runtime Environment' by selecting 'Java 3D for Windows (OpenGL Version) Runtime for the JRE' from the drop-down menu and then click 'Continue'.
Java 3D 1.3 RT - At the present time the file name is called java3d-1_3-windows-i586-opengl-rt.exe and it is 4,309,794 bytes big.
WHAT A DEVELOPER HAS TO DOWNLOAD
The developer has to go to the same download page,http://java.sun.com/j2se/1.4.1/download.html and he has to download the J2SE v1.41_01 Windows (all languages including English) SDK (as there is no SDK for an English-Only version).
JDK 1.4.1 - At the present time the file name is called j2sdk-1_4_1_01-windows-i586.exe and it is 37,731,236 bytes big.
Next, the developer has to go to http://java.sun.com/products/java-media/3D/download.html and he has to download the 'Java 3D version 1.3 SDK' by selecting 'Java 3D for Windows (OpenGL Version) SDK for the JRE (Includes Runtime)' from the drop-down menu and then click 'Continue'.
Java 3D 1.3 RT - At the present time the file name is called java3d-1_3-windows-i586-opengl-sdk.exe and it is 6,667,270 bytes big.
WHAT CAN THE USER DO AFTER HE HAS DOWNLOADED THESE FILES?
After downloading and installing those two files, he can then run any page which has a Java applet on it, even if it utilizes Java 3D.
WHAT CAN THE DEVELOPER DO AFTER HE HAS DOWNLOADED THESE FILES?
After downloading and installing these two files, the developer can create any Java applet, even utilizing the Java 3D API.
SO, WHY SHOULD YOU EVEN CONTINUE READING?
That 'Big Incentive' I talked of has to apply to you, as well. After all, I'm sure you're thinking, "What will you gain if you do all that I just said?
WHAT IS THIS APPLET THAT I'VE BEEN TALKING ABOUT?
As I mentioned in the last tutorial, it can sometimes be useful to export objects from LightWave to 3D Studio Max.
One particular reason to do this is, a company called Albatross Design created a 3D format which has the windows extension .ADG.
Then, they created what is called a 'Java Applet' that allows 3D objects, using the 'Java Runtime' and the 'Java 3D API', to display 3D objects and rotate them on the internet.
On their site they say, "ADG Pure Java 3D Viewer version 4.0 is free for non-commercial use. It enables Internet Explorer (r) and Netscape (r) users ... to view, rotate, and manipulate ADG compositions on the Web."
Notice that they say you can manipulate 'ADG compositions'. That means that they invented a new file format which they call the Albatross Design Group File Format, (© Copyright 1999-2002, Albatross Design Group, Inc. All Rights Reserved).
You can see a sample of their applet by going to ADG Pure Java 3D Viewer 4.0 page.
So, you will have to convert an object file to their special ADG format. And, they only have a plug-in for 3D Studio Max, not LightWave. Thus the purpose for these tutorials.
You will either use their '3D Studio Max v3.0' plug-in if you have revision 3 of Studio Max, or the ',3D Studio Max v4.0' export plug-in if you have 3D Studio Max revision 4. With the proper plug-in, you will be able to export a 3D Studio Max object as a .ADG file.
And, once you have exported your object as an .ADG file, then you will use their 'ADG Pure Java ® 3D Viewer 4.0 applet to put the object on the internet.
The following code was copied from their web page and is copyright © 2002, Albatros Design, and is their main page for ADG 3D Viewer 4.0. (I am not affiliated with their company in any way.):

ADG 3D Viewer 4.0.
FREE for Non-Commercial Use!
ADG Viewer, Version 4.0. Standalone application for Windows ® 95/98/2000 for real time rendering, animating,
debugging and interactive manipulating of comlex 3D-scenes in ADG Format. Enables file export for Web Publishing.
Minimum System Requirements
- Intel ® - compatible CPU (150 MHz or higher)
- Windows ® 95/98/2000
- DirectX (realise 6.0 or higher)
- 3D accelerator (recommended)
- 64 MB RAM
Installation
1. To install, simply unzip the zip file and run Setup.exe.
2. Follow the installation instruction on your screen.
Supported Properties
- Gouraud shading Z-buffer
- Texture maps
- Contour transparency maps
- Reflection maps
- Color fog generator
- Animation tracks support
- Manual 3D objects manipulation (keyboard, mouse, joystick)
- Networking support for Remote Control
- Direct3D support (full screen and in a window)
Viewing ADG Files
1. Select File-Open.
2. In the Select File dialog box, choose a file name and click Open.
Exporting ADG Files
1. Select File-Save
2. In the Select File dialog box, enter a file name, select a location and click Save.
3. Select a location for the saved file, then click Save.
Important: There will be created (*.jpg) file, related to the texture materials & ADG Java Viewer 4.0 file - ADGview.jar. Do not separate them from the (*.adg) files to a different directory!
Embedding ADG Composition into Your WEB Site.
- Press Save button to store composition into .ADG format file.
- HTML page will be created automatically, for example "yourname.html" .
- Upload from the ADG Viewer Directory to appropriate Web Site Directory.
- Upload files ADGview.jar, "yourname.html", "yourfile.adg" and "yourfile.jpg" you've just created earlier to the same Web Site Directory.
Viewing 3D Compositions through the WEB Browser on the Internet
Use a standard Web Browser. Type proper web address of the HTML page "yourfile.html", you've just uploaded. No special plug-in required.
License
You may use this software for FREE for non-commercial purposes only; otherwise you must either buy a commercial version of software from ADG or remove it from your computer and stop using it. Please, read carefully License Agreement for more information. Every time you create the ADG File for commercial displaying it on the Internet/Intranet you have to obtain a License for ADG panorama & ADG File (buy ADG Registration Key). If ADG File does not have a Commercial License properly you will see a watermark in Java Viewer 4.0 "Non-Commercial License".
Click here to purchase ADG Registration Keys. You will receive a registration code by E-mail. For quantity discount, please, contact our
Sales Department.
Support
If you have a technical problem, question or comment, please send e-mail to
support@albatrossdesign.com
Download Now
Free for Non-Commercial Use, $149.00 for Commercial Use.
|
|
|
|
THE EXPORT PLUG-IN
The following code was copied from their web page and is copyright © 2002, Albatros Design. It is their main page for the ADG 3D Studio Max R4 Plug-In. (I am not affiliated with their company in any way.):
|
ADG 3D Exporter 5.0 for 3DStudio MAX4®.
FREE for Non-Commercial Use!
Plug-in for 3DStudio MAX4®. ADG Exporter 5.0 enables file export from 3DStudio MAX4® to
Albatross Design Group File Format for WEB Publishing (Albatross Design Group, Inc. File Format, Copyright © 1999-2002.)
ADG Exporter 5.0 has a built-in ADG Viewer 4.0 for fast viewing of 3D scenes in ADG File Format.
Minimum System Requirements
- 3DStudio MAX4 ®
- Intel ® - compatible CPU (150 MHz or higher)
- Windows ® 95/98/2000
- DirectX (realise 6.0 or higher)
- 3D accelerator (recommended)
- 64 MB RAM
Installation
1. To install, simply unzip the zip file and run Setup.exe.
The installer will automatically locate 3DStudio
MAX4 ® installation directory on your hard drive and copy
ADG Exporter 5.0 into appropriate plug-in directory.
If it has a problem locating it, please, find it manually.
As usually it c:\3DSMAX4\Plugins\, or you can
get it from 3DStudio MAX4 ® Help.
2. Follow the installation instruction on your screen.
Supported Properties
1. Multiple meshes within a scene
2. Standard materials
3. Diffuse, Ambient and Specular color
4. Multiple non-procedural texture maps
5. Contour transparency texture maps
6. Reflection texture maps
7. Key-framed animation
3D Viewer Properties
1. Gouraud shading Z-buffer
2. Color fog generator
3. Animation tracks support
4. Manual 3D objects manipulation (keyboard, mouse, joystick)
5. Networking support for Remote Control
6. Direct3D support (full screen and in a window)
Exporting Files from 3DStudio MAX4 ® to ADG File Format
1. Select File-Export.
2. In the Select File to Export dialog box, type a file name, for example, ("yourfile.adg") and select the ADG format (*.ADG) file type.
3. Select a location for the saved file, then click Save.
Important: There will be created (*.jpg) file, related to the texture materials & ADG Java Viewer 5.0 file - ADGview.jar. Do not separate them from the (*.adg) files to a different directory!
Viewing 3D Models using ADG Viewer 5.0
1. On the Utilities panel, click More, and select "ADG Exporter Viewer".
2. Click "Put Data into Viewer".
Viewing ADG Files using ADG Viewer 5.0
1. Click "Launch Viewer"
2. Select File-Open.
3. In the Select File dialog box, choose a file name and click Open.
Embedding ADG Composition into Your WEB Site.
- Press Save button to store composition into .ADG format file.
- HTML page will be created automatically, for example "yourname.html" .
- Upload from the ADG Viewer Directory to appropriate Web Site Directory.
- Upload files ADGview.jar, "yourname.html", "yourfile.adg" and "yourfile.jpg" you've just created earlier to the same Web Site Directory.
Viewing 3D Compositions through the WEB Browser on the Internet
Use a standard Web Browser. Type proper web address of the HTML page "yourfile.html", you've just uploaded. No special plug-in required.
License
You may use this software for FREE for non-commercial purposes only; otherwise you must either buy a commercial version of software from ADG or remove it from your computer and stop using it. Please, read carefully License Agreement for more information. Every time you create the ADG File for commercial displaying it on the Internet/Intranet you have to obtain a License for ADG panorama & ADG File (buy ADG Registration Key). If ADG File does not have a Commercial License properly you will see a watermark in Java Viewer 5.0 "Non-Commercial License".
Click here to purchase ADG Registration Keys. You will receive a registration code by E-mail. For quantity discount, please, contact our
Sales Department.
Support
If you have a technical problem, question or comment, please send e-mail to
support@albatrossdesign.com
Download Now
Free for Non-Commercial Use, $249.00 for Commercial Use.
|
|
|
|
DOWNLOAD AND INSTALL THE PROPER 3D STUDIO MAX PLUG-IN
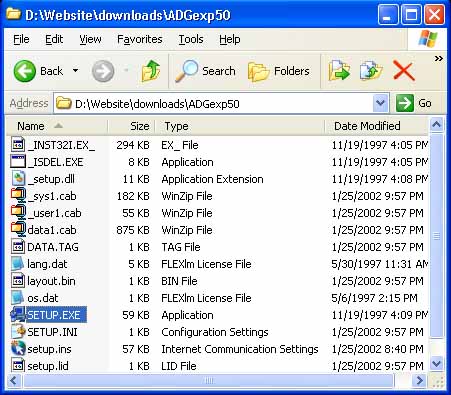
Thus, the first step is to determine whether you have Revision 3 or 4 of 3D Studio Max, and using the links I gave above, download the proper plug-in. You will need the WinZip program to unpack the ZIP archive.
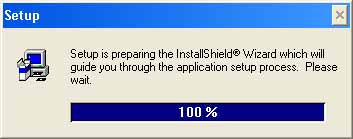
Double-click the SETUP.EXE file to install the plug-in. It will run the typical blue-screen installer.
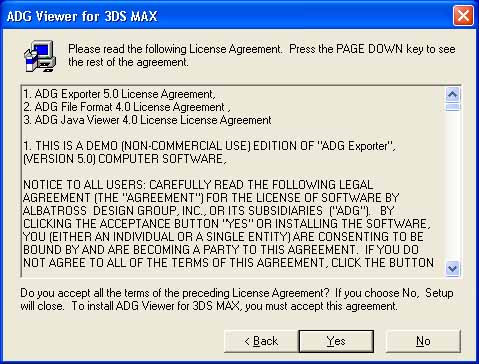
Say 'yes' to the copyright stuff.
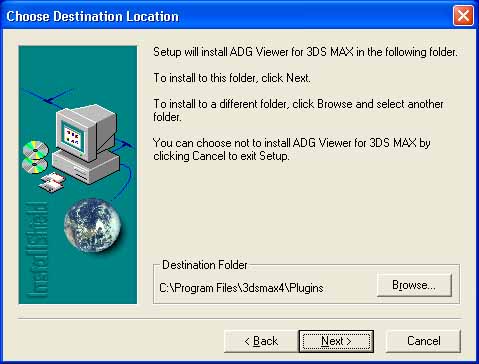
Ensure that the directory they give you is the actual place where your 3D Studio Max plug-ins reside.
Click on 'Finish'.
DOWNLOAD AND INSTALL THE ADG VIEWER PROGRAM
Download the viewer. Use WinZip program to unpack the ZIP archive.
Double-click the SETUP.EXE file to install the plug-in. It will run the typical blue-screen installer.
Say 'yes' to the copyright stuff.
Click 'Next' to install the ADG Viewer program.
Click on 'Finish'.
After all of that, IN THEORY we are now ready to export our pyramid as an ADG file.
LOAD 'pyramid.max' FILE YOU CREATED IN LAST TUTORIAL
From 3D Studio Max, do a 'File' menu, 'Load' and load in the 'pyramid.max' object.
EXPORTING AN ADG FILE
They say, above...
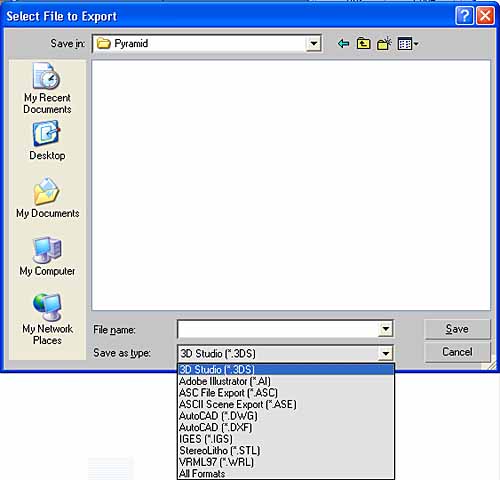
1. Select File->Export.
2. In the Select File to Export dialog box,
type a file name, for example, ("yourfile.adg")
and select the ADG format (*.ADG) file type.
3. Select a location for the saved file, then click Save.
But when you try selecting 'The ADG Format'...? THERE IS NO EXPORT TYPE CALLED ADS.
I find a FAQ page, and it says that if you run into any problems...
|
Frequently Asked
Questions
ADG Exporter 3.0, 4.0,
5.0
How to overcome problems that
may prevent a proper installation?
1. Please check if you have ADG plug-in in a list of installed plug-ins by going to File/Summary/Info/Plug-In Info and look for ADGexp.dle
2. If it is a list, please, do not forget to type file extension *.adg when you are exporting file, 3DSmax is not doing it automatically
3. If it is not in a list, you have to find your 3DSmax directory manually when you installing ADG Exporter, as usually it is C:\3DSmax\Plugins
4. May be 3DSmax plug-in pass configuration is not proper. Go to File/Configure Paths/Plug Ins. If you do not have "Additional 3D", you should add it.
5.The most simple way is just to copy ADGexp.dle (for 3.0 Version) ADGview.dlu (for 4.0 and 5.0 Versions) to one of the following directories (remember! - only one): Plugins or STDPLUGS. STDPLUGS is better.
6. ADG versions 3.0, 4.0 are only working with 3DSmax 3.0. ADG version 5.0 working with 3DSmax 4.0.
|
|
|
When I follow step 1, it turns out that there is no plug-in called 'ADGexp.dle'. I ignore the rest of what they say, do a search on my hard disk for a file named 'ADGexp.dle', and find that there is no plugin on my hard disk with that name. However, there IS a plug-in called 'ADGview.dlu'.
I click on the 'Show Details' box to see if there is any more information, and notice that it is called 'ADG Exporter Viewer'. So, this implies that this might possibly be a thing which can export an ADG file. I guess, again, that it might be a combination of the old Export module, combined with the ADG Viewer v4.0.
I had read some page on their website which had given me the impression that there was a new version of the ADG Viewer called version 5.0, but I couldn't find a download for it on their site.
I take a chance, and guess that they now have integrated the old Exporter with the capability of loading the viewer from 3D Studio Max instead of having to run it from outside Max.
So, if that's the case, lets see if 3D Studio treats it like any regular plug-in.
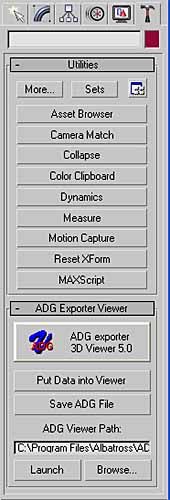
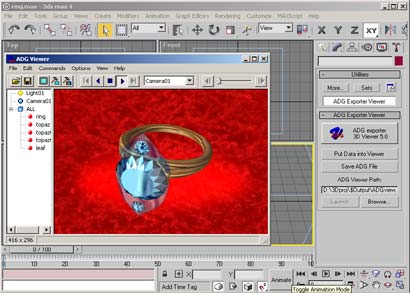
Click on the Utilities icon in the 'Command Panel' 
Click on the  icon in the 'Command Panel' icon in the 'Command Panel'
Highlight 'ADG Exporter Viewer' and click 'OK'.
Sure enough, controls appear for the ADG Exporter 3D Viewer 5.0'. They will appear at the bottom of the Roll-outs in the Command Panel if you have a large enough monitor, otherwise scroll the Utilties panel when the cursor changes to a hand if they aren't visible.
Again, guessing, I click on 'Put Data into Viewer' and it says...
This makes sense, because it is interpreting a SCENE not just an OBJECT. It feels like I'm getting close, now.
I will have to first set up a target camera, then set up a light.
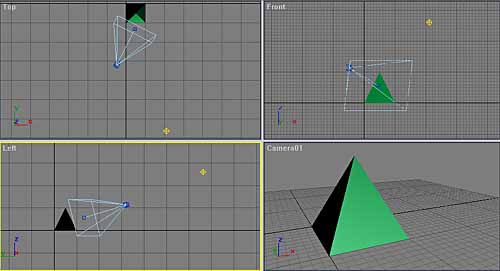
PLACING A TARGET CAMERA IN THE SCENE
It will be much easier for you to place a camera if you first arrange the pyramid within each viewport, making room for where the camera will eventually sit. Preparing things ahead of time is often a thing you have to do with any 3D sculpture program.
And, another thing we should do is we should change each viewport so that we can see the pyramid or we will be placing a camera without being able to tell where the pyramid is. The problem is, when a particular view is in wireframe view mode, it is very difficult in 3D Studio Max to discern the object. Since 3D Studio Max uses the current object color when it draws the representation, it usually blends too well with the gray background.
In fact, if you have a fast processor on your computer, you might put each view into 'Smooth+Highlights' mode, which will let you see things better.
To change the view mode for each view click where it says 'Front' with the left mouse button. A menu will appear.
Do the same, right-clicking on the word 'Top', and 'Left' (Perspective should already be in 'Smooth+Highlights' mode). Now, you will be able to see the pyramid better when you back away from it.
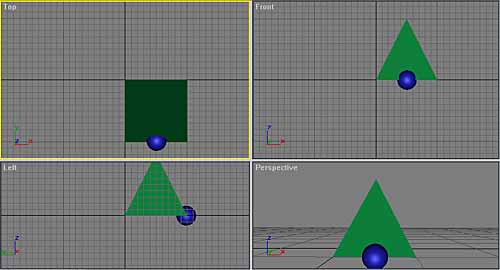
Next, lets use a sphere to orient ourselves. From the Tab Panel's 'Object Tab' select the 'Sphere Object'.
On the center of the bottom edge of the pyramid in the 'Top' viewport drag out a sphere.
Just as we did for LightWave in Tutorial #2, this orients us within our world.
So, in the 'Top' viewport, we can see that 'Front' means 'the bottom of that viewport'.
In the 'Front' viewport, 'Front' is obvious because the blue ball is in front of the green pyramid. Front is, of course, just what you'd think it would mean.
In the 'Left' viewport, 'front' means to the right. Now, just as with LightWave, you start to see stupidity crawling into the scheme. Why don't they put Top above Front, like anyone who did drafting might do. That way the ball in the Top view would line up with the ball in the Front view?
And, in the bottom left viewport, why are they calling that 'Left'? If the sphere is towards the front of the object, that makes that the object's right side, not it's left side! So, LightWave didn't do it right, but 3D Studio doesn't either. So, you have two wrong methods that don't match up with each other.
While we're orienting ourselves to this new world, lets see what else they screwed up. Hmmmm... That blue line that goes upwards? It's labeled 'Z'? So, the 'Z' axis is what is called the Y axis on LightWave, and the 'Y' axis is what is called the 'Z' axis on LightWave.
You have to wonder why they did this, because everybody in the world knows that the X axis of any graph on the planet goes left to right, while the 'Y' axis of any graph goes up and down. That means that the Z axis of any graph goes into and out of the world. That's always the way a graph has been, everybody on the planet knows that, so WHY DID 3D STUDIO MAX PUT THE Z AXIS SO IT GOES UP AND DOWN?
Why these guys do these things I haven't a clue, but they did it so we're stuck with it.
But, you at least have oriented yourself a bit. So, lets make room for the camera.
We will want to place the camera 'in front' of our pyramid.
First, get rid of the sphere. Click on the 'Select Object' arrow and it will turn yellow.
Click on the sphere. The corners should turn into white lines, and two red arrows should come from the center of the sphere. Press the 'Delete' key to get rid of it.
Right click each viewport to select it, then press the 'z' key to zoom in and out or 'CTRL-p' to pan side to side / up and down. Arrange all four viewports so they look about like this...
If you remember your orientation, I have now made room for the camera in each viewport. In the 'Top' viewport I moved the pyramid 'Upwards' relative to the viewport, thus making room in the 'Front' which is at the bottom of that View.
In the 'Left' viewport, I moved the pyramid to the left, thus opening up space at the 'front' again (the righthand side of that viewport).
And, the 'Front' viewport won't be affected much because front doesn't mean as much in that viewport.
I'm now ready to place the camera.
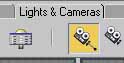
Click on the 'Lights & Cameras' tab in the 'Tab Panel', and pick the icon called 'Target Camera'.
Click where you wish the camera to be in the 'Top' viewport. Keep the mouse down and drag upwards. A bluish cone appears. This is the camera's field of view.
INSTANTLY PICK THE 'Select and Move' tool. Since you will almost always have to adjust the angle of the camera, this is a thing you should get in the habbit of doing.
If you don't do this, you will accidently place another camera in the scene. You could also pick the 'Select Object' tool, but the 'Select and Move' tool is handier. It is very easy to accidently place a nearly zero-sized camera otherwise, which can cause you problems later on. Don't put it off. Any time you place a camera, choose the 'Select and Move' tool immediately afterwards so you won't forget.
Move the blue crosses in appropriate viewports to adjust the angles of the camera.
After you have created one camera, you can click in the perspective window and press 'c' key to turn that viewport into a camera view instead of a perspective view. This will let you move the camera into position easier.
CREATING A LIGHT FOR THE SCENE
Next, can't see anything without a light, so lets add a light to the scene.
Make sure that the 'Lights & Cameras' tab is chosen and click on the 'Omni Light' button.
Click with the left mouse button in the 'Top' viewport so that the light is to the front-right of the scene. Choose the 'Select and Move' button and move the light in each viewport, watching the lighting results in the Camera01 viewport in the lower right corner as you move it. If you choose the 'Select Object' Arrow and click away from the light, or click on another object, the light will turn yellow.
ADDING A TEXTURE TO THE PYRAMID
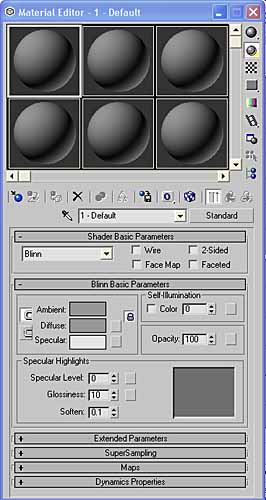
Lets say it is a brushed aluminum pyramid. Click on the 'Material Editor' in the 'Main Toolbar'.
That will bring up the 'Material Editor Panel'. The upper-left sphere will be highlit with a white border.
Click on the 'Get Material' button. 
In the 'Material/Map Browser' panel, choose 'Mtl Library' radio button from the 'Browse From' section. Scroll down and double-click with the left mouse button on 'Metal_Chrome [Standard]' or another texture that you like. The effect will appear on the first sphere.
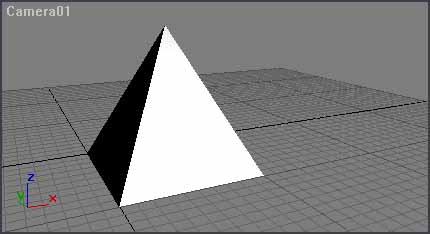
With the 'Material Editor Panel' still open, go to the 'Main Toolbar' and choose the 'Select Object' Arrow. Click on the pyramid to select it and over in the 'Material Editor Panel' the third icon ('Assign Material to Selection') will no longer be be ghosted. 
The minute that you click on that icon, the pyramid will probably change to black and white. Even without rendering, you can see that the contrast is way too high. All light is washed out on the lit side.
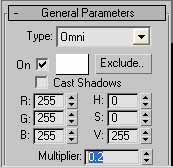
From the 'Main Toolbar' make sure that the 'Select Object' Arrow is still selected and click on the light. In the 'Command Panel' click on the 'Modify' button.
Under the 'General Parameters' Roll-out, under 'Multiplier', click and drag inside the text gadget and change 1.0 to .2. The pyramid will turn dark in the Camera01 window.
Press 'F9' and it will render the pyramid and show you the lighting effects and texture.
The result isn't too bad, but I think I'll put one more omni light at the back-left and bring its value down to .4
Again, I press 'F9' to render.
This is where you tweak the positions of the two lights a bit, pressing 'F9' each time so you can see the changes until you like the result. Then do a 'File->Save As...' and give it a new name of 'pyramid2.max'
EXPERIMENTS WITH THE APPLET
So, to export a scene from 3D Studio Max, First you set up the object, you set a target camera, you set a light, you set a material for the surface.
Through experiment it turns out that oftentimes Materials do NOT translate well. Apparently some materials are created by using a surface texture, but at other times no surface texture picture is used at all. If no surface texture picture is used, but procedures are used to create the texture, instead, then the applet can't find an image to make a .jpg from and fails without telling you an error (sloppy programming).
So, the Metal_Chrome Material that I just chose doesn't save out a .jpg image. When I tried the one below it, Metal_Dark_Gold, that one also didn't work. Whenever I used a Material that it didn't like, it wouldn't save out the a .jpg image when you saved the ADG file and no material would appear on the pyramid in either the viewer, or the the applet.
Another problem I ran into as I experimented was, sometimes no pyramid at all would appear after I had written out the ADG file and tried it with the applet. I don't know what caused that, as no error would be generated (poorly written applet).
HOW TO CONVERT FROM MAX TO ADG FORMAT
There were no proper instructions, and the instructions they had were incorrect but I succeeded. After you have set up a target camera and light, go to the 'Utilities' Panel in the 'Command Panel'. Click on the 'More' button. You select 'ADG Exporter Viewer' and controls appear in the bottom section of the 'Command Panel' (you may have to scroll it).
You click on the button which says 'Put Data into Viewer' and it calls up the 'ADG Viewer v4.0' that you had installed, earlier.
The lighting in the Viewer window is sometimes too dark, yet when you save the pyramid as an .ADG file, it looks fine.
To succeed in having the applet properly pivot the pyramid, the pyramid name must be highlit just before you do a 'File->Save...'. Give it a name (you can put .adg as the extension if you want).
Make sure the checkmark is on by 'Save JPEG Texture Map'. If it doesn't save a texture.jpg image for it, then that Material won't work, and you'll have to try another.
Then, you paste in some HTML code into your HTML file. Here is the entire code for the HTML.
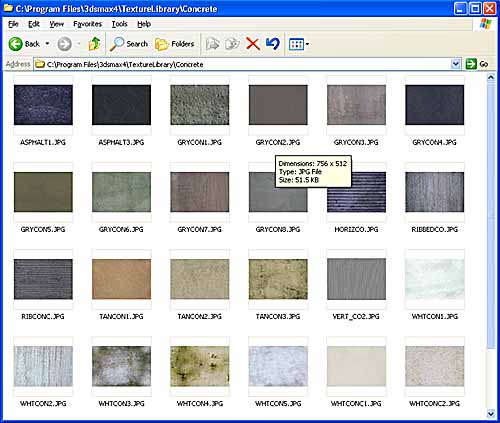
I didn't want to just have a plain background, so I searched for a texture in my C:\Program Files\3dStudio4\TextureLibrary\Concrete\ folder.
I used a texture called GRYCON4.jpg. I brought it into Photoshop and saved it as a JPEG image with a quality level of 1.
You can change the width and height that the applet's display area will use. 320 x 240 is good, 500 x 375 is not as fast, but excellent and 640 x 480 tends to be jerky.
CODE THAT YOU USE IN YOUR HTML
<HTML>
<HEAD>
<TITLE>Webpage Titlebar Text Goes Here</TITLE>
<META NAME="Description" CONTENT="Webpage Description">
<META NAME="Classification" CONTENT="Java Applet">
</HEAD>
<BODY BGCOLOR="black">
<CENTER>
<FONT COLOR="white">Click left mouse and drag.</FONT> <BR><BR>
<BR><BR>
<APPLET CODE="ADGview.class" WIDTH=500 HEIGHT=375>
<param name=Archive VALUE="ADGview.jar">
<param name=Data VALUE="pyramid.adg">
<param name=Background VALUE="GRYCON4.jpg">
<param name=BackColor VALUE="#FFFFFF">
</APPLET>
</CENTER>
</BODY>
</HTML>
WHAT FILES DO YOU PUT ON THE WEBSITE?
If you saved the file as 'MyFile' from the viewer and saved your HTML file as MyFile.HTML. All files must be in the same directory as the .HTML file.
The files you will need to put on your website are:
1. The 'MyFile.HTML' file
2. The 'MyFile.ADG'
3. 'ADGview.JAR' (taken from the ADG Viewer folder)
4. The 'the_texture.JPG' image that the viewer wrote.
5. The 'background.JPG' texture if you used one.
THE APPLET IN OPERATION
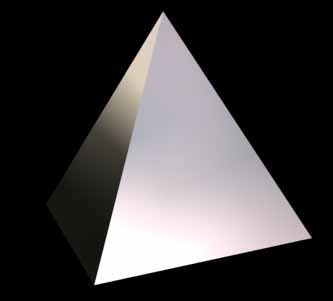
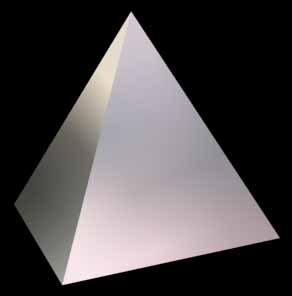
Here are two successful versions of the pyramid. Since the pyramid is only 5 polygons and one texture, it seems to rotate poorly.
I chose a size of 500 wide by 375 tall.
Because of the nature of applets, it is best to place an applet on its own webpage. As a web page loads, if it has to load numerous images first, it has to figure out the heights of each image as it draws the page.
Each time the applet starts itself a new picture will be drawn. As the next picture loads, the browser will have to change the dimensions of the web page. This will cause the applet to have to initiate again.
This constant state of restarting and redrawing can make the applet crash, so it's best to place an applet on its own page with few graphics of its own.
Here is the completed rotating pyramid with metal rust material texture. Metal Rust Material
Close the window once you're done with it.
Previous
Table of Contents
Home
Next
|