
|
|
||
|
40. Deinonychus Dinosaur 1 - Plastilina to Backdrops |
||
 Creating a 3D Scultpure Dinosaur From the Plasticine Model Next, from the plasticine model I will create a 3D dinosaur. Equipment needed: 1. 35 mm Camera. I used a Nikon F3 camera with a 60 mm AF Micro Nikkor lens.I draw a center line down the center of the model's base in each direction using the length of the model for my determination, then use those lines when setting up the camera so it'll be perfectly centered. Next, I line up the camera with the center of the model, top-to-bottom and view the result in the single-lens relflex viewfinder. A single-lens-reflex camera has a mirrow in the viewfinder which flips out of the way when you take the picture. It allows me to see exactly what the edges will look like so I won't chop off the tail or nose when I take the photo. You now know the drill. First, I'll need to create a side view, top view and front view of the dinosaur. I set two lights on light stands and take rolls of 35 mm film at different F stops and with different placements of the lights. When I set up lights, just as when I set up lights in a 3D Sculpture program, generally one main light goes towards the front and off to one side to the left. Ideally, you'd use three lights. If I had three lights (which I don't) I'd place a second one to the right and put it on less power and the third light would go as a backlight at about a 45 degree angle behind the object. In my case, I use one light as the 'Master' light which I place to the right and set to 240 Watts/Second. The second light, I turn on it's strobe feature so it will sync with the master light and set it at half the Watt/Seconds of the Master light (120 Watt/Seconds). I aim both lights backward, not toward the model, and use reflecting umbrellas which have a reflective interior. This will create softer lighting. I do this with both lights. For the backlight I use a reflecting circle of coated nylon (which is designed for doing reflected backlight) and prop it at a right angle behind my model (you could just use a piece of white mat board). Besides the front, side and top views, I also do a back view which I'll use in the 'Front' viewport when I do it from that angle. I repeat this process, making the right-hand light the Master light and the left one the Slave just so I'll have variety when I make my final choices of which image is best. I also try some images with only one front light and a backlight with no reflected backlight. I later determine that the film I've shot which have two lights and a reflected backlight work best. You should keep a log of each shot you did, what F-Stops you used, and what angles and powers you placed the lights at so later you'll be able to understand which were the best choices you made. After developing the film, I choose which shots best illustrate the contours and scan them into my computer using a Nikon Coolscan III 35 mm scanner. I paste the four images that I've determined to best represent the contours into one image using Photoshop so the tip of the nose of the top view lines up with the tip of the nose in the side view, etc. 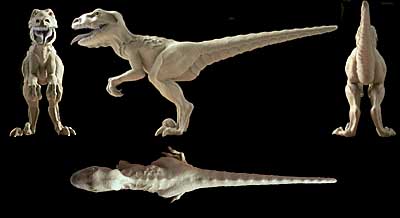 Next, I get rid of all perspective differences (such as the great height of the tip of the tail in the back view) using Photoshop. I create red keylines to help me match up the side-view nostril to the front-view, etc. as I've shown you before. Then, I put a guide line down the center of each view, throw away the darker side of each view, and mirror each side of the dinosaur so it's symmetrical.  Notice the slight differences after I've done this. The tail now matches up in the back view with the side view as does the head (which I had to fake completely in the back view by looking at the model, itself). Also note that the feet in the top view have been moved forward to match with the feet in the side view. Although there don't seem to be many differences between these two pictures, you'd be amazed at how many things have to be nudged a little so they will match up view-for-view. THe more work you put into it here, the less problems you'll have when you do the actual 3D sculpture. Since I didn't actually form teeth in my model, I draw teeth on a separate layer of the side-view using an actual scan from a Deinonychus fossil, then scaling, rotating them until they match to the red gumline I chose. 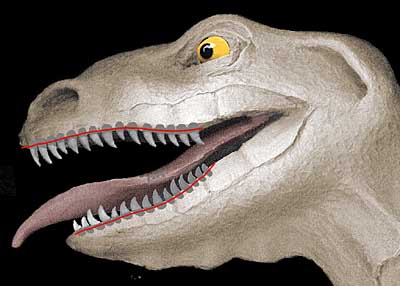 Once I think everything matches up well enough, I crop each view so the pixels exactly come to the edges of the view images. If there is any slight discrepancy between the number of pixels wide in the front view as opposed with the top view, I force the number of pixels to be equal with Photoshop's 'Image->Size' feature. In the end, the side view image is 851 deep x 408 high pixels.  The front view is 213 wide x 408 high pixels (408 matching the 408 of the side-view).  The top view is 213 x 851 pixels (213 matching the 213 of the front view). I also rotate the top image so the nose points downward so it'll be proper when I import it as a backdrop into LightWave.  And, the final 'Back' view will be the same size as the front image.  Next, I'll be creating a dinosaur from these images using LightWave Modeler. |
||
