|
This page contains basic instructions for tying Salmon and Steelhead flies. We are presuming that the tyer has some experience with the basics of fly tying. If not, basic fly tying can be learned from many fine authors or by taking classes, but is difficult to teach on the web. As with everything, there is nothing that substitutes for experience, so sometimes you just have to dive into it, then practice, practice, practice.
Modern day Salmon and Steelhead flies have evolved into simpler hairwing, reduced patterns and other variations that have proven very successful in catching fish. The older, Classic Atlantic Salmon Fly versions, fully dressed, require various colored feathers of large or exotic birds, blended together to make the wing, but they are the original flies on which all others are based. There are many tiers, that still tie the classic flies, and it is truly an art. The instructions here are based on the classic version of tying but leave out some details of tying the complicated wings. These instructions should, however, enable you to tie all the flies in these pages.
OOPS!
You forgot to upload swfobject.js ! You must upload this file for your form to work.
DETAILED INSTRUCTIONS
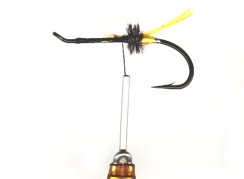
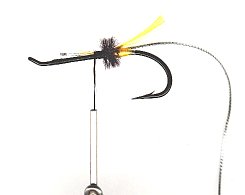
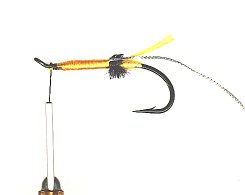
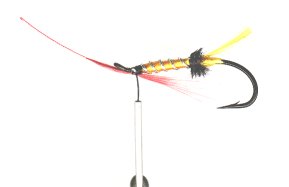
Click on Thumbnail Images or Highlighted Words for expanded view and explanation.
Begin by placing the hook in the fly-tying vise. Spiral thread onto the hook shank, starting
just before the shank and winding to it.
The Tag and Tip
 First tie in the
tip material
(usually about two or three inches of it). Hold one end of the tip material
(usually tinsel) diagonally between the hook shank and the thread. Bind down the tinsel
about four turns of the thread. Wind the tinsel to the rear, into the bend
and then back to the thread. Secure the tinsel with the thread and clip the
excess. The tip should be about 1/8 inch long. Cut a single strand of the
tag material (often
floss , but not always). Tie that in where you left off from the tip.
Let the thread dangle from the bobbin. Wind the floss to the rear, covering
part of the tip so that only about a sixteenth of the tip is exposed.
Wind the floss forward to the point where you left the thread. Tie down the
floss (tag) and clip the excess. The tag should extend to a point directly
above the point of the hook. First tie in the
tip material
(usually about two or three inches of it). Hold one end of the tip material
(usually tinsel) diagonally between the hook shank and the thread. Bind down the tinsel
about four turns of the thread. Wind the tinsel to the rear, into the bend
and then back to the thread. Secure the tinsel with the thread and clip the
excess. The tip should be about 1/8 inch long. Cut a single strand of the
tag material (often
floss , but not always). Tie that in where you left off from the tip.
Let the thread dangle from the bobbin. Wind the floss to the rear, covering
part of the tip so that only about a sixteenth of the tip is exposed.
Wind the floss forward to the point where you left the thread. Tie down the
floss (tag) and clip the excess. The tag should extend to a point directly
above the point of the hook.
The Tail
 Next comes the tail. Place the tail material
on top of the hook shank at the place where the thread is dangling, making
sure that the natural curvature of the material bends up, away from bend of
the hook. Tie in with three turns of the thread over the same area. For a
dual tail, tie in the second tail material over the top of the first. For a
dual tail, the second material should cover half the distance to the end of
the first tail material. Next comes the tail. Place the tail material
on top of the hook shank at the place where the thread is dangling, making
sure that the natural curvature of the material bends up, away from bend of
the hook. Tie in with three turns of the thread over the same area. For a
dual tail, tie in the second tail material over the top of the first. For a
dual tail, the second material should cover half the distance to the end of
the first tail material.
The Butt
 Next tie in the butt material (often ostrich or
peacock herl) directly over the area where the tail was secured. Wind about
three turns forward, covering the area over the secured thread holding the
tail. The butt should now lie directly over the point of the hook. Next tie in the butt material (often ostrich or
peacock herl) directly over the area where the tail was secured. Wind about
three turns forward, covering the area over the secured thread holding the
tail. The butt should now lie directly over the point of the hook.
The Ribbing
 Next tie
in a five inch piece of the ribbing material (often flat or oval tinsel).
With oval tinsel, it is necessary to expose some of the cotton core at the
end. This is the material that will be tied to the hook shank to prevent
too much bulk at the tie. Tie this directly in front of the butt. Hold the
ribbing material out of the way with a material clip. Next tie
in a five inch piece of the ribbing material (often flat or oval tinsel).
With oval tinsel, it is necessary to expose some of the cotton core at the
end. This is the material that will be tied to the hook shank to prevent
too much bulk at the tie. Tie this directly in front of the butt. Hold the
ribbing material out of the way with a material clip.
The Body
 Cut a section of body material(often floss or fur) about six or seven inches long. Note that if fur is the body material you will have to use one of several methods to secure it to the thread. Wind it slightly to the rear, covering any exposed thread or bulky areas, and then wind it forward, making a slightly tapered body, covering about 1/4 inch from the hook eye, securing it with a few
winds of the thread. Cut a section of body material(often floss or fur) about six or seven inches long. Note that if fur is the body material you will have to use one of several methods to secure it to the thread. Wind it slightly to the rear, covering any exposed thread or bulky areas, and then wind it forward, making a slightly tapered body, covering about 1/4 inch from the hook eye, securing it with a few
winds of the thread.
 Note there are various body styles. Some call for
two-toned bodies, some call for hackled bodies. If you use common sense, you
should be able to determine at what point to tie in these materials and wind
them on to the body. Now wind the ribbing material forward in an open spiral
of about five or six turns. Note there are various body styles. Some call for
two-toned bodies, some call for hackled bodies. If you use common sense, you
should be able to determine at what point to tie in these materials and wind
them on to the body. Now wind the ribbing material forward in an open spiral
of about five or six turns.
The Throat or Collar
 Next the throat is tied in. This usually made
with a saddle or neck hackle feather. First fold it and tie it in tip end
first at the point where the thread is dangling. Wind it around as a collar as you would for a wet fly. The Charles DeDeo method, an alternate way to tie in the throat is illustrated by clicking on the thumbnail. The throat or collar should be extend about midway
along the length of the hook shank. Next the throat is tied in. This usually made
with a saddle or neck hackle feather. First fold it and tie it in tip end
first at the point where the thread is dangling. Wind it around as a collar as you would for a wet fly. The Charles DeDeo method, an alternate way to tie in the throat is illustrated by clicking on the thumbnail. The throat or collar should be extend about midway
along the length of the hook shank.
The Wing
 Next the wing is tied in. This is
probably the area where the most variation is encountered, so use your
common sense again to determine the correct order and amounts. We will assume for this example that we are using mallard flank sections or similar material. Cut two matching mallard sections as downwings, match them and place over the top of the hook. Tie them in
over the point on the hook shank where the collar was secured. Clip the
excess ends at a taper toward the eye so that you can finish with a neatly tapered head. Next the wing is tied in. This is
probably the area where the most variation is encountered, so use your
common sense again to determine the correct order and amounts. We will assume for this example that we are using mallard flank sections or similar material. Cut two matching mallard sections as downwings, match them and place over the top of the hook. Tie them in
over the point on the hook shank where the collar was secured. Clip the
excess ends at a taper toward the eye so that you can finish with a neatly tapered head.
The Shoulder
One of the last things to tie in, if it is called for, is the
shoulder (usually jungle cock, similar material or an imitation). Select two of medium size. Place one on one side of the wings. Tie it in at that point. Take the other cheek feather and tie on the opposite side so that it matches the placement of the other.
Finishing The Fly
 Now wind a neatly tapered head forward to the eye. Whip finish the thread, cut it, and finish with a few coats of lacquer or varnish for the affect you want (usually a smooth, glossy head). Now wind a neatly tapered head forward to the eye. Whip finish the thread, cut it, and finish with a few coats of lacquer or varnish for the affect you want (usually a smooth, glossy head).
SUMARIZED INSTRUCTIONS
(See Proportion Chart)
- Start working thread and tie in the
tip
at end of hook shank
- Wind tip on hook shank about 1/8
inch and tie off. Tie in
tag material.
- Wind tag material forward and tie off.
- Set
tail material on
hook.
Tie down tail material.
- Tie in
butt material. Wind forward two or three turns and tie off.
- Tie in
ribbing material.
- Wind thread forward to just before eye of hook and tie in
body material.
- Wind body material backward and forward tapering body. Tie off.
- Wind ribbing material and tie off.
- Cut hackle section and tie in. Wind to create
throat.
- Set pair of matched
wings or other wing material on hook. Tie off.
- Complete by setting
topping on top of wings. Tie off.
- Whip-finish
head and lacquer.
|
Proportion Chart |
| Tip |
The tip starts on the shank above the barb point and proceeds to
to just above, but before the hook point. |
| Tag |
Two or three turns in front of the tag usually floss to the point just above
the hook point. |
| Tail |
Length is 1-1/2 of the hook gap. |
| Butt |
3-5 wraps of material: usually ostrich, peacock herl, wool etc.
|
| Body |
From the butt to 1 hook-eye length back from the head. |
| Ribbing |
Generally, 5 or 6 wraps from butt to head |
Wing |
Length is from the head to the end of the tail. |
| Topping |
Length extends from the head to the end of the wing. |
Shoulder |
Length is approximately 2/3 the length of the wing, or to the butt. |
Cheek |
Length is generally 1/2 the length of the shoulder. |
Horns |
Length equal to intersection of topping and the tail. |
|
Throat |
Length should extend about midway along the hook shank. |
|
Head |
Evenly tapered and not too large. The smaller the better. Finish with gloss coat on heads tied with thread. |

|