|
|
|
|
|
|
|||||||||||||
|
|
|
|
|||||||||||||||
|
|
Salmonfly.Net |
|
|
|
|||||||||||||
|
|
|||||||||||||||||
|
|
Intruders – Tube Fly
Style |
||||||||||||||||
|
|
|
|
By
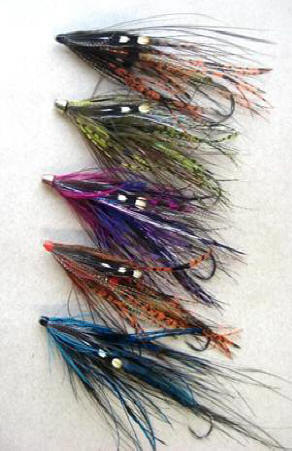
No other pattern in recent years has dominated the west coast
steelhead and salmon scene as much as the Intruder. In fact, these patterns
have proven to be so effective that they are now taking the Great Lakes by
storm and have even most recently made the jump across the
Anyone who has closely followed the development of the Intruder knows
that every tier has there own take on what works best. I think most fly tyers
would agree that the word Intruder is best used to describe a style of fly
rather than a specific pattern. The most obvious characteristic with all
Intruders is
there size – they are huge compared to a traditional steelhead or salmon fly. The
next qualification for a fly to be an “Intruder” is for the pattern to look
ridiculously buggy. Long flowing hackle like ostrich and rhea barbs, blue eared
pheasant, large heron, Lady Amherst center tail fibers, and long, slim grizzly
hackles are common favorites appearing on these fantastic patterns. The last
common attribute to the majority of Intruder flies is substantial weight. The
first intruders almost always had dumbbell eyes at the front of the fly to
punch through heavier currents. When added up, the weight of the eyes, hook
shank, and trailing hook made a
“plunker” of a fly. Most current
Intruders patterns also have a substantial shot of weight to them Intruder flies were (and still often are) tied on large sized hooks
that have had the hook point and bend cut off with wire cutters. A trailing
hook is then tied in with fire wire or some other sort of braided line that is
first tied down on a bed of tying thread and then glued over the shank of the
broken off hook. Intruders are also sometimes tied using Waddington Shanks and
trailing hooks. This cleaned up the look of the Intruder, having a nice eyelet
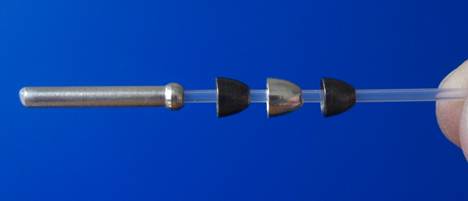
at the back of the shank rather than just a cut off point. The latest styles of Intruders are now being seen more and more as tube flies. Using tubes for an already long and webby pattern makes sense. Most metal tubing can be ordered in almost any length, some over three inches long. Tubes also come in different types, plastic, aluminum, copper, brass, and stainless steel. This puts the weight of the final pattern completely in your hands. The weight that a metal tube offers over a standard hook shank or Waddington allows a tyer to have a weighted pattern without the dumbbell eyes that can drastically alter the balance of the fly. I believe that the more uniformly a fly sinks, the better your chance is of both a hit and actually hooking the fish that hit. Tubes achieve this uniform sinking much easier than the standard trailing hook and dumbbell eye presentation. When tubes are used, body cones can also be incorporated for a completely balanced fly with a fantastic amount of weight. That was the driving force behind the development of the Russian Intruder series
Many like the ease of hook replacement with Intruder Tubes too.
It’s true that a hook can be replaced with standard trailing hook setups by
resnelling the loop created by the braided line. In cold weather, with shaky
hands, this can sometimes prove challenging. With tubes, it’s a matter of tying
on another hook and synching it into the junction tube. Using a tube for your
Intruders also gives you the well documented advantage with all tube flies –
they last longer because when a fish is hooked the hook usually disengages from
the pattern and the fly sees less time in the mouth of the fish. With standard
Intruders, the hook is absolutely replaceable but the pattern still often
remains in the teeth of a fish during the fight. With some intruders taking well
over half an hour each to tie and costing as much as 8 or 10 dollars in a shop,
saving your pattern from the mouth of a fish is important. After all, anyone
who has tied up many Intruders knows that tying a dozen up is not the same as
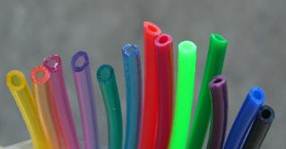
tying a few Wooly Buggers for your pals! Using tubes for Intruders also allows you to add a splash of color
to the back of the fly. I use Flex Tube for my junction tubing,
it comes in a wide range of colors that really adds to the overall look of the
fly. I have friends that also like to incorporate a colored hook that also compliments
(to use a term from the fashion world) the flies
colors. The best part with using Flex Tube is that the Flex Tube is only being
used as your junction tubing – the tube that connects your pattern to your
hook. Junction tube, unless you tie it right onto your metal tube, is
interchangeable. I often will fish my Intruder Tubes with different colors of
Flex Tube, it is a really fast way to make some subtle
but sometimes effective changes while on the river.
Flex Tube looks great on the back of
Intruders
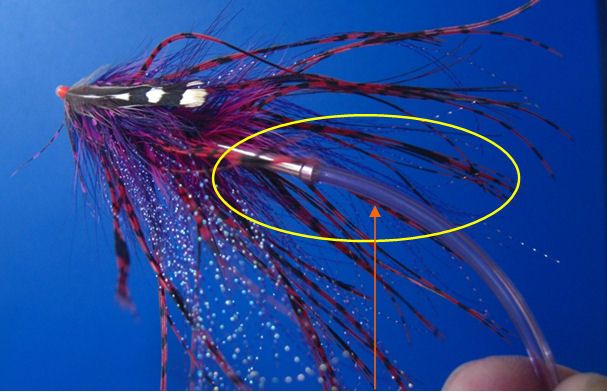
By far the biggest advantage to using tubes for Intruders though is
the ability to have your hook not foul around your wing and tail. With a
standard trailing hook, often a pattern can get twisted up and wrap around
itself. This is because the hook is only being held away from the pattern by a
floppy braided line. When using a tube, the junction tube can be cut long and
allow the hook to be held far back from the flowing parts of the pattern.
The Flex Tube holds the hook back and away
from the trailing materials so there is less chance of your hook wrapping
around the pattern. I believe this more rigid presentation allows your pattern to
retain its shape better in the water too. When a standard Intruder is sinking
for instance, it is possible for the hook to be hanging way lower than the
actual pattern. Using a tube with a Flex Tube back allows your hook to sink
parallel with the pattern and have the hook set behind the fly rather than
under it. I believe this makes for a better hook up percentage.
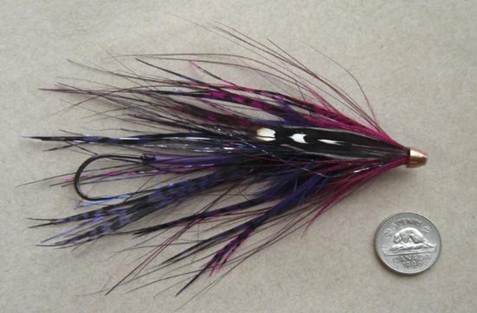
In this picture, the Intruder Tube is being
held in the fly tying vise by the hook. Though there is some “give” in the Flex
Tube, it does hold the hook back in line with the pattern, right where a fish would
take it from. It is tempting to think that everything new, including ways to tie
flies, is always better than the old way of doing things. Anyone who has been
around tying for a while will tell you that newer is not always better. By no
means in this article did I want to extend the sentiment that using tubes is a
better way to tie Intruder style. I see some advantages to the use of tubes,
though I also recognize that getting into tying tubes can be a bit intimidating
to a lot of tiers. I can say though that I have yet to meet an experienced
flytyer that did not fully embrace the advantages when they began tying
“tubular”.
Here are a few recipes of my favorite
Intruder style tubes………
GENERAL PRACTITIONER INTRUDER – LIGHT
Tube:
1.5
or 2 inch small diameter metal tube, I prefer stainless steel. Junction tube is
transparent orange Flex Tube.
Thread:
Fire Orange 6/0
Tail:
several strands of orange Lady Amherst center tail
fibers. Tie them in spaced around the tube. Also one dyed orange heron hackle
or B.E. Pheasant.
Rear Body:
Back 2/3 of tube - Black 4 strand floss with a fine
silver rib
Mid Hackle:
several
strands of long orange Lady Amherst center tail fibers plus several strands of
pearlescent Crystal Flash
Rear Body:
Front
1/3 of tube – Orange Seals fur dubbing (or substitute) with a large dyed orange
heron (or substitute) hackle palmered thru.
Hackle:
2 orange large heron (or substitute) hackle dyed
orange
Throat:
several
strands of very long orange Lady Amherst center tail fibers plus several
strands of pearlescent Crystal Flash
Collar:
a
large mallard flank feather dyed hot orange. Strip it on one side.
Wing:
a large GP Tippet cut in a “v” like a regular
General Practitioner pattern. 4 large Golden Pheasant Rump Feathers, either
natural red or dyed orange. Cheeks: long jungle cock
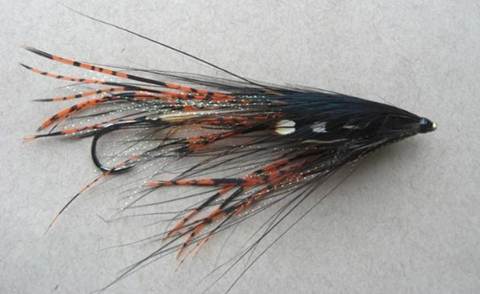
GENERAL PRACTITIONER INTRUDER – DARK
Tube:
1.5
or 2 inch small diameter metal tube, I prefer stainless steel.
Junction tube is transparent orange Flex Tube.
Thread:
Black 6/0
Tail:
several strands of orange Lady Amherst center tail
fibers. Tie them in spaced around the tube. Also one dyed black heron hackle or
B.E. Pheasant.
Rear Body:
Back 2/3 of tube - Black 4 strand floss with a fine
silver rib
Mid Hackle:
several
strands of long orange Lady Amherst center tail fibers plus several strands of
pearlescent Crystal Flash
Rear Body:
Front
1/3 of tube – Black Seals fur dubbing (or substitute) with a large dyed black
heron (or substitute) hackle palmered thru.
Hackle:
2 black heron (or substitute) hackle
Throat:
several strands of very long orange Lady Amherst
center tail fibers plus several strands of pearlescent Crystal Flash
Collar:
a
large mallard flank feather (natural). Strip it on one side.
Wing:
a large GP Tippet cut in a “v” like a regular
General Practitioner pattern. 4 large Golden Pheasant Rump Feathers, dyed
black.
Cheeks:
long jungle
cock
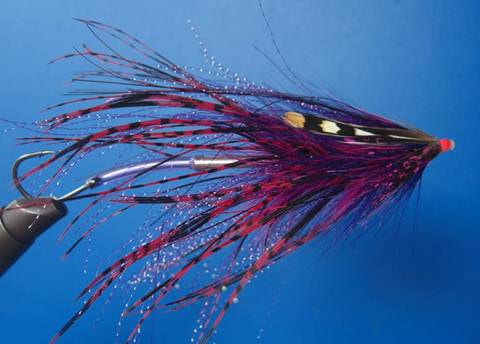
PURPLE INTRUDER
Tube:
1.5
or 2 inch small diameter metal tube, I prefer stainless steel.
Junction tube is transparent purple Flex Tube. Only melt the inside liner tube
on the back of the tube. Leave a ¼ inch of extra liner tube out the front of
the metal tube. You will nee this later to attach your cone.
Thread:
Black 6/0
Tail:
several strands of purple Lady Amherst center tail
fibers. Tie them in spaced around the tube. Also one dyed purple heron hackle
or B.E. Pheasant.
Rear Body:
Back 2/3 of tube - Purple 4 strand floss with a
fine silver rib
Mid Hackle:
several
strands of long purple Lady Amherst center tail fibers plus several strands of
purple, silver, and pink Flashabou
Rear Body:
Front
1/3 of tube – Purple or Black Seals fur dubbing (or substitute) with a large
dyed purple heron (or substitute) hackle palmered thru.
Hackle:
2 purple heron (or substitute) hackle
Collar:
a
large pink mallard flank feather. Strip it on one side.
Cheeks:
long jungle
cock Head: copper cone.
OLIVE INTRUDER
Tube:
1.5
or 2 inch small diameter metal tube, I prefer stainless steele.
Junction tube is transparent green Flex Tube. Only melt the inside liner tube
on the back of the tube. Leave a ¼ inch of extra liner tube out the front of
the metal tube. You will nee this later to attach your cone.
Thread:
Black 6/0
Tail:
several strands of olive Lady Amherst center tail
fibers. Tie them in spaced around the tube. Also one dyed olive heron hackle or
B.E. Pheasant.
Rear Body:
Back 2/3 of tube - Chartreuse 4 strand floss with a
fine silver rib
Mid Hackle:
several
strands of long olive Lady Amherst center tail fibers plus several strands of
green, silver, and copper Flashabou
Rear Body:
Front
1/3 of tube – olive or green Seals fur dubbing (or substitute) with a large
dyed olive heron (or substitute) hackle palmered thru.
Hackle:
2 olive heron (or substitute) hackle
Collar:
a
large chartreuse mallard flank feather. Strip it on one side.
Cheeks:
long jungle
cock
Head:
silver cone. [Page 2 - Russian Intruder Tubes | Russian Bullet Tubes Article]
April 2010
| ||||||||||||||