Bruceee's Sandpit
Web Design with SiteSpinner
Where Do I Look?
If you have used the SiteSpinner defaults for published folders, you will find the images in these folders under the root of your published project:
- /geometry -- has images for objects and geometries that SiteSpinner has created from scratch.
- /image -- has the thumbnail images and the like that SiteSpinner has transformed from other images.
I find it easier to look instead in the preview folder. Then I find all the images of interest in the /geometry folder. I find this so much more convenient, that I will assume for the rest of this page that you too, will work with the preview folder and not the publish folder.
What do the Names Mean?
The first time you look at the image names, they will appear strange indeed. But there is a pattern in all these names. To find out how to decode object names, see this FAQ.
In general, anything with a 'geo' prefix is likely to be used on multiple pages -- a clone or an include. Anything with an 'obj' prefix will also have a page number embedded -- it is only ever used only on one page. The page number will appear like this: 'p5'. Even if you have renamed the page, it will be number 5 in the drop down page list that appears both in the Page Editor and on your top toolbar.
Cleaning Up Images
When you publish your project, it is always useful to examine the files in the published project. Especially look at the file sizes and examine the images. In Win XP, I view in thumbnail view. Even though I am now aware of some traps, I am still surprised by images that:
- are much larger in file size than I expect
- are duplicates of other images
- have the same apparent shade but which have different names for the shade
- don't even appear on any page when viewed in a browser
These are not fatal problems, so you can ignore them. However apart from the housekeeping aspects, these problems tend to:
- needlessly use up bandwidth
- make your pages slower to load (especially for users on slow dial-up connections)
This page will concentrate on how to find and remove duplicates.
OK Found It - Now What?
If you have the same duplication appearing across multiple pages, make all the duplicates includes or clones. You can turn an existing copy into a clone by setting the geometry so that all clones have the same geometry. (At least, I think that is the case. I don't know if you can turn a copy into an include -- if you know please tell.)
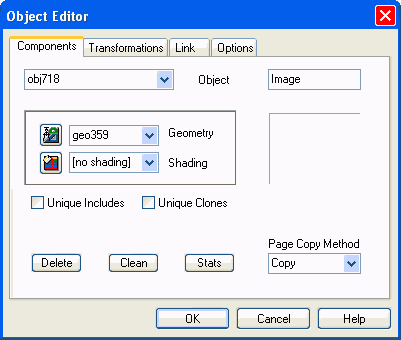
Change the geometry from the Object Editor or the Quick Editor.
On the Object Editor > Components tab, uncheck the 'Unique Includes' and 'Unique Clones' checkboxes. See image below.
Then type the object number e.g. 'obj780', into the Object Editor. With luck that object will now be highlighted on the page and by scrolling up and down the page you should be able to find it. Even if it is behind some other object, it will still be highlighted.
Haaalp!! I Can't Find It
If you can't find the object with a casual inspection of your page, there are some other possibilities to be aware of:
- the object is part of a group
- the object is outside the visible boundaries of your page
- another possibility I have not thought of yet!
The Object is Part of a Group
If the object is part of a group, there is no indication on your work page that this is the case. Neither the group nor the object itself are highlighted. However if you open the Object Editor > Components tab then the 'Stats' button, the truth will out:
In this case, as shown on the second line of the statistics, the object is part of a group whose name is obj672.
The Object is Outside Your Work Area
Although you should not normally normally find an object outside your work area it, can happen. I have on occasion found large negative numbers as the x and y coordinates of objects. In this state, they will never display on your workpage.
You can check this state by opening the Object Editor, set the object name of interest, then click on the Transformations tab and examine Horizontal and Vertical Positions reported there. These should be within the boundaries of your workpage. If not, set some new coordinates for these horizontal and vertical positions. I suggest something like (300:300) as that will show conveniently near the top of your page.
Other Tips
You can safely delete the contents of your preview folder. It is a good idea to do this if there is any doubt that an image has been created by the latest preview. (Exception -- if you have manually copied in some external files to the preview folder, don't delete those.)
By deleting the whole geometry folder then doing a preview of either the whole project or a single page, you can quickly check the effects of a change you make. For larger projects, you will probably find it easier to treat a single page at a time.
If you have used thumbnails as links to popup larger images, expect to find thumbnails that look the same as your larger images. These are legitimate duplicates -- don't try to remove them!
The choice of image format can have big influence on the size of your images. See image formats.
If you have Javascript which is duplicated on two or more pages, consider moving it to a separate include file.
Images the same but different sizes (exception -- for thumbnails you expect to have a small image and a duplicate larger image). But see the page on scaling images
Flat rectangles and lines. Consider making them into HTML rectangles.
If trying these techniques for the first time, concentrate on the biggest and most numerous duplicates. Fixing those first will give you the biggest bang for the buck.
Reuse an existing geometry
Is an invisible object part of a group?
Geometry
The technique to find the source of an image prefixed with 'geo' can be a little more brutish. Recall that such images are includes or clones and as such are likely to be included on one or more pages -- to start with you don't know which pages.
Of course you may have a good idea which page uses the geometry -- that is a start.
The technique I suggest is to delete the geo image while previewing the project in your browser. Just the same as for deleting object images covered above.
If you have a duplicate geometry to remove, the technique is to identify which objects use the geometry, then modify them to use the alternate geometry. If they are clones or includes, you will need to do this only on one object.
The best way to delete a geometry which you no longer use is to use an Edit > Clean Components. Publish will also do the trick.
Finding the Naughty Object
A piece of key information we just extracted from the object name is the page number where it lives. For this example, the page number is Page 5.
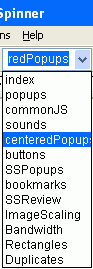
If you have renamed your pages, you need to look up your page list and count down 5 pages from the top to find the real name of the page. As shown in the image to the right, my Page 5 has the name 'centeredPopups'
With a page name, you can open the page concerned.
On the right is the thumbnail of an object from this project. It attracts my attention because it seems to be mostly empty space.
From the name, we can extract some useful information:
- Object name: obj780
- Geometry name : geo467
- Page Number: 5
- Project Number 8:
Last Resort (Delete Object)
If all else fails, delete the object from your project, having first made sure you have a backup of the project. Use the Object Editor > Components tab Delete button. When you preview the project there are two possibilities:
- the object really was needed after all. Reinstate it, if necessary via your backup. Console yourself with the thought that you at least now know what it is.
- the object was not needed. Consider yourself well rid of it.
I Still Can't Find It (Object or Geometry)
- View your project in preview mode
- Using Windows Explorer, delete the object image from the geometry folder in your preview folder.
- Click refresh on your browser
- if the object or geometry was visible on your preview page before, it will now show a blank image -- with a little red cross in the top left-hand corner.
Keep your preview window open while you do this. If you click either of the SiteSpinner preview buttons again, you will recreate the image you have so carefully deleted.
This technique is easily reversible -- to restore the image, you need only preview the page or project by clicking either of the preview buttons on SiteSpinner.