
Home |
Section One |
Section Two |
Section Three |
Section Four |
Section Five |
Glossary |
There are three major types of links that we will cover in this tutorial. These three links are the external link, the mailto, and the anchored internal link. The external link links to a page outside the current address or domain. ![]() To create an external link, first create an anchor tag <a> around the text or image you want to be a link. In the opening anchor tag you need an href attribute in the format <a href="URL">text you want to link</a>. To link to an external site through an image you only need to change one thing. Instead of having text in the area you want to link, you can ues an image tag which we will go into detail about in the next subsection. Here is an example of how to use it anyway: <a href="URL"><img src="image name.*></a>. The image to the right is linked like this to the Business Professionals of America homepage.
To create an external link, first create an anchor tag <a> around the text or image you want to be a link. In the opening anchor tag you need an href attribute in the format <a href="URL">text you want to link</a>. To link to an external site through an image you only need to change one thing. Instead of having text in the area you want to link, you can ues an image tag which we will go into detail about in the next subsection. Here is an example of how to use it anyway: <a href="URL"><img src="image name.*></a>. The image to the right is linked like this to the Business Professionals of America homepage.
The mailto link is used to automatically send an e-mail to a specific e-mail address. The mailto link is like an external link except that the address isn't to an absolute URL; instead it links to an e-mail address. Substitute the mailto address for the URL: <a href="mailto:johnsmith@emailprovider.com">Send John Smith An E-Mail By Clicking Here!</a>.
The anchored internal link uses an anchor (<a> tag) in one part of a page which can be linked to from elsewhere on the same page, or to that specific point from another page. This is very useful for glossaries and "top" buttons. To make this kind of link, start with an anchor tag <a>. Instead of using an href attribute, give your anchor a name: <a name="anchor name">anchor text</a>. To link to this point internally (from on the same page) use an href attribute with quotes around your anchor name and with the pound sign (#) before it: <a href="#anchor name">link text</a>. If you want to link to this anchor from another page, type the URL of the page the anchor is in into the href attribute, followed by the pound sign (#) and the anchor name: <a href="your_page.com#anchor name">. Our links to the glossary are of this type.
Images add color, texture, and interest to a web-site. Nearly every page you go to has some images on it. Images are embedded in a website using the <img> tag. The <img> tag has one required attribute, the "src attribute, which designates the source of the image: <img src="cw2.jpg">. The source is a file in the .jpg, .bmp, or .gif format. A basic image looks like this: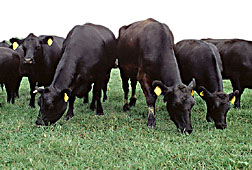
There are other optional attributes that can help you get your image to look just the way you want it. A very commonly used attribute is the alt. Use it to make a caption to your image, which will appear when the mouse is held over it. <img src="cw_2.jpg" alt="This is a cow.">
Another useful attribute is the align attribute. Use it to align the image within the line the tag is written. It can be set to the values left, right, top, bottom, center, and middle. I think the only two that need clarification are center and middle. Center moves the image horizontally to the center of the web page, whereas middle moves the image vertically to the middle of the line. <img src="cw_4.jpg" alt="This is a cow." align="left"> <img src="cw_4.jpg" alt="This is a cow." align="right">

|
|
You can use the width and height attributes to change the size of your image. Numbers values will set the number of pixels the image is across in each dimension: <img src="cow.jpg" alt="This is a cow." align="center" width="500" height="340">
 |
Text naturally flows around the outside of an image. However, without regulation, the letters are close enough to be touching the image, which makes it difficult to read and aesthetically challenged. That's why we use the vspace and hspace attributes. They leave a space around your image to give it some room between text and other elements. Define the space necessary in pixels. The cow at the right has vspac="8" and hspace="8". The cow at the left has neither.
The border attribute has a similar function, but leaves a colored border instead of transparent. Set the width of the border in pixels, as in border="5". For now, the only border color available is black. <img src="https://www.angelfire.com/mn3/bpa/images/cow.jpg" alt="Moo!" align="center" border="10">
This subsection is here to teach you to integrate sound and video into a website with HTML.
The easiest way to bring sound into a website is to link to it. Simply use an <a> tag with the href attribute giving the URL of the sound. When somebody clicks on the link, an external program will pop up and play the sound. <a href="cow.wav">click here to hear a cow</a>. click here to hear a cow. You can also link to a video in this manner.
You can use the <bgsound> tag to make a background sound for your website. It has a src attribute that works like an image. The other attribute of the <bgsound> tag is loop. A number value will determine the number of times the sound will play after the page is loaded, or "infinite" will make it play continuously as long as a client is on your page. Be careful when choosing a background sound! A bad background is incredibly annoying. Most sites do not use the background sound concept because of that propensity. The tag should go right after the body tag. A completed tag looks like this: <bgsound src="cow.wav" loop="1">. When you opened this page, you should have heard the sound "cow.wav". Turn up your speakers and hit refresh to hear it again!
The most respected and most useful way to embed is with the <embed> tag. It's source is referenced in the same way as in the <bgsound> tag (using a src attribute). Those two pieces of information are the minimum required to embed a sound. However, this results in a full sized multimedia console showing up in the middle of your website. This is a bit cumbersome, especially if it is only a minor sound you are embedding. The height and width attributes solve this problem. Use them in the same way you did for images. A 25 by 25 pixel display is the perfect size for a simple play button with Windows Media Player and others. 25 by 25 is the minimum size that should be used, because a smaller space won't be big enough for the play button. Adding more room will get you more buttons, for a more functional embedding. To embed a video using the <embed> tag, you will need to leave much more room, so the video can be seen. Another problem is that without other specification, the embedded sound will automatically start playing as soon as it is loaded. In most cases this is not what you wanted, or you would have just used a background sound. The autostart attribute can be set to "true" or "false", determining whether it will start automatically upon loading. Please note that tags like the ones discussed in this section (except the anchor tag) are singular; they do not need end tags to be complete.
A final embedding will look like this: <embed src="cow.wav" width="25" height="25" autostart="false">. Push the button to play the sound.
