
Home |
Section One |
Section Two |
Section Three |
Section Four |
Section Five |
Glossary |
The <table> tag is the whole premise of a table in HTML. This is the tag that defines that a table even exists on the page. A table acts in a separate way than most tags though, in the sense that it requires more tags between the start and end tag to function. Tables require at the minimum one (1) <td> tag, and one (1) <tr> tag to function. The content that is defined inside those two tags is what determines what the table says. The syntax of a table is as follows:
The <TR> tag stands for Table Row. This tag makes a new row in the table that you can put data into. Let's say you wanted to have a table that could be used for accounting. The first row (which is the row created by the <tr> tag) would be used for the beginning balance in your account. Each row after that would contain a credit or debit to your account. There is an example of a table with one row below with its proper code to the left:
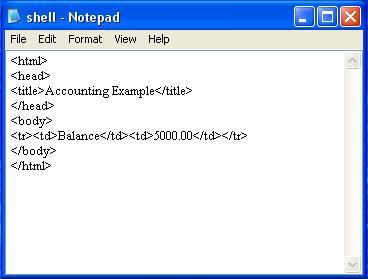 | 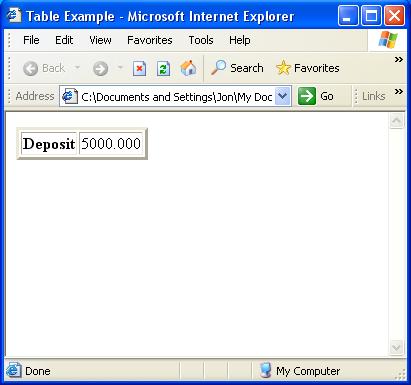 |
The <td> tag creates data in a column within a row. So in other words the <tr> tag just creates the row, the <td> tag is the tag that you actually put the data into. That is probably why it stands for Table Data. So in all essence, going back to our example we had earlier, the <td> is the one that makes both the word 'Deposit' appear in a cell, and the number '5000.00' appear in a different cell on the same row. So far we have learned that table row tag is what creates the rows and the table data tag is what creates the cells within the rows.
The <th> tag acts just like a <td> tag other than the fact that a <th> bolds the text in the cell instead of making it normal face. This is useful for distinguishing credits from debits in a check ledger or deposit record. This way instead of having to look for each deposit, you can look for each bold-faced text in the credit/debit column. These are the three main tags used in a table other than the <table> tag itself. So to recap what was tersely covered in this section so far.
There are many ways of formatting a table and there are many different attributes that can be used for each specific cell and/or the entire table. The most well known, in my opinion, would have to be the border attribute. The border attribute is kind of self explanatory in the sense of that it makes a border around the table and around each cell within the table. The syntax is as follows: <table border="x">. For this to work you will need to replace 'x' with a value. The value can be anything but usually is around three (3) to five (5). This determines the width in pixels of the border. Anything bigger is kind of annoying in a way, and anything smaller is too small to notice so those are the happy mediums. Another attribute that is well known is the cellpadding attribute. This attribute controls how much "blanck space" is around the content of the cell. The syntax for the cellpadding attribute is as follows: <table cellpadding="x">. Again, you will need to replace 'x' with a value to make this work. There is no real 'happy value' for the cellpadding attribute. It all depends on your preferences of how much space you want around your content.
You can also format the colors of cells and the table. To change the color of a cell or the table as a whole you will have to put a 'bgcolor' attribute in either the <tr>, the <td>, or the <th> tag. To change the color of an individual row you will have to use the following syntax: <tr bgcolor="rrggbb">Content</tr>. To change the color of an individual cell you will have to use this next set of code: <td bgcolor="rrggbb">Content</td>. And to change the color of a <th> tag you use the last set of syntax which is as follows: <th bgcolor="rrggbb">Content</th>. The last color set you can change is the color of the entire table. The syntax of this is: <table bgcolor="rrggbb"> Content Inside Table </table>.
Once a row or column is created, each cell is automatically the height of its row and the width of its column. Those distances are either equal to the largest element in the row or column, or you can set a size with the width or height attributes. In many cases you will want to have some cells that are wider or taller than the one by one space alotted to it. The colspan and rowspan attributes help in this. Colspan spreads the cell horizontally the number of columns specified. Rowspan causes the cell to take up more room vertically. The upper left hand corner of the cell will be in the first space you allot it to. Using the colspan and rowspan attributes you can create rectangles of various sizes, but never an L-shaped cell. A table with these attributes is shown below.
| 5 |  | |
| 5 | ||
| 5 | ||
Top |
Home |
Section One |
Section Two |
Section Three |
Section Four |
Section Five |
Glossary |
