|
What is Coolant? Inspect
Coolant Level Hoses
Replace
a Radiator Hose Drive
Belts The
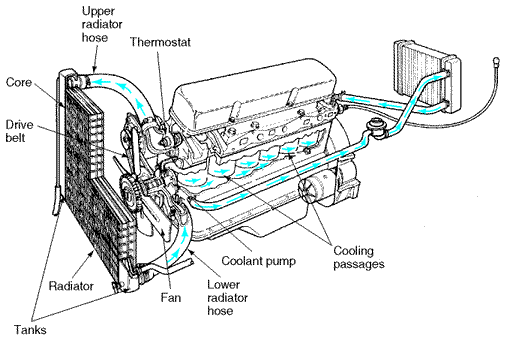
Fan Thermostat Coolant refers to the mix of antifreeze and water that circulates through the engine, radiator and heater core. Heat generated in the engine is picked up by the coolant, and circulated by the water pump through the radiator in the front of the car and the heater core. Air blowing through the radiator cools the coolant, and it returns to the engine to cool the engine. In cold weather, coolant circulating through the heater core is used to provide warm air inside the passenger compartment. There are a number of things that can go wrong with your car's cooling system, causing the engine to run warmer than it should.
Preventative
Maintenance Check List The following is a list of things that are easily checked at home by yourself. Check under the car, inspect the radiator and look around the engine compartment for telltale signs of a coolant leak: Coolant is greenish, slippery and sweet-smelling. Visit your mechanic if you know there's a leak but can't find it. A mechanic can detect a slow or small coolant leak by pressurizing the cooling system. A loose fan belt or an electric fan that isn't working correctly can cause overheating even if there's enough coolant in the cooling system. A loose water pump belt or a broken water pump can also cause overheating even if there's enough coolant in the cooling system. Coolant can leak into the car (on the floor by the passenger's feet) if there's a leak in the heater core. A thermostat stuck shut can produce similar symptoms resulting in coolant not flowing The engine's coolant level may be too low. The engine's drive belts may be broken or slipping. The electric cooling fan may not be coming on. The ignition timing may be set wrong. There may be a vacuum leak. The engine may have mechanical problems. You have been pushing the car too hard and making it work too hard. There may be a leak in the cooling system. The engine's head gasket may be leaking. The radiator may be clogged.
Understand that overheating problems may be caused by a low coolant level.
Inspect
Coolant Level You should check the coolant level in the cooling system anytime you have the hood up. If there is not enough coolant, the engine can overheat and be damaged.
Vehicles with a
recovery system may be inspected for proper coolant level by simply
observing the level in the transparent recovery tank. Most tanks have
lines showing the proper coolant level as shown below The hose leading from the reservoir to the radiator is a tip off that you aren't pouring coolant into your windshield wiper reservoir.
The coolant level is checked through the recovery reservoir. You will find two lines on the recovery reservoir. The highest line is typically marked "hot" or "maximum." The lower line is typically marked "cold" or "minimum." There are two lines because the level of coolant changes as the cooling system warms up.
If the engine
is cold, you should use the bottom line. If the engine is hot, you
should use the top line. If you find the coolant below the specified
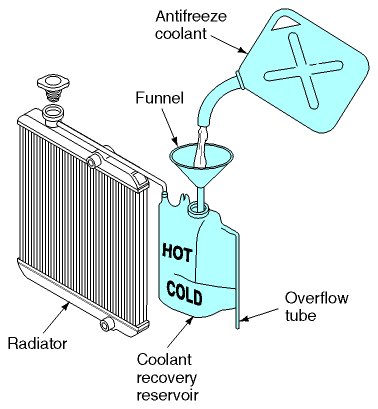
level, you must add coolant. Remove the cap on the reservoir. Use the
recommended type of antifreeze
coolant specified in the owner's or shop service manual. Place a
funnel in the reservoir and add coolant to bring the level up to the
correct mark as shown below.
Adding coolant to the cooling system. If the recovery reservoir is completely empty, add coolant up to the hot or cold line as determined by engine temperature. Then start the engine and allow it to run long enough to bring the coolant up to operating temperature. Observe the level in the reservoir. You will probably need to add more coolant to get it to the correct level.
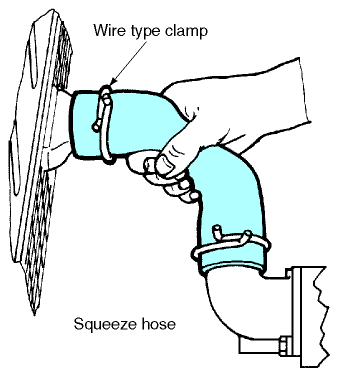
Radiator hoses connected to the radiator carry the coolant to and from the engine. If one of the hoses ruptures, the coolant is dumped out very quickly. The hoses should be checked so that they can be replaced before they cause a problem.
The hoses
should be checked when the engine is cold so that you can touch them
safely. Inspect each hose closely using a trouble or flash light.
Make sure to check the underside of the bottom hose. It is this hose
that causes the most trouble. Squeeze the radiator hose to inspect its hardness.
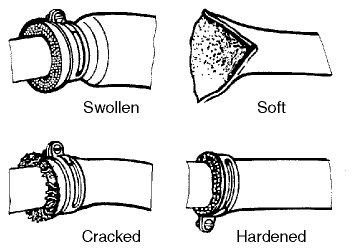
The conditions to look for on the hoses are shown below
Radiator hose problems Old hoses can become so stiff and brittle that vibration can cause them to break. Check hoses carefully for signs of hardening or cracking. Even a small crack can soon cause trouble. Swollen or soft hoses indicate that the material has begun to deteriorate. Any of these conditions warrants replacement. SERVICE TIP: When you find one bad hose, the other hose will probably turn up bad shortly. Because the coolant must be drained to replace the hose, most technicians prefer to replace both at the same time. Insects, paper, and leaves in front of the moving car can get drawn into the radiator and clog up the small air passageways. When the passages get plugged, the radiator does not work as well and the engine can overheat. Look through the radiator core when the hood is up to see if the passageways are plugged. Use an air hose to blow air out through the radiator from inside the engine compartment. This will force out bugs and other debris. Be careful to use very low air pressure when doing this job or you could damage the radiator core.
Engine temperature must be regulated. If the temperature gets too high, engine parts can be damaged. If the temperature is too low, poor fuel mileage and sludge build-up in the oil results.
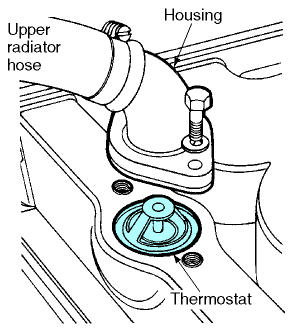
Efficient
temperature control is achieved in the cooling system by regulating
the flow of coolant with a thermostat. The thermostat is located in a
housing where the upper radiator hose is connected. The thermostat is located in a housing on the top of the engine. The thermostat is a temperature-controlled valve that regulates the flow of coolant into the radiator from the engine.
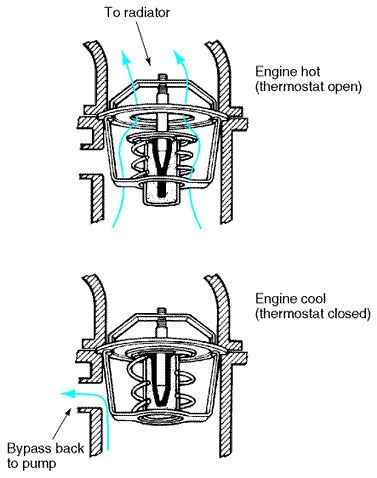
In a pellet
thermostat, a wax pellet (also called a power element), inside it
grows when heated and shrinks when cooled. Operation of the wax pellet-type thermostat.
It is connected
through a piston to a valve. The heated pellet pushes against the
piston, which forces the valve to open. As the pellet shrinks on
cooling, it allows a spring to close the valve and stop circulation
of coolant through the radiator. Coolant then goes through a bypass
passage back into the block. Coolant flow through an open and closed thermostat. As the engine becomes warm, the pellet gets big and the thermostat valve opens, permitting the coolant to flow through the radiator. This opening and closing of the thermostat valve permits enough coolant to enter the radiator to keep the engine within operating temperature limits.
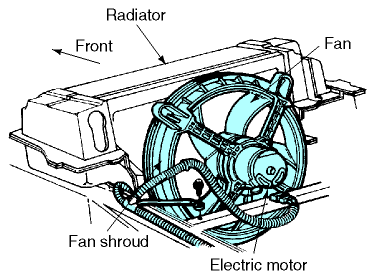
The coolant in the radiator is cooled by forcing air through the radiator's core. This air movement is caused by natural draft or by a fan. The radiator is often mounted in the front of the car, right behind the grillwork. As the car moves forward, air is pushed through the grill and through the radiator core. When the car is moving, there is enough natural draft air flow for cooling. There is not enough natural air flow through the radiator core when the engine is running and the car is stopped. For this reason, a fan is placed between the radiator and the engine. It may be driven by a drive belt or powered by electricity.
Most newer cars
use a fan driven by an electric motor. A temperature-sensitive
radiator fan switch turns the fan motor on when the engine is hot.
Older cars use a fan that is normally mounted to the same pulley that drives the coolant pump. When the engine is running, a drive belt turns the pulley, which turns the fan. The fan pulls air through the radiator core. These fans often have a clutch between the pulley and the fan blades. The clutch is a hydraulic unit. A temperature sensor on the fan activates the clutch. It adjusts the speed of the fan to engine temperature. Fan clutches provide adequate cooling at reduced engine speeds while eliminating overcooling, excessive noise, and power loss at high speeds.
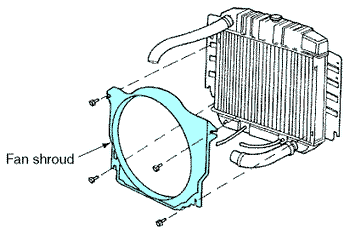
Where the
amount of air moved by the fan must be increased, a sheet metal (or
plastic housing) called a fan shroud is used A fan shroud directs the air from the fan to the radiator. This unit, normally attached to the radiator, acts like a tunnel to direct the air flow from the fan through the radiator core.
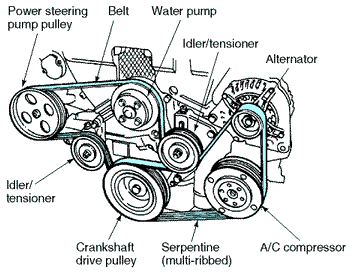
Drive Belts The coolant pump and the mechanical-type fan are driven by an accessory drive belt. Many other engine accessories are driven by the same type of belt. It fits both on a pulley driven by the crankshaft and on a pulley attached to the pump shaft and fan. As the crankshaft turns, the belt turns and drives the components.
There are two
basic types of drive belts: the serpentine or multiple-ribbed belt
and the "V" belt. The serpentine belt has a wide surface
with six or more ribs. The ribs provide frictional contact with the
surface of the pulleys. The serpentine belt gets its name from the
fact that it is flexible enough to "snake" back and forth
around many different pulleys. ribbed serpentine belt is used to drive many engine accessories. The V belt is the oldest belt type. It gets its name from the fact that its contact surface is shaped like a V. The groove in the pulleys it drives are also V shaped. The sides of the belts are V shaped to fit in the groove and provide the friction surface to drive the pulley. Drive belts must be strong yet flexible. They are constructed from layers of fabric and rubber strengthened with metal or fiber. Replacement belts must have the correct V or rib shape, the correct width, and be the correct diameter to fit on the pulleys. Replacement belts have a part number, which is usually printed on the cardboard container. An application chart is used to match the correct belt to the engine. Application charts are available in auto parts stores and often printed on the belt container.
The coolant in your car's cooling system needs to be changed every year in cold climates or every two years in temperate climates. If the coolant is changed regularly, there's no need to flush the cooling system. Coolants are a mixture of an antifreeze called ethylene glycol and water. The correct mix protects against both freezing and boiling. At regular intervals, the coolant must be drained and replaced. From time to time, the coolant level must be adjusted. During cold weather operation, coolant strength is important in preventing freezing. The percentage of ethylene glycol in the coolant will need to be checked and adjusted as necessary.
WARNING: Never use more than 70% antifreeze in a cooling system. In very cold temperatures (around -68°F), high concentrations of antifreeze can turn into a thick gel. This gel will not circulate properly through the system. Too much antifreeze can also cause the cooling system to overheat in hot weather. The mixture of antifreeze and water determines the freezing point of the coolant. If the coolant freezes in the system, the expanding ice can damage the cooling system components. A mixture of half antifreeze and half water is called a 50/50 solution. A 50/50 solution has a freezing point of -34°F (-51°C). If the mixture has a higher percentage of water, the freezing point will be higher. Pure water has a freezing point of 32°F (0°C). You can mix different percentages of antifreeze and water to prevent the system from freezing at different temperatures. Mixing instructions are printed on the container of antifreeze.
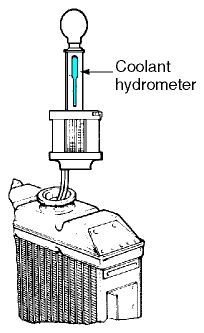
The coolant
mixture can be tested with a hydrometer. The hydrometer test tells
the mixture of antifreeze and water in the coolant by measuring its
specific gravity. A hydrometer is a glass tube with a float in it.
Following the precautions described earlier, remove the radiator
pressure cap. Place the tube of the hydrometer into the neck of the
radiator as shown below. Measuring the coolant mixture with a hydrometer. Squeeze the bulb to pull coolant into the glass tube. Compare the position of the float to the graduated lines on the glass tube of the hydrometer. Where the float settles in the coolant depends on the percentage of ethylene glycol. Graduations on the float indicate the freezing point of the coolant. If it is necessary to add antifreeze to the system, the engine should be operated afterward in order to circulate and mix the coolant. Coolant mixture should then be checked again to determine that enough antifreeze has been added to bring the solution to proper strength.
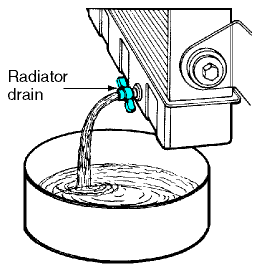
When you drain the coolant from a cooling system, you should first allow the engine time to cool down. Working on the cooling system is easier and safer when the coolant is cold and the pressure in the system is low. Place a drain pan under the radiator. Remove the pressure cap from the top of the radiator following the safety precautions described earlier in this chapter. Removing the cap will allow air to enter the radiator and to drain completely out of the drain plug hole.
Locate the
drain valve in the bottom tank of the radiator. The drain valve will
typically have a handle so that a wrench is not required. Open the
drain valve. As you open the valve, coolant will flow out from the
bottom of the radiator as shown below. Draining coolant from the radiator. Some systems have drain plugs located on the side of the engine block Check the shop service manual to determine if these valves should be opened. Allow time for all the coolant in the system to drain. Then close the drain valve.
Dispose of coolant properly - don't pour it down the drain or sewer. Many service stations, repair shops and parts stores will take it so it can be recycled, or you can take it to a recycling center. Next, add the correct amount and type of coolant. Check the owner's manual for the recommended type and mixture of coolant. Place a funnel in the neck of the radiator. Pour a measured amount of antifreeze and a measured amount of distilled water into the radiator. When you drain and refill the coolant, air can be trapped in the system. We get the air out by bleeding the cooling system. Check the shop service manual for specific recommendations on bleeding. Many systems are bled by leaving the radiator cap off, then running the engine until the coolant circulates and the thermostat opens. Air bubbles trapped in the coolant can escape through the open radiator neck. After bleeding, replace the radiator cap and bring the engine up to operating temperature. Check the level of coolant in the recovery reservoir and adjust the level if necessary. Check the radiator drain valve for leaks.
Remove and Replace a Radiator Hose A defective radiator coolant hose needs to be replaced. Hose replacement is much safer and easier if it is done when the cooling system is cold. Allow the system to cool down before you begin. Then drain the coolant from the system following the procedure described earlier.
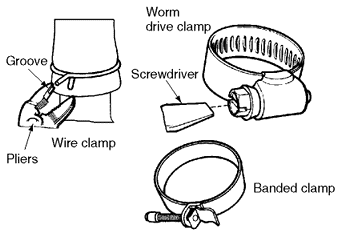
Radiator
coolant hoses are held in place with hose clamps. Three common types
are the wire clamp, worm drive clamp, and banded clamp as shown below. The banded and worm clamp type are removed with a standard screwdriver. The wire clamp type requires a special pair of pliers with grooves in the jaws. These grooves lock onto the ends of the wire clamp. Unscrew or unclamp and remove the hose clamp from both ends of the coolant hose. Use a knife to cut the old hose off the fitting. If you find that the hose is stuck, do not try to pry it off. The radiator fitting is very thin and could be damaged. Use a knife and cut it in several places until it can be removed.
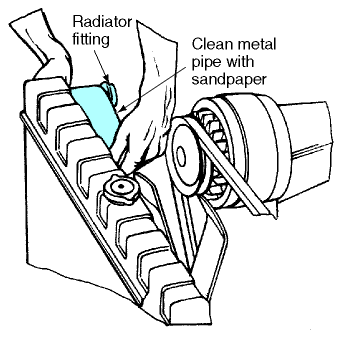
Use a piece of
fine sandpaper or emery cloth to clean off the surface of the
radiator fitting as shown below Cleaning off the fitting surface with sandpaper. The surface must be perfectly clean to seal properly with the new hose. Any burrs or sharp edges must be removed; these could damage the new hose when you slip it on.
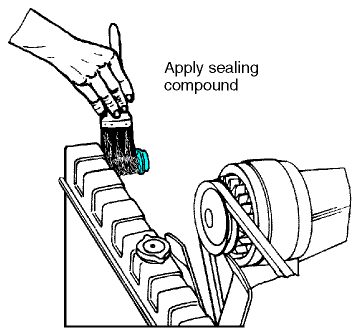
Coat the
radiator fitting with sealing compound to prevent leaks. Applying sealing compound to the fitting. Place the new replacement radiator hose and the old one next to each other on the work bench. Compare the new one with the old one. They must have the same diameter, length, and if molded, the same curve. If the hoses match up, you can go ahead with the installation.
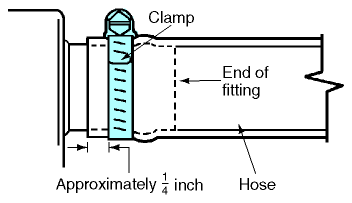
Slide the hose
in position on the block and radiator fitting. Always use new clamps
because the old ones often become distorted during removal.
Spring-type clamps must always be replaced even if they show no
visible damage. Install the new clamps and slide them about 1/4 inch
from the end of the fitting as shown below. Proper position of hose clamp. Tighten the clamps securely, but be careful not to over tighten. Refill and bleed the cooling system as described earlier. Run the engine and check your connections for leaks. You should check the hose clamps after a brief run. The clamps and the hose heat and expand at different rates. This can cause a change in the clamping force on the hose clamps. Recheck the tightness of each of the clamps.
If you notice the gauge going up, turn on the heater full blast and go to the nearest mechanic to have it checked - even if the temp comes down. If you are unsure of the distance to the next service station or you know it's more than 10 miles away . . . Pull over before it gets too hot. Turn off the engine. WAIT! If the engine is steaming, DO NOT open the hood. Open the hood when the car has cooled completely.
Check
the coolant reservoir tank first.
Open
the radiator cap with a rag.
Examine
the radiator . . . Put the radiator cap back on. Check to see that the upper or lower radiator hose, or any of the heater hoses, hasn't burst. Restart the engine. Watch the temperature gauge obsessively. Don't let the needle go into the red. Turn off the engine if the gauge approaches the red zone. Understand that you can continue driving a high-temperature vehicle if you're far from a phone or a service station and the car does not need coolant (or does not respond to these instructions). However, drive only as long as you stop and turn off the engine whenever the gauge gets close to the red, and let the engine cool down until you drive again. This may take a long time, but it probably beats walking. Tips: Overheating can be caused by factors other than low coolant level (thermostat stuck closed, blocked radiator, malfunctioning fan or failed water pump). If the coolant level isn't low, it's time to visit a mechanic. It's OK to add just plain water or antifreeze in an overheating, emergency situation. When routinely adding or changing coolant, always use a 50-50 mixture of water and antifreeze.
DISCLAIMER: PLEASE READ - By printing, downloading, or using you agree to our full terms. Review the full terms by clicking here. Below is a summary of some of the terms. If you do not agree to the full terms, do not use the information. We are only publishers of this material, not authors. Information may have errors or be outdated. Some information is from historical sources or represents opinions of the author. It is for research purposes only. The information is "AS IS", "WITH ALL FAULTS". User assumes all risk of use, damage, or injury. You agree that we have no liability for any damages. We are not liable for any consequential, incidental, indirect, or special damages. You indemnify us for claims caused by you.
I am in no way, shape, or
form telling you to do this yourself. Your results may vary. If
something goes wrong, it is not my fault!
|
|||||||||


 Cooling
System
Cooling
System

 CAUTION:
The radiator cap keeps the coolant in the
radiator under pressure to raise its boiling point. If the cap is
opened when the engine is hot, the coolant may overflow. Do not open
the radiator cap on an overheated radiator until you allow it to
cool. Cover the radiator cap with a rag and wear eye protection
anytime you open it. Always use caution when opening any radiator cap.
CAUTION:
The radiator cap keeps the coolant in the
radiator under pressure to raise its boiling point. If the cap is
opened when the engine is hot, the coolant may overflow. Do not open
the radiator cap on an overheated radiator until you allow it to
cool. Cover the radiator cap with a rag and wear eye protection
anytime you open it. Always use caution when opening any radiator cap.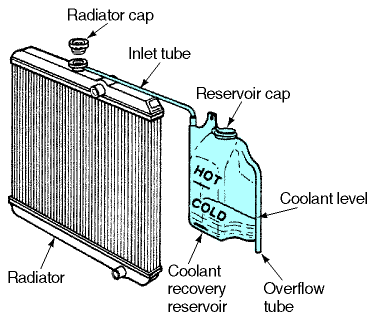

 WARNINGS: