*************************************************************
(This game was chosen as the BEST web-based analysis of 2004, by the CJA.)
*************************************************************
In 1904, mainly to celebrate the completion of one of the world's finest hotels - at a nationally famous spa, (back then, mineral waters were very popular and thought to cure many ailments and diseases); at a small town in Pennsylvania - it was decided to hold "the strongest chess tournament ever held." (With donations and support from some of America's wealthiest men.) Invitations were sent out to all the World's best chess players. (The venue of the event was to be to be the Ryder Hotel, in Cambridge Springs, PA.)
(Note: I just received a letter from one of the nation's most respected historians. {He asked that I not use his name, at least for now.} His area of expertise is that of architecture, not chess. He told me that the Ryder Hotel (Rider?) the event that CS1904 was played in - was indeed one of the finest buildings of its type. It had the finest foyer, balcony and lobby ... of any hotel ... IN THE WORLD!!! {Of that time.} It also had the most rooms, (over 500 actual guest rooms); of ANY hotel of its kind in the continental United States! Hopefully, he will soon be publishing a book on this topic. Once the book is published, he said he would give me permission to use a few of the photo's here on my website. Of course the building itself no longer exists, it was {regrettably} later destroyed in a fire, circa 1931. Monday, August 23rd, 2004.)
In the end, some of the players (like Tarrasch) declined their invitations, but it was still probably the strongest tournament ever held on American soil! EIGHT (8) of the "Old World's" strongest players and EIGHT of the strongest masters in the U.S. assembled to play in a truly world-class venue. Some of the finest chess ever played in America, (at least, prior to 1950); was played at this event.
Masters like World Champion Emanuel Lasker, Tchigorin, Janowski, Schlechter, or even Pillsbury would have been the pre-tournament favorites. But in a VERY surprising turn of events, a young Marshall virtually ran away with this event. In the final tally, he scored an incredible eleven wins and only four (!!!) draws - an incredible score that has few, if any!, equals in modern tournament practice - to run away with the tournament.
Later - when asked by a newspaper reporter - to name his best or most memorable game, he cited several struggles. In particular he noted this contest, because it virtually guaranteed him clear first place.
Cambridge Springs
- April 25th/May 19th 1904
International Chess Tournament
1 2 3 4 5 6 7 8 9 0 1 2 3 4 5 6
1. Marshall
* ½ 1 ½ 1 1 ½ 1 1 1 1 ½ 1 1 1 1 13.0
2. Lasker ½ * 1 ½ ½ 0 1 0 1 1 1 1 1 ½ 1 1
11.0
3. Janowsky 0 0 * ½ ½ 1 1 1 1 0 1 1 1 1 1 1
11.0
4. Marco ½ ½ ½ * ½ ½ 1 ½ 0 1 0 ½ 1 ½ 1 1
9.0
5. Showalter 0 ½ ½ ½ * ½ 1 1 1 ½ 0 ½ ½ ½ ½ 1 8.5
6. Schlechter 0 1 0 ½ ½ * 0 ½ ½ 0 ½ 1 1 ½ 1 ½ 7.5
7. Chigorin ½ 0 0 0 0 1 * ½ 1 0 1 1 ½ 1 0 1
7.5
8. Pillsbury 0 1 0 ½ 0 ½ ½ * 0 1 ½ ½ 0 1 ½ 1
7.0
9. Mieses 0 0 0 1 0 ½ 0 1 * 1 1 1 0 ½ 1 0
7.0
10. Fox 0 0 1 0 ½ 1 1 0 0 * 1 0 1 1 0 0
6.5
11. Teichmann 0 0 0 1 1 ½ 0 ½ 0 0 * 1 ½ 0 1 1
6.5
12. Napier ½ 0 0 ½ ½ 0 0 ½ 0 1 0 * 0 1 1 ½
5.5
13. Lawrence 0 0 0 0 ½ 0 ½ 1 1 0 ½ 1 * ½ 0 ½
5.5
14. Barry 0 ½ 0 ½ ½ ½ 0 0 ½ 0 1 0 ½ * 0 1
5.0
15. Hodges 0 0 0 0 ½ 0 1 ½ 0 1 0 0 1 1 * 0
5.0
16. Delmar 0 0 0 0 0 ½ 0 0 1 1 0 ½ ½ 0 1 *
4.5
|
It was NOT my idea to annotate this game! The idea really belongs to Mr. Steven Etzel, who has the extremely nice site for this tournament. (Please check it out.) I
do have a long history with this game. I saw it many years ago, when I
was just a teenager. (I think a friend or the library had a book on
Marshall.) Anyway, I really devoured that whole book, and I was
impressed by several of the games in there. (I also gave a chess
lecture and a simul at a small town in Alabama once. This was the game I
lectured on - I didn't pick it, I almost always allow a paying
client to pick the game I am going to analyze and give a talk on. They
picked two games of Marshall's. I think the other was his 'quickie' win over
Pillsbury.) I was also writing a book on this tournament,
but sadly when I had my big computer crash in February of 2003, I lost
nearly all of those files. Anyway I was very pleased to see all the progress that Steve had done with his site. I told him - that if he would like me to - I would make him a 'present.' I offered to analyze one of Marshall's games, {from Cambridge Springs, 1904}; that I had not done before or was not currently posted on any of my web pages. {I did tell him I would not do the Pillsbury game ... I considered Pillsbury a dying man and I did not consider that clash truly representative of Pillsbury at his very best.} Anyway, Steve wound up picking this game ... in retrospect, I would have been MUCH better off doing some other game!!! (hee-hee, ha-ha) |
Many
thanks to:
# 1.)
Thomas ______ (he asked I not use his last name); ... of a small town
just outside Cleveland, Ohio. Tom spent many hours pouring through the "John
G. White" collection in the Cleveland Public Library. He
e-mailed me (and even USPS mailed me) literally hundreds of documents, (Actually
photo-copies, NOT the originals!!); and <tid-bits>
of information.
# 2.) A Mr. J. Halder, (spelling? I could barely read his handwriting!); who is a big fan of my web sites. He photo-copies a ton of documents and put them in a sturdy box and shipped them to Florida all the way from ... ... ... ENGLAND!! Needless to say, this is way, way above and beyond the call of duty!!!!!!! Thanks!
#
3.) A special thanks to ALL the friends and {former}
students who gallantly answer the call when I ask for copies or information. And
a special thanks to ______ for copying an entire book
and mailing it
to me!!
(This person {or
persons} asked that I not use their name.)
# 4.) A VERY special thanks to Steven Etzel who was kind enough to PROOF-READ my original ChessBase document. Steve caught many errors. (All my wretched mis-spellings!) Additionally, he had dozens of suggestions about improving the notes to the game. ("You have to add a note here, otherwise the reader will not understand why you gave this move an exclam," says Steve. Of course I knew I would hate him when it came time to format this page! Just kidding, Steve!!) Again, many thanks. (To everyone.)
In my own opinion, this game is not as thoroughly appreciated as it might be. It was only AFTER I taught this TITANIC STRUGGLE a few times on the Internet to some "average" chess players, that I began to realize just what an incredible chess game this is. It gets a (full) TEN for fighting content!!
Normally - almost every line I give ends in an evaluation. (symbol) In this game, I did not do that - often times it was unnecessary, as Janowsky sacrificed material for the attack. If his attack failed, he was going to lose because of his material deficit. His approach was dictated by his standing in the tournament ... I believe he was TWO full points behind Marshall when this game was played. Even a draw would not help him to gain ground on Marshall, which is exactly what he was trying to do.
NOTE: See the very fine article in the August, 2004 'Chess Life,' page no. # 11. (About the Centennial Event.)
There
are also two very fine articles in the Spring and Summer (August) 2004
issues of: "The
PennsWoodPusher."
(The official - quarterly - publication of the Pennsylvania
State Chess Federation. [website]
{Current} Editor: Neil
Brennan, 333 Lancaster Ave; Apt. # 1003, Malvern, PA. 19355-1832.)
Click HERE to see an explanation of the symbols that I use when annotating a game.
***
Click HERE to see this game in an (un-annotated) JS re-play format.
|
D.
Janowski (2675) - F.J. Marshall (2564)
|
|
|
*************************
This is a very nice move, and if
Janowski were smart, he would
look for a way to equalize -
or risk
getting a very bad game.
[ Black could also play:
10...Qf6!?;
{Diagram?}
or even 10...dxc4;
"=" {Diagram?}
with an equal game. ]
11.e4!?,
{Diagram?}
Typical Janowski ... "full steam
ahead, and damn the torpedoes."
That sort of thing. But maybe he
should (already) be looking for a drawing line.
*******
[ Maybe
>/=
11.cxd5!?,
"=" {Diagram?}
looking for equality?
(Then e4 would even give
White a slight initiative.);
***
Probably the best line was:
>/=
11.Nd2! Qh4!?; 12.h3!? dxc4;
13.Nxc4 Nxc4;
14.Bxc4 a6;
"=" {Diagram?}
with a fairly balanced position. ]
*******
Now Black wins the Bishop-pair.
(Something that must have bugged
Janowski ... he supposedly loved
having the two B's.)
White will
then advance his KP which threatens
Black's King, forcing Marshall to
swap
off one of his Bishops.
11...dxc4;
12.Bxc4 Nxc4; 13.Qxc4 Qc7;
Black defends the c5-square.
[ Maybe 13...cxd4; was also possible? ]
14.Qd3 Bd7;
15.e5!? Be7; 16.Ng5!?,
(White has a small threat in this
position!)
In searching through the database,
I discovered Janowski had a lot of
success with an attack based on
Bishops of opposite color. But maybe
Bishop-to-g5 was a little more
promising here.
[ Maybe 16.Bg5!?, "+/=" instead. ]
16...Bxg5;
17.Bxg5 Rfc8; 18.Qg3,
This threatens Bf6 winning.
*******
Now White tries to generate some
attacking chances based on the
presence
of opposite-colored
Bishops. (These types of positions
tend be either terribly
dull
... or
extremely sharp. Often times one
player can attack a certain color
square that his opponent cannot
really defend.)
*******
[ Or 18.Rab1 h6; "=" ]
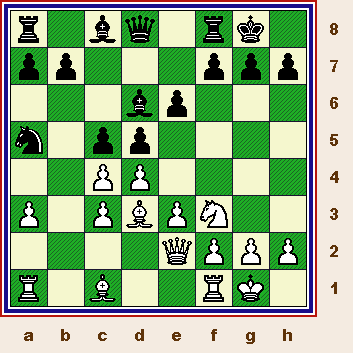
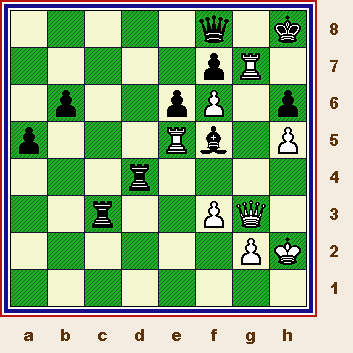
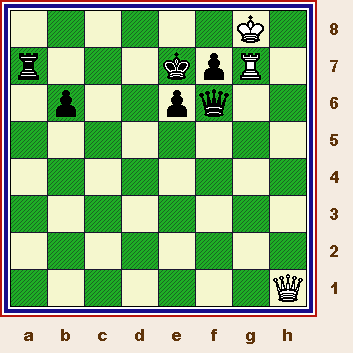
18...Kh8;
{Box?}
{See the diagram just below.}
Black has easily parried the threat.
Now Tarrasch points out that White
should probably play Rfc1. But by
continuing to try so hard to win, he
is only setting himself up for a loss.
*************************
|
|
*************************
But I think the great German teacher
and writer, (Tarrasch); is really missing
the point.
A draw here is as good as a
loss as far as Janowski was concerned.
(He bragged before this game he would
put down the young, upstart American.)
'!' - GM Andrew Soltis.
(I don't understand this, this move
is completely forced!)
*******
[ Black should not allow:
</=
18...cxd4?; 19.Bf6! g6 [];
20.cxd4!,
This is (probably) best.
( Or 20.Qh4!? Qc5; 21.Rad1!, "+/=" )
20...Qb8;
21.Qh4 Rc4; 22.Rac1! Rxc1; 23.Rxc1 Qf8;
24.Rc5!,
'±' ("+/") {Diagram?}
with a continuing attack.
(Although Black has some drawing
chances ... due to the presence
of the opposite-colored Bishops.)
]
*******
19.Rfe1,
White plans to try and bring this
Rook over to the King-side ...
to strengthen his already flagging
assault.
[ Maybe 19.Rfd1!?, {Diagram?} is a little better? ]
19...cxd4; 20.cxd4 Qc3!;
This is NOT the move most players
or computers pick here, but it is
almost certainly the best move.
Black insures domination of the c-file,
and also offers an exchange of the
Queens - after which, it would be
practically impossible for White to win.
[ Most boxes like:
20...Bc6!?;
"~" {Diagram?}
The position is rather
unclear. ]
21.Qf4,
White had to try something like
this here.
Tarrasch once said of Janowski -
that he understood HOW to attack
as well as any man
that ever lived.
It was just that he did not always
understand WHEN he should go
on the
offensive. (A truly penetrating
and perceptive comment.)
[ </= 21.Re3 ???, 21...Qxa1+; and mates. ]
21...Kg8;
This looks simple enough, but
it was not the only move for Black.
[ Was the move:
21...Be8!?;
{Diagram?}
worth a try? (In order to try not to
lose another tempo - as
compared
to what happened in the game.) ]
22.Rab1 b6;
('!')
{Diagram?}
The simplest ... and also the best,
at least in this position.
[ Black could have also played:
22...Bc6!?;
{Diagram?}
with a reasonable position.
]
23.h4!?,
White continues with his all-out
hostile efforts on the King-side.
*******
[ Tarrasch points out that R-K3 is
a bad idea here for White. I.e.,
</=
23.Re3? Qc1+;
24.Re1, {Diagram?}
This is forced.
( Of course not: 24.Rxc1?? Rxc1+; 25.Re1 Rxe1#. )
24...Qxf4;
"=" {Diagram?}
and Black has absolutely nothing
to fear in this position.
( Maybe >/= 24...Qxa3!?; "=/+" );
***
A move like:
23.Ra1,
"~" {Diagram?}
is just an admission that White's
attack is over ... and definitely was
not the great Janowski's style. ]
*******
23...Qxa3;
"The execution of White's attacking
plans forces him to allow the massacre
of his Q-side, so that Marshall obtains
two passed Pawns there."
- GM Siegbert Tarrasch.
[ Interesting was: 23...Qd3!? ]
24.h5 h6;
This is a wise precaution.
(And practically forced.)
'!' - GM Andrew Soltis.
*******
[ To show how easily Black gets
into trouble here, I offer a line
that was played by one of my
Internet students in 1996:
24...Rc2?!;
25.h6 g6!?; 26.Qh4,
{Diagram?}
This is the correct way to pursue
the attack here.
( After 26.Qf6!? Qf8;
"~" {Diagram?} it is not clear that the first
player
has accomplished anything. )
26...Rac8??;
27.Be7! Qd3?!; 28.Qf6,
("+/-") {Diagram?}
and Black cannot prevent mate.
***
The funny thing was that this
particular student's rating was
over 1800 USCF.
(And he had
used a lot of time to find his
moves in this line.) ]
*******
25.Bh4,
White really has no choice, the
sacrifice on h6 would be
completely unsound at this point.
[ After the moves:
</=
25.Bxh6? gxh6; 26.Qxh6 Qf8;
27.Qg5+ Qg7;
28.Qf4 Bc6; 29.g3 Bd5;
"/+" ("-/+") {Diagram?}
White's game is nearly resignable.
]
25...Rc3!,
The correct move says Tarrasch,
who also points out that Marshall
had to prevent Re3.
**************
[ Black can easily fall under an
attack if he is careless:
</=
25...Be8!?;
('?!')
26.Re3 Qa2; 27.Rbb3 Qa1+!?;
28.Kh2 a5?;
{Diagram?}
Thinking about promoting a Pawn.
( Probably better is: >/=
28...Rc1!; "/+" {Diagram?}
& Black is clearly for choice. )
29.Rg3,
'±' ("+/")
{Diagram?}
and White's King-side assault
has reached frightening proportions.
*******
After the moves:
</=
25...Qc3!?; 26.Re3! Qc2!;
27.Rbe1! a5!?;
28.Bf6!!;
"/\" {Diag?}
White's attack really heats up. ]
White now tries to maneuver his
Rook over to the King-side. But it
is difficult, as he has
to get his
Queen out of the way first, and
has other problems to deal with
as well.
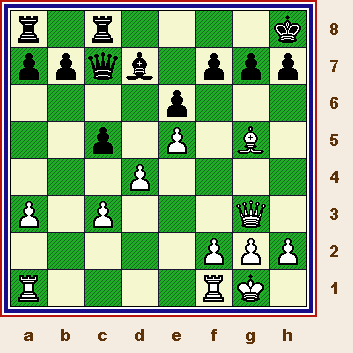
26.Qg4 Rac8;
27.Kh2!, {See the diagram, just
below.}
Avoiding an exchange of Rooks
on the c1-square.
*************************
|
|
*************************
The game is building to a crisis point,
White will shed Pawns without any
care - concentrating all of his energies
on attacking his opponent's King!
*******
[
If 27.Bf6!?, then simply
27...Qf8;
"/+" {Diagram?}
(Black is clearly much better.);
***
But NOT:
</=
27.Re3? Rxe3; 28.fxe3 Rc1+;
29.Rxc1,
29...Qxc1+; 30.Kh2 Kf8!;
"/+" {Diagram?}
after which Black - effectively -
has a won game.
***
Also NOT satisfactory for White was the following continuation:
27.Ra1!? Qf8; {Box?}
{Diagram?}
Black must guard against the
possibility of White playing Bf6.
(Which would win if Black removes
his Queen form the a3-f8 diagonal.)
28.Rxa7 R8c7; 29.Rea1!? b5;
"=" {Diagram?}
Black has complete equality ...
and more importantly, White's King-side
attack has fizzled.
{Editorial comment: REMEMBER ... a draw
did NOT help Janowski ...
only a win
would enable him to have a chance of catching Marshall here.} ]
*******
27...Qf8;
This is a really good move, (!) Black
helps defend his King (g7)
and also
gets the Queen out of the way.
(In some lines, White had the threat
of Ra1 followed by Rxa7.)
But I was still surprised to see that
Soltis lavished so much praise on
basically a fairly obvious (and
relatively forced) move.
{And failed to really appreciate some
of the more subtle plays by Black.}
'!' - GM Andrew Soltis.
[ </= 27...Bc6?; 28.Ra1, "+/=" ]
28.Re4 Bc6!?;
This looks both reasonable and
also promising.
(Black plans on
bringing his Bishop to the nearly impregnable d5-square.)
But
several writers have pointed out
that Bishop-to-Rook's-Five!! ...
(immediately), was an improvement, (and a fairly significant one, at that);
over the game.
Soltis condemns this move, (...Bc6) but his analysis of this game is very
poor
and can therefore be ignored.
(I also must make a point here, that
I hate the "super-modern" school
of annotation.
What I mean is when
a player misses an exclam move, he
is automatically rewarded
with a
full question mark. See the book, "
G.K. on 'My Great Predecessors,' "
by
GM G. Kasparov for hundreds of
examples of this kind of approach
to older
chess games.)
*******
[
A much better move would
have been: >/=
28...Ba4!; {Diagram?}
and Black has a large advantage.
- GM Siegbert Tarrasch.
]
*******
29.Rf4 Kh7;
This was forced, White now
threatened Bf6, followed by
f3,
and 'stacking up' on the
g-file. (Q-to-g3 and R-g4.)
[ The continuation of:
29...Bd5;
30.Ra1 a5;
"/+" {Diagram?}
is not quite as
accurate ... the second player will be required to play
...Kh7;
(or
even ...Kh8); sooner or later. (To
avoid the risk of losing.) ]
30.f3,
{Diagram?}
Janowski definitely gets high marks
here for his enthusiasm and his
persistence.
"In order to play Qg3 and Rg4." - Siegbert Tarrasch.
[ Or 30.Ra1!? a5; {Diagram?} is practically winning for Black. ]
30...Bd5; 31.Qg3 Bc4;
32.Ra1 a5; 33.Rg4,
White is trying to get something
going.
[ The continuation of: 33.Rb1?! b5;
34.Ra1? a4; "/+" {Diagram?}
is a complete waste of time
for David Janowsky. ]
33...Bd3!,
The Bishop is most useful on this
diagonal here ... as an obvious and
added defense to the beleaguered
Black Monarch.
'!' - Georg Marco. '!' - GM Andrew Soltis.
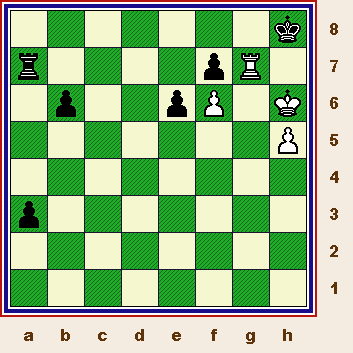
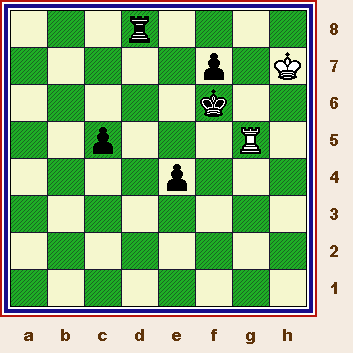
34.Bf6,
('!')
{See the diagram just below.}
"White has finally obtained the
desired attacking position." - GM Siegbert Tarrasch.
*************************
|
|
*************************
He goes on to comment that the
move Bf6 is the only way of really
continuing the attack,
but it does
present real and definite danger (!)
to Frank J. Marshall. (our hero)
'!' - GM Andrew Soltis.
The position after Bf6 is one the
computers completely fail to appreciate.
White's ONLY hope is to attack -
passive and routine play will simply
lose.
And even advanced students fail
to grasp the amount of danger that is
presented to the Black King.
(This is
one of those ... very rare ... positions
where I can defeat most of my students ...
... NO MATTER WHICH COLOR
PIECES {or which side} ... I play!)
[ 34.Rf4!?, - Olomouc. ]
34...gxf6!;
Marshall takes up the gauntlet.
[ Maybe playable was:
34...g6!?;
"=/+" {Dm?}
but Marshall's method is better.
]
35.exf6,
This is forced ... but now White
threatens Rg7+ and Qf4 winning
in some lines.
[ 35.Re1?? Bf5; "-/+" ]
35...Rd8!; (Maybe - '!!')
{Diagram?}
An extremely good defensive
maneuver Black will meet Rg7+,
...Kh8; Qf4, with ...Qd6; pinning
White's Queen to his King and
forcing the exchange.
'!' - GM
Siegbert
Tarrasch.
'!' - G. Marco.
'!' - GM Andrew Soltis.
[ Possible was: 35...e5!?; "=/+" ]
36.Re1 Kh8; 37.Re5!?,
{Diagram?}
"Up to this point, Janowski has
conducted the attack under adverse
conditions
with the greatest skill, ... "
- Siegbert Tarrasch.
(The book of the tournament.)
He goes on to say that Janowski
should have played Q-B4! While this
might have been true,
(It is definitely
a better/trickier try by White.); it would
NOT have changed the end result ...
not one iota. (I think Soltis simply
mimics Tarrasch here.)
*******
[ One author gives the following
continuation:
>/=
37.Qf4 Rd5; 38.Re5 Rxe5;
39.Qxe5! Rb3!; 40.Qe3, {Diagram?}
This is probably best. ('!')
( Or 40.Rg7!? Rb5; 41.Qf4 Rxh5+; 42.Kg1 Bg6; "+/-" )
40...Bf5!;
41.Qxb3 Bxg4; 42.fxg4!? Qd6+; 43.g3
Qxd4; "-/+" {Diag?}
and Black should win. - GM
Siegbert Tarrasch.
(He claims that White has some
{slight} drawing chances here, but
a computer
analysis reveals that
White's game is lost, and completely
without hope.) ]
*******
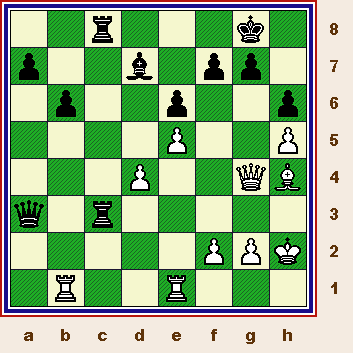
37...Bf5;
38.Rg7 Rxd4; {See
the diagram ... just below.}
"This repulses the attack by White,
as Janowsky's Queen now has no
avenue
to attack KR6." - Tarrasch. (Schach Zeitung.)
*************************
|
|
*************************
The defense is still not easy. I have
tried this position on a few of my
lower-rated students,
and most
greatly under-estimate the number
of threats to the Black King here.
39.Rb5,
{Diagram?}
"White has no real means of
continuing the attack, in fact he
can hardly move any of his pieces!
All the more astonishing is the
ingenuity which Janowski displays
in creating something out of
nothing
and in placing obstacles in his
opponent's path." - Siegbert Tarrasch.
(The Reinfeld Book of this tourney.)
[ He could also try
39.Re1!?,
{Diagram?}
but the position looks very bad
for White - at least to me.
{A.J.G.} ]
39...Rcc4!;
This is excellent, and the move
...Rc6; was (also) good enough
to win.
(But it is not better than the
text as two other authors claim.
The computers
see very little difference
between the two lines. In fact, the
great Siegbert
Tarrasch awards this
move an exclam!)
'!' - GM Siegbert Tarrasch.
'!' - George Marco.
'!' - GM Andrew Soltis.
[ After the moves:
39...Rc6!?; 40.f4 Rcd6;
41.Re5 Rd2;
"-/+" {Diag?}
Black is also (obviously) winning.
]
40.Qe5,
"White must prepare a flight square
for his King, and this is about the
only move
available for that purpose." - GM Siegbert
Tarrasch. (The Reinfeld book.)
*******
[ Possible was: 40.Kg1!?,
{Diagram?}
and now ...Rc1+; followed by
...R/c1-c4 is just a repetition of moves.
(But Black probably
has an improvement over this!);
***
One student grabbed the pawn
here, but after the moves:
</=
40.Rxb6?? Rh4+;
41.Kg1?! Qc5+; 42.Kf1 Rh1+; 43.Ke2 Rc2#.
was quick to admit he had made
a terrible error. ]
*******
40...Qd6;
41.g4 Qxe5+; 42.Rxe5 Bxg4!; {Diagram?}
"The strongest continuation," says
Tarrasch, as it forces an exchange
of Rooks.
(It is also correct according
to the formula that Capablanca would
later devise for
'won' positions, i.e.
that the defender should not be afraid
to simplify and even give
back material.
One Pawn is often sufficient to gain
a victory!)
'!' - GM Andrew Soltis.
[ After the moves:
42...Bd3!?;
43.Rxf7 a4?; ('??')
{Diagram?}
(This is a natural-looking move,
yet it is also a mistake, ...
but I do it
to demonstrate the VERY REAL
DANGER that Marshall faced,
and
how one mis-step could have cost
him the game.)
( Best is probably: >/=
43...Rc8; "/+" (Maybe "-/+")
{Diagram?}
and Black should {eventually}
win this game. )
44.Rf8+ Kh7;
45.Rxe6 Rc2+; 46.Kg3 Re2; 47.Rxb6!,
"+/-" {Diag?}
... it is WHITE
who is winning
this position!!! (White's threat is
simply
R/b6-to-b8, with a mate
to follow. It is difficult to see how
Black can now
prevent this.) ]
43.fxg4,
In his notes - which were later put
in the magazine, "The American
Chess Bulletin,"
Janowski AND
Marshall stated they felt taking with
the pawn ... and keeping Black's
King boxed in ... was the only real
hope for White.
It
is a very simple idea ... when you are ahead in material, you want
(and need) to
exchange pieces. Here Janowski MUST try to keep the Rooks on the
board.
[ After the moves: </=
43.Rxg4?! Rxg4; 44.fxg4 Rxg4;
("-/+") {Diag?}
Black is simply winning.
(If Rb5, then simply ...Rb4.) ]
Now we are in two-Rook or a double-Rook ending. These endings are
EXTREMELY
complex ... even the world's very best players, {"Super GM's") ... have gone sadly
astray
in this difficult type of end-game.
Marshall now shows that he has
evolved a fairly simple and effective plan ...
... to win the game.
43...Rc2+!;
All my students want to grab the
pawn here, but this is better.
(Benko gives ...Rd2+ here, but that is really only a transposition.)
*******
[ After the moves: 43...Rxg4!?;
44.Rxf7 Rg8!;
"/+" {Diagram?}
Black is still clearly better.
(And possibly still winning.) ]
*******
44.Kg3 [],
{Diagram?}
This is obviously forced,
yet the
great Siegbert Tarrasch awards the
move an exclam.
This might seem
a bit of a paradox until you realize
he is simply praising Janowsky's
will and his ability to continue this
magnificent struggle.
'!' - GM Siegbert Tarrasch. (and ... '!' - GM Andrew Soltis.)
"White's Rook is stalemated and the
hostile RP cannot be stopped. One
would think that White
is just on the
point of resigning, but Janowski still
continues to find something. Now he
is going
to (try and) force checkmate ... with his King!"
- GM Siegbert Tarrasch.
(The Reinfeld book again.)
**************
[ Of course not: </=
44.Kg1??
Rd1+; 45.Re1 Rxe1#. {Diagram?}
(A relatively simple
mate.)
***
Also very bad is: </= 44.Kh3?? Rd3+;
45.Kh4 Rh2#. {Diagram?}
(Yet another "edge-of-the-board" mate!)
]
**************
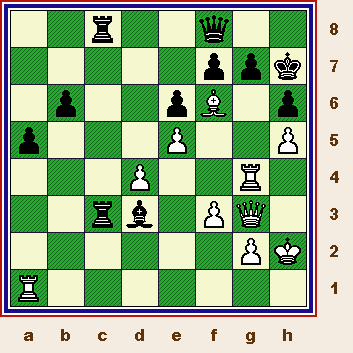
44...Rd3+;
45.Kf4 Rc4+?!; (Probably - '?')
{See the diagram below.}
This move is given without any
comment by Reinfeld ... or anyone
else, for that matter.
But the move -
while still winning - is NOT the best
move here!
In Marshall's defense, he may have
been a little short of time here.
(The
local newspaper column reported he
used a lot of time "extricating himself"
from Janowsky's attack.)
*************************
|
|
*************************
The idea of ...Rf2+; followed by
the simple ...RxP/f6; is much superior.
Marshall may have seen his Rook
hanging, but missed that White's
Rook is also
'en prise' at the end
of this rather tricky line.
'!' - GM Andrew Soltis.
I was VERY shocked to see that
GM Andy Soltis gave this move an
exclam ... but (also)
did NOT give
the move any commentary at all.
(I consulted Soltis's book LAST when I
was annotating this game!!
See game # 36, beginning on page
number 64.)
It also appears that G. Marco gave
this move an exclam, but my copy is
of a very poor quality,
and I cannot
be completely sure.
*************************
************************
[ It was obviously better for Black
to play the sequence:
>/=
45...Rf2+;
('!')
46.Ke4 Rd1!!;
{Diagram?}
Another VERY intricate move, and
one that is not all that easy to see
over the board. The point is that
Marshall now threatens a Rook
check
from behind, (e1); followed
by a Rook check on f4, WINNING
White's
Rook on e5!
The other point here is that if White
tries 47.Ke3, simply 47...R/f2-f1!;
renews the threat to win the Rook.
(ALSO! - don't forget that after the
capture of the White Pawn on the
f6-square, White's Rook on g7 is
trapped and has no
moves.)
**************
( Marshall may have only calculated:
46...Rxf6;
47.g5!?, {Diagram?} with continuing complications.
(See the second line, just below.)
*******
( White's best chance may be: 47.Rxf7 Rxf7;
48.Kxd3 Re7;
49.Kc4 Kg7; 50.Kb5 Kf6;
but Black should win. ("-/+");
***
After the moves: 47.g5 Kxg7!; 48.gxf6+ Kxf6;
49.Kxd3,
49...Kxe5; "-/+" {Diagram?}
White should simply resign.
(I am betting this is what Marshall
may have missed, especially
if he
was short of time.) )
)
**************
(Returning to the main analysis
line that began with ...Rf2+; instead
of 45...Rc4+.
White's next move is
relatively forced, otherwise Black
plays ...RxP/f6; and White's
Rook
on g7 is lost.)
47.Rxf7 Re1+; 48.Kd4 Rf4+;
49.Kc3 Rxe5; ("-/+")
{Diagram?}
White's position here is hopeless. (He is a Rook down!) ]
*************************
*************************
The next few moves look to be
relatively best.
46.Re4 Rxe4+;
47.Kxe4 Rd7;
This is forced. Now Marshall's plan has been revealed. He simply plans
to shove his
Queen-side Pawns up the board and win the game. Janowski is very hard-pressed to
find a method of generating counterplay. (White's Rook is bottled up.)
48.Kf4 a4; 49.g5 hxg5+;
{Diagram?}
Black should not allow White to
play the move, Pawn/g5-to-g6.
[ Not
</= 49...a3?; as
50.g6!; "<=>"
('cp')
{Diagram?}
gives White tremendous play.
( I.e. 50.g6! a2?; 51.Rxf7; "+/-") ]
50.Kxg5 a3;
51.Kh6 Ra7!; {See the
diagram - just below.}
The reason for this move is NOT
at all immediately obvious!
'!' - GM Andrew Soltis.
*************************
|
|
(The key position for the whole of the R+P endgame.)
*************************
It is hard to believe that the reason
for this move is to provide a (later)
flight square for Marshall's King!
*******
[ After the (seemingly, very
natural) moves:
</= 51...a2?;
(Really - '??') {Diagram?}
Believe it or not, this seemingly
harmless pawn push throws
away
Black's win!!!
52.Rh7+ Kg8; 53.Rg7+ Kh8; This is forced!
***
( Of course not: </= 53...Kf8??;
54.Kh7!; "+/-" {Diagram?}
and Black will be mated!!
{About a dozen of my students
fell into this trap, and/or did
not
see this coming.} )
***
54.Rh7+ Kg8;
55.Rg7+, ("=")
{Diagram?}
the game is drawn by a simple
repetition of the position.
- GM
Siegbert Tarrasch. ]
*******
52.Rh7+ Kg8;
53.Rg7+ Kf8; 54.Kh7 Ke8[];
This is naturally forced.
[ Not </= 54...a2 ???; 55.Rg8# ]
Both sides now hurry to promote.
(Soltis gives White's 55th move here
an exclam - believe it or not.)
To me, this is somewhat artificial, without this move, White should resign.
55.Kg8, a2; 56.h6, a1=Q; {See the diagram just below.}
*************************
|
|
*************************
57.h7,
{Diagram?}
This is the only (reasonable) move
that White can make.
This is such a complex ending, it
is easy to miss a trick or a tactic,
especially if you are trying to rush
through it.
"An astonishing position for a game
upon which the first prize hung."
- GM Andrew Soltis.
[ </= 57.Kh7?? Qxf6; "-/+" ]
Now Marshall has a nearly problem-like win.
57...Qxf6;
This is good enough for victory,
(But ..."too routine," says Tarrasch.);
so it is hard to really criticize it.
(And it finally turns the trick ...
in the very end.)
*******
[ Black had a VERY interesting
win, but even as a Master; it is
not all that easy to
find some of
these particular moves:
57...Ra8!;
('!!')
{Diagram?}
GM Andy Soltis gave this move
TWO exclams ... and for once,
I am
inclined to agree with him!
58.Rxf7 Qg1+!;
{Diagram?}
At first, this looks rather pointless.
(I checked this line with about five
of my students, NONE found this
sequence of moves!)
59.Rg7[]
Qxg7+!!; {Diagram?}
I think that this move is really
and truly shocking. (Very much so.)
60.Kxg7,
{Diagram?}
After you think about it a bit,
you will see that this move
was - and is - forced.
(The moves: </= 60.fxg7??, 60...Ke7#;
{Diagram?}
are good - only for a laugh.)
60...Ra7+;
{Diagram?}
This follow-up was hard to see,
at least in my opinion.
61.Kg6 Rxh7!;
{Diagram?}
The last "sneak" ... in a very
tricky and difficult line!
(I think
you have to < see > this position
... 'in your head' ... before even beginning
the combination. Otherwise there is no point in playing
any of these moves.)
62.Kxh7 Kf7; ("-/+")
{Diagram?}
Black has a simple, but a very
effective (K+P) win here.
(I am quite sure if this position had
been reached, D. Janowski would
have instantly resigned.)
This truly stunning and VERY brilliant
analysis of this line is all (originally)
the
work of the great Siegbert Tarrasch.
(And also verified by several strong
computer programs.) ]
*******
58.h8Q,
{Diagram?}
One of the greatest players and
writers who ever lived, provides
the very insightful comment:
---> "Janowski has won a moral victory:
don't resign, for you can never tell
what will happen.
But here Black's
advantage is so considerable that
even the new Queen cannot affect the
outcome." - GM Siegbert Tarrasch.
(The Reinfeld book of the tourney.)
[ 58.Rg1?? Ke7; "-/+" ]
58...Ke7;
59.Qh1,
{See
the diagram, just below.}
I think this is forced.
*************************
|
|
*************************
The position is interesting and surely merits a diagram.
[ </= 59.Rg4?? Ra8+; 60.Kh7 Rxh8# ]
59...Rd7;
60.Kh7 Qf5+; 61.Kh6 e5;
Now Black threatens a devastating
check on d6 with the Rook, and he
also has the idea
of ...Rd8; with the
threat of winning the White Queen
with an X-RAY Attack. (...Rh8+)
**************
[ Interesting was: 61...Rd8!?;
"/+" {Diagram?}
Black is probably
better/winning. ("-/+")
*******
Most students want to play
the rather obvious check:
61...Qf4+!?;
("-/+") {Diagram?}
but this play is also very good
for Black as well.
(It is hard to go wrong when you
are only three whole Pawns ahead!) ]
**************
62.Rg1 Rd8;
With the idea mentioned in the
last note.
(The check on d6 looked
good for Black as well.)
*******
[ Very interesting was:
62...Rd6+!?;
63.Kg7 Rg6+; 64.Rxg6; {Diag?}
White had no choice here.
( </= 64.Kh7?? Rxg1+; ("-/+") )
64...Qxg6+;
65.Kh8 e4;
"-/+" {Diagram?}
with a won game for Black.
(The main point is that the Rooks
have been swapped off.) ]
*******
63.Qb7+ Qd7;
64.Qf3,
White continues to squirm here.
*******
[ If
</=
64.Qxb6?, then simply
64...Qd6+; {Diagram?}
and the Queens come off the
chess board.
("-/+")
***
Of course a move like: </=
64.Qxd7+?, {Diagram?}
is simply admitting defeat.
(A R+P end-game with a whole
three pawns deficit should appeal
to almost no one.) ]
*******
64...Qe6+!?;
{Diagram?}
This looks like a good move here.
(Tarrasch criticizes this move, but
his remarks here are plain wrong.)
**************
[ Tarrasch recommends the
VASTLY
INFERIOR line of:
</=
64...Qh3+?!; ('?')
{Diagram?}
A panic reaction to dump the
Queens that costs Black 3-5
points
in the box's evaluations
of this position.
65.Qxh3 Rh8+;
66.Kg5 Rxh3; 67.Rb1, {Diagram?}
and while Black is probably still
winning, White gains considerable
counterplay ... mainly because he
wins a Pawn ... AND activates his
King!! {A.J.G.}; (The
"point differential" between this line ... and
the
line actually chosen by
Marshall is vast, at least by computer standards!)
*******
The best move was: >/=
64...Qd4!; {Diagram?}
centralizing the most powerful
piece on the board.
(This move is
also the first choice of close to
10 different strong programs!) ]
**************
65.Kh7 Qd5;
Black offers an exchange.
According to several sources, the game
was adjourned around here and was
not completed
until several days later.
(Most books don't even mention this
fact!)
[ It is very possible that:
(>/=) 65...e4;
('!') {Diagram?}
is an improvement over
the actual game. ]
66.Qa3+ Qd6!;
The correct move.
*******
[ After:
66...Qc5!?;
67.Qg3, {Diagram?}
is harder to meet properly.
***
And after: 66...Ke8!?;
67.Qa7, {Diagram?}
White threatens Rg8# next. ]
*******
67.Qc1,
White is quickly running out of
moves here.
*****
[ An old book I have - in German -
gives the following line:
67.Qa7+ Rd7;
68.Qa2 Qd3+; 69.Kg7 f5!; 70.Rg6 Kd8+;
71.Kf8 Qd5!;
72.Qxd5 Rxd5; 73.Rxb6 Kd7!?;
("-/+") {D?}
and Black is obviously winning
this endgame. ]
*****
67...e4!?;
{Diagram?}
This threatens ...Qh2+; winning.
"Very powerful," says Tartakower.
**********
[ Probably the move:
>/= 67...b5!;
("-/+") {Diagram?}
represents a small improvement
over the actual game.
(This makes
sense too, just win by shoving home
a passer!);
***
The move: >/=
67...Qd4;
("-/+") {Diagram?}
is also probably {slightly} better than
what was played in the game. ]
**********
68.Rg2 Qc5!;
{See
the diagram, just below.}
This wins ... as now the exchange
of Queens is virtually forced.
*************************
|
|
*************************
(Soltis {also} awards this move
an exclam.)
'!' - GM Andrew Soltis.
69.Qxc5+,
Not much choice anymore.
**************
[ But definitely not:
</=
69.Qh6?? Qf5+; ("-/+")
{Diagram?}
and Black wins easily.
*******
Also failing is: </=
69.Qf4? Qh5+!;
70.Qh6,
{Diagram?}
This is forced.
(Not </= 70.Kg7?? Qh8#)
70...Qf5+!;
{Diagram?}
This wins nice, of course a swap
of the ladies should also do the
trick for Marshall.
71.Rg6,
{Diagram?}
This horrid-looking move could
be completely forced.
(Of course not: </= 71.Kg7?? Qe5+; {Diagram?}
and White is mated ... in very
short order.)
71...Qxg6+!?;
72.Qxg6 fxg6; 73.Kxg6 e3; ("-/+")
{Diagram?}
and White should resign.
*******
The continuation of: </=
69.Qg5+!? Qxg5; 70.Rxg5 Rd6!;
{Diagram?}
is just losing for White. ("-/+")
]
**************
The rest really needs no comment.
69...bxc5;
70.Rg5 Kf6!?;
{See
the diagram - just below.}
This is probably best.
( Several authors give it an exclam, ... so it probably fully deserves one!
{An old German book I have gives
this move a question mark, but I
am not sure why. A 'typo?'} )
'!' - GM Andrew Soltis.
*************************
|
|
*************************
The point of Marshall's move is he
sacrifices his QBP to contain the
White King and
obtain two healthy,
connected, and passed pawns.
[ Black could also win another way
with something like:
70...Rc8;
{Diagram?}
Another book gives this an
exclam ... and while this method
proves fully adequate,
it is
definitely less than best. (IMOHO)
71.Re5+ Kf6; {Diagram?}
This is obviously better than
the grossly passive ...Kf8?
72.Rxe4 c4; 73.Rf4+ Ke6;
74.Kg7 Rc7; 75.Rf6+ Ke5; 76.Rf1 f5+;
77.Kg6 f4;
78.Re1+ Kd4; 79.Rf1 Ke3; 80.Kg5 c3;
81.Kg4 Rg7+;
82.Kf5 c2;
83.Re1+ Kd2;
"-/+" {Diagram?}
and Black is obviously winning.
(But Marshall's method is MUCH
more efficient!) ]
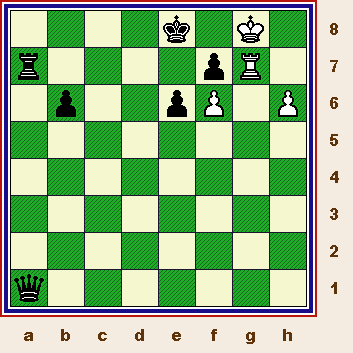
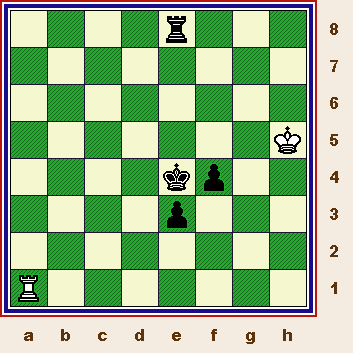
71.Rxc5 Re8; 72.Rc1 e3;
73.Rf1+ Ke5; 74.Kh6 f5;
75.Kh5 Ke4; 76.Ra1 f4; {See
the final diagram.}
White Resigns (0-1) ...
his position is
completely hopeless.
*************************
|
|
*************************
"A truly masterly game, abounding in
exceedingly fine and instructive play -
which does credit to both players."
- the great GM Siegbert Tarrasch
"One of the greatest Rook-and-Pawn
endings in all of the pantheon of chess."
- Georgi Marco.
(I think that Lasker- from what he
wrote in his U.S. magazine - was
basically
agreeing with Marco here.)
Marshall was very proud of this ...
"difficult, but grueling victory," which
virtually
guaranteed him first place.
The World Champion said:
Of his excellent score of ELEVEN
wins, only FOUR draws, and NO
losses, (!!)
"This is a tournament of the highest
order. This marvelous performance
now holds all the
records in
International Chess."
- Lasker's Chess Magazine.
(Shortly after this tournament, Marshall
went 6-0 in Sylvan Beach, and then
9.5 {out of 10}
in St. Louis, MO; in the
Seventh American Chess Congress.
Thus, Marshall established
himself
as the King of American Chess!)
A "titanic battle" ... "in which White's
attacking resources seem to be
inexhaustible, but are
thwarted by
an ingenious and sound defence."
- GM S. Tartakower and J. Du Mont
**************************************************************
BIBLIOGRAPHY:
I used many different sources to
annotate this game ... but my main
and most helpful ones were copies
of old German magazines.
(I was also
sent some copies of 'The ACB' and
also Lasker's Chess magazine.) My
sources are listed in the order that I
used
them.
# 1.) Schach Zeitung, 1904. (old magazines, photo-copies)
# 2.) Cambridge Springs, 1904.
Historical Chess Tournaments, # 018.
By D. Olomouc. (c) 1998.
Published by Caissa 90, Czech. Rep.
ISBN: # 80-7189-234-3
# 3.) "Cambridge Springs (1904) -
International Chess Tournament."
(The only real book of the event.)
By Fred Reinfeld. (c) 1935.
Published by Black Knight Press.
(New York City, NY / U.S.A.)
# 4.) "My Fifty Years Of
Chess."
('The Triumphs of an American
Chess Champion.')
By GM Frank J. Marshall.
(A Hardinge-Simpole re-print.)
Published in Great Britain. (2002)
ISBN: # 1-84382-053-6
# 5.) "500 Master Games
of Chess,"
by GM Savielly Tartakower and also
James Du Mont.
Copyright (c) 1952, by the authors.
(A 1975 Dover re-print.)
# 6.) "FRANK MARSHALL,
United States Chess Champion,"
('A Biography with 220 Games.');
by GM Andrew Soltis. (c) 1994
Published by McFarland Books. (hard-back)
ISBN: # 0-89950-887-1
(Note: This ending is also analyzed by GM Pal Benko in his
"Endgame Lab" column. See the December 2004
issue
of the magazine, "Chess Life." {Page # 46.} I
don't see anything new worth mentioning that I did not
cover.)
**************************************************************
Copyright
(c) A.J. Goldsby I. Copyright (c) A.J. Goldsby, 1989-2004.
Copyright (c) A.J.G; 2005. (All
rights reserved.)
All games ... HTML code (initially): Generated with ChessBase 8.0
(The diagrams were created with the aid of the program, Chess Captor.)
I really don't think this is one of Marshall's greatest games, but it was a ROUSING struggle!!!
***
|
This is a game that I worked on annotating for an almost inestimable amount of time. I annotated it a long time ago, but lost these files in a computer crash. When I began this project anew, I even purchased two books I did not have in order to be able to the best job possible. The computer was consulted constantly as well. Before chess programs became so strong, it was possible to argue endlessly over which line was better. Now a machine - with no ego - gives a completely honest evaluation. And if there is a very dramatic difference in the "point score" of the two lines, well ... it is not too difficult to tell which line is the best. (There are also certain principles a Master draws upon as well, such as: "When ahead in material - exchange pieces." {But NOT Pawns!}) This game would not have been possible without the contributions of many different people. (There are too many to name, some have asked that I not use their name.) In particular, I would like to (again) thank Steven W. Etzel. He spent an untold amount of time going over my CB copy of this game and offered literally dozens of suggestions. Nearly all of these were used in some fashion. I am very proud of this effort. It probably took over six months just to annotate the game, (the second time); ... and then it took many more weeks of labor to prepare the final HTML document you are now viewing. In many cases, I have discovered new ideas and variations, in others - I have corrected the false assumptions many other authors have made as concerns this amazing and timeless struggle. |
This
(web) page was created in (mid) September, 2003.
This page was last updated on 11/29/14
.
(Diagrams
were re-done on Sunday; June 27th, 2004.)
***
Click HERE to go (or return) to my Java-Script (re-play) page for this game.
*******
Click HERE to go to, (or return to); my Home Page for this site.
Click HERE to go to, (or return to); my End-Game School on this site.
***
Click HERE to return to my page on Frank J. Marshall.
Click HERE to go to ... or return to ... the Electronic Archive & Museum.
Click HERE to go to, (or return to); my page on Paul Morphy.
***
Click
HERE
to go to, (or return to);
my Geo-Cities page
on the Best Chess Players who ever lived.
Click HERE to go to, (or return to); my page on the Best Chess games of all time.
(Or click the 'Back" button on your web browser.)
Copyright (©) A.J. Goldsby, 1985 - 2014. All rights reserved.