|
|
GM V. Kramnik vs. Deep Fritz (7.0)
|
|
|
(The ratings are the ones given for Deep Fritz, in "The Week In Chess.")
The Sixth (#6) game of the: "Man vs. Machine/Brains In Bahrain" Match.
Kramnik comes out of the opening with a very large advantage. If life were always fair, he would have won this game easily. (He was much better.) But Kramnik does not find the best way to prosecute his advantage, and then he lets his edge slip. In the aftermath of all this, he unwisely decides to sacrifice a Knight, but this is unsound.
Shades of Deep Blue vs. Kasparov, Mig Greengard says he found a draw in the position that Kramnik resigned. While I am not completely convinced, (And neither are several GM's, like Nigel Short, or Danny King.); it does appear that Kramnik did not need to resign, and could have put up much more resistance. But it is also the kind of position where the computers can find these little surprises, as many of these lines are found only by deep calculation. (Human have a harder time seeing these types of complex possibilities, especially if you believe that your position is lost.)
<< Kramnik does not find the best
line and decides to sacrifice a
piece.
(Unsound.) Although he
gets a terrific attack, the machine
could be
counted on to find the
very best defense.
(Near-perfect
calculation of long tactical lines
are the machines strong point.) >>
<< In the end, Black may be winning.
Kramnik resigns, but according to
an analysis
of the final position by
one of the Fritz team, the position
could have held some
real and
concrete drawing chances. >>
The comments that are contained
within the brackets, ... << blah-blah-blah-blah >>
are from the
short version of
this game - that you can download
from my web site.
I have also used several quotes from
the ChessBase web
site.
(http://www.chessbase.com/images2/2002/bahrain/games/bahrain6.htm,
by Kure, GM Danny King, GM Julian
Hodgson, and GM Vladimir Kramnik.)
I urge all interested parties to check
out their comments as well ... for a
completely
different take on this game.
(Almost no text, but a very deep
analysis of some of the alternatives.)
Click HERE to see an explanation of the symbols I use.
<< Once again, Kramnik uses
probably his favorite opening, the
classical Queen's Pawn. >>
1.d4
Nf6; 2.c4
e6;
{Diagram?}
Black threatens a Nimzo-Indian,
or some other sharp line ...
but
alas it is only a feint.
3.Nf3, {Diagram?}
This is - of course - a completely
good opening move, fulfilling all
four of the
basic opening principles.
BUT!! ... ... ... ...
White actually chickens out
with this move.
Has the Fritz
team programmed their box
to avoid difficult and complex lines?
[ White could also play: 3.Nc3!?, {Diagram?} in this position. ].
3...b6; {Diagram?}
<< Black chooses the Queen's Indian
Defense. Having gotten trashed in
the first half
of the match, the
programmers asked the machine to
choose lines that kept the
Queen's
on the board and led to a much
greater complexity. >>
4.g3, {Diagram?}
<< The best way of meeting this
opening.
(For many years,
opening books only considered
this move alone.)
But today,
many opening books consider
the "Petrosian System,"
{4.a3}
to be the main line.) >>
<< This method of handling the
"Queen's Indian Defense," was
first worked
out in detail by the
great Akiba Rubinstein. >>
***
[ White can also play:
4.a3!?, {Diagram?}
with a good game for White.
("The Petrosian System.")
This system was pioneered by
the great (former) World Champ,
Tigran Petrosian.
And it was later
revived and refined to a much
feared system by another World
Champion - Garry Kasparov.
(It is probably because of the many
ideas and
refinements by Kaspy
that this is considered to be the
main line today.)
[ For more details, see:
"Modern Chess
Openings," or "Nunn's Chess
Openings." ] ].
***
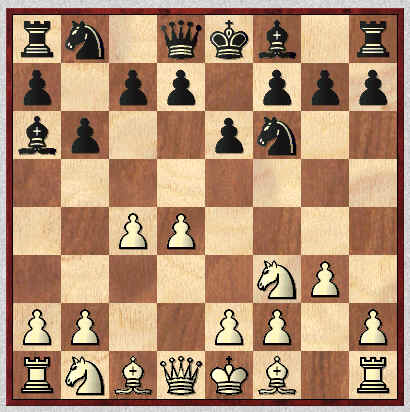
4...Ba6;
{See the diagram just below.}
<< This is one of Nimzovich's
original ideas - in an almost
continuous stream
of innovations
by this great player. (Nimzovich
was also one of a small handful
of
players - like Richard Reti - who
fathered the Hyper-Modern
movement.) >>
|
|
Black plays an original idea of Aaron Nimzowitsch.
***
[ Black can also play: 4...Bb7; {Diagram?}
with a good game.
(See the next game for an
example of this type of
opening.)
The modern main line is: 5.Bg2
Be7; 6.0-0
0-0; 7.Nc3
Ne4; 8.Qc2
Nxc3;
9.Qxc3
c5; ("=" or
"~" Maybe White has a very small edge.) {Diagram?}
which is seen in the very next
game, as well as dozens of other
master games as well.
(A search of my database indicates
that this position has been played
nearly ...
500 times at the Master
level of chess!
{ChessBase's db has
nearly 700 matches!!})
(See the game:)
GM Ulf Andersson -
GM Anatoly Karpov;
Biel, 1990. (31) (Drawn in 31 moves.)
].
***
5.b3, {Diagram?}
<< White must protect - or gambit -
his attacked pawn on c4.
This
move (b3) is one of the main lines.
(White can also play Nbd2, or
also Qc2, as well.) >>
This ... and Qc2 ... are probably the two main lines here.
***
[ White could also play: 5.Nbd2, "+/=" {Diagram?} with a good game.
Or 5.Qc2!?, "+/=" {Diagram?} also with a good game. ].
***
<< The next few moves are all
one of the main lines. >>
5...Bb4+; 6.Bd2
Be7; {Diagram?}
Black retreats his Bishop to
a good square, and leaves
White's dark-squared QB
on
the board ... on a somewhat
awkward square. (This is the book move as well.)
7.Bg2, {Diagram?}
<< Probably the best approach,
White prepares a quick K-side
castling. >>
[ Another approach for White is: 7.Nc3
0-0; 8.e4
d5; 9.cxd5
Bxf1; 10.Kxf1
exd5;
11.e5
Ne4; 12.Kg2
Qd7; The end of the column.
13.Qe2
Nxc3; 14.Bxc3
c5;
15.Rad1
Nc6; 16.Rd2
Qe6; 17.Rhd1
Rfd8; 18.Ng1
Rac8; 19.Nh3!,
"+/=" {Diag?}
A strange position. Many computer
programs consider this position to
be much better
for Black, MCO,
(GM N. de Firmian); considers this
position to be solidly better
for White.
("+/") Oddly enough, I look at the
position, and feel it to be very close
to equal!
(White won a nice game that was
picked as a best game by the
'Informant' series,
so I think theory
has been unduly influenced by the
result of this encounter.)
GM J. Hjartarsson - L.B. Hansen; Copenhagen, 1997.
[ See MCO-14; page # 570,
column # 31, and also note # (c.). ] ].
<< We continue by marching
straight down a book line. >>
7...c6!?; {Diagram?}
A critical decision for Black.
The main strategy behind this move
is to block the power of White's
fianchettoed Bishop (on g2) by
jamming the center full of pawns.
(Pawn wedge ---> strong point
ending on the d5-square.)
This plan also has the benefit of increasing/augmenting the Black Bishop on a6.
Once again, this is also one of
the main lines ... but NOT the only
playable
move for Black! (Black has at least 7 (!) playable moves
in this position.)
***
[ Black could also play: 7...0-0;
8.0-0
Bb7!?; Black re-deploys his QB to counter
White's fianchettoed Bishop on g2.
(This is a fairly common maneuver
in these variations.) (Black could also try: 8...d5!?
"~")
9.Nc3, "+/=" (dev./center)
{Diagram?} White has a very small
advantage in this position.
This position - according to my
database - has happened, at
the master level,
over 250 times!
One of my favorite games, which
is in one of my books, (and I
have studied in depth); is:
V. Dydiishko - Lev Psakhis;
8th Spartakiade, (Team Tourney).
U.S.S.R; 1983. (43)
{White won a nice game.}
Probably the most significant
encounter of the last 10 years
(in this particular sub-variation),
is the following game:
GM Vishy Anand - GM Boris Gelfand;
FIDE World Cup (knock-out) Tournament.
New Delhi/India/2000. (41)
{A brilliant expose by Anand.} ].
***
8.Bc3
d5; {Diagram?}
Black counters by striking
strongly at the center ...
one of the most basic precepts
of the
opening phase of the
game of chess.
***
White now anchors his Knight
into the < outpost > square of
e5 ...
and Black immediately
takes steps to rid himself of it.
9.Ne5, {Diagram?}
Not only does this move get the
Knight to one of its best squares,
it also controls the c4-square.
(Which is attacked by the Black
Bishop on a6 and the pawn on
the d5-square.)
[ White could also solve
the problem of the hanging
pawn on c4 by playing
the
continuation of: 9.cxd5
cxd5; 10.0-0, {Diagram?}
with a fair game
for both sides.
Or White could simply play: 9.Nbd2, {Diagram?}
which also guards the
sensitive
c4-square. ].
Both sides continue with their
plans ... and their development.
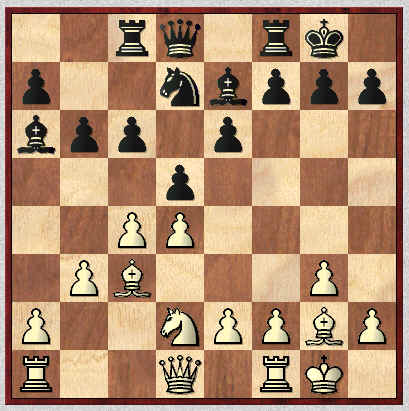
9...Nfd7; 10.Nxd7
Nxd7; 11.Nd2
0-0; 12.0-0
Rc8;
{Diagram,
just below.}
<< The end of the column in MCO. >>
Black gets a Rook nearer the center, and prepares a possible ...c5.
This is one of the main lines/key positions for this whole line.
|
|
The book position after Black's 12th move.
***
13.a4, ('!?')
{Diagram?}
<< A slight deviation from the
main line of 'book,' according
to many
of my manuals on this
opening. >>
<< More often seen here is the move, 13. e4. >>
<< Was Kramnik purposely trying to
steer the Fritz program away from
the better known lines, perhaps in
the hope of another error? >>
***
[ More normally played is the line:
13.e4
c5; 14.exd5
exd5; 15.dxc5
dxc4;
16.c6
cxb3; 17.Re1
b2; 18.Bxb2
Nc5; "~" {Diagram?}
... "with chances for both sides."
- GM Nick de Firmian in MCO.
GM John van der Sterren -
GM Anatoly Karpov;
Hoogovens Annual Tournament.
Wijk aan Zee/HOL/1998.
[ See MCO-14; page # 32,
column # 32, & note # (f.). ]
Another game continued:
19.Ba3!?
Bd6!?; 20.Nb3
Nd3!?;
(Maybe - '?!') {Diag?}
This could be dubious, Black's
game goes rapidly downhill.
(Probably Black should play: >=
20...Bb5, {Diagram?}
to eliminate White's dangerous
c-pawn.)
21.Bxd6
Qxd6; 22.Nc1
Rfd8; 23.Nxd3
Bxd3; 24.Qa4
a5; 25.Rad1
Qc7;
26.Bh3!
b5?; 27.Qh4!,
("+/-") {Diagram?}
Black Resigns, 1-0.
Black is lost. If 27...Rb8; then
White will play 28.Rxd3!, Rxd3;
29.Bf5,
threatening a mate in 2,
(beginning with Qxh7+); and the
loose Rook on d3.
Since Black
will have to guard against the
greater threat, he will emerge a
piece down.
GM F. Gheorghiu - L. Cserna; Berlin Open/[A.J.G.]/1986. (27)
This was probably the very first
game to reach the position in MCO after 18...Nc5;
so I thought I would
take a look at it. (I thought I had
remembered that the position
after
18...Nc5; was judged to be MUCH
better for White.
{In an earlier book,
- based on this one game.}
I was
correct, but this game obviously
leaves a lot of room for improvement!) ].
***
13...Bf6; {Diagram?}
<< The main line, although Black
often plays ...c5!? here as well. >>
*****
[ ChessBase gives the line:
13...c5!?; {Diagram?}
Black also strongly counters
in
the center. 14.cxd5,
{Diagram?}
Is this the best line?
***
( White could also play: 14.a5!?
b5; "~" {Diagram?}
with balanced chances in
a rather murky position.
The best line may well be: 14.dxc5
Nxc5!?; 15.b4!?,
"~" {Diag?}
with continuing complications.
(- LM A.J. Goldsby I.) )
***
14...exd5; 15.Bxd5
cxd4; 16.Bxd4
Nb8; 17.e4
Bxf1;
18.Nxf1
Nc6; "=/+" {Diagram?}
Black is clearly better here. ].
*****
14.e4!, {Diagram?}
<< This looks to be the most
energetic move in this position ...
to me, anyway. >>
White gains a strong break in the center of the board.
[ White could also play: 14.a5!? b5!; "~" {Diagram?} with good play for Black. ].
14...c5; ('!') {Diagram?}
Black gets in a big pawn
break of his own, striking
at the center as well.
15.exd5
cxd4; {Diagram?}
<< The last book move for the
computer, according to
GM Danny King. >>
(And also the ChessBase web site.)
This position has only occurred in
a few games. It FIRST turned up
in the encounter:
G. Morrison - GM Anthony Miles;
FIDE Zonal Tournament.
Amsterdam/HOL/NED/1978. (41)
(Black won a nice game.)
{Tony Miles passed away in
Nov, 2001. I knew him from his many
U.S. travels, -
he stayed in my room
several times when we played in
tourneys together -
and I also watched him play in at least one
U.S. Championship.
I was very
sad to hear of his passing.}
16.Bb4!?, (Maybe - '!') {Diagram?}
<< This is interesting, White could
have also played Bb2 here as well. >>
[ White could have also played:
16.Bb2!?, {Diagram?}
with uncertain consequences. ].
16...Re8; {Diagram?}
<< This is good and very natural-looking. (Maybe also playable
here was ...Nc5!?) >>
17.Ne4!?, (Probably - '!')
{Diagram?}
<< The sharpest and most energetic
move, it also leads to extremely
complicated positions.
Is
Kramnik out to avenge himself of
his loss in Game # 5? >>
<< (The ChessBase web site
analyzes several different alternatives ...
at this particular juncture.) >>
[ White could have also played: 17.d6, {Diagram?};
or 17.dxe6!?, {Diagram?};
or even 17.Re1, {Diagram?}
all with an interesting game. ].
17...exd5!; {Diagram?}
<< This is probably the best move
for Black, as it breaks up White's
pawns.
But ...Nc5; was probably
playable as well. >>
[ Black could also play:
17...Nc5!?; 18.dxe6
Rxe6; 19.Nxf6+
Rxf6;
20.Re1,
"=" {Diagram?} with a roughly level position. ].
18.Nd6, {Diagram?}
<< White goes ahead and forks the
two Rooks, this is pretty much
forced now,
in this position. >>
Apparently Fritz had even predicted
this position would occur, back
around
moves 10-through-12!
[ Very bad for White would be:
18.cxd5?!
Bxf1; 19.Qxf1
a5;
20.Ba3
Nc5; "/+" {Diagram?}
and Black is much better. ].
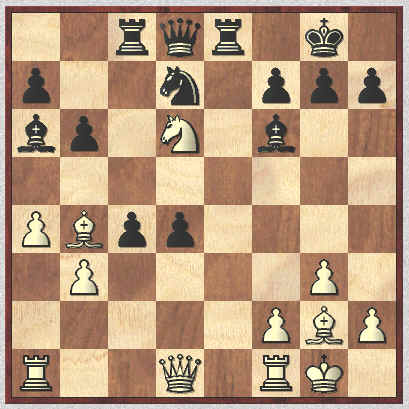
18...dxc4;
{See the diagram just below.}
<< Black wins another pawn - this
is pretty much forced as well. >>
|
|
***
[ An inferior line was: 18...Be7?!;
19.Nxc8
Bxb4; 20.Nxa7
Bc3;
21.Bxd5
Nf6; 22.Nc6
Qd6; 23.Qf3,
"+/=" {Diagram?}
and White is clearly much better.
(Maybe - "+/") ].
19.Nxf7?!, (Hmmm.)
{Diagram?}
<< Kramnik is very fired up, and
decides to sacrifice a piece. But
this is
an over-reaction, and does
not quite yield the desired results. >>
(Was he distracted? This is certainly
not the kind of move ... or the kind
of play ...
we saw from this same
player in the first half of this match.)
<< Of course, if Kramnik had made
this sacrifice against anyone else,
(like a human);
he may have easily
succeeded. But a computer will
not get nervous or become a
little frightened. It will simply crunch
the numbers and come up with the
best
possible defense that its little
program will allow. >>
<< In the early days of chess
programs, one could count on the
computer program to
often err in
extremely critical positions, but this
is (of course!) no longer true. >>
<< [ The ChessBase web-site gives
the following analysis: 19.bxc4 Be7; (Unclear?)
Or 19.Nxe8 Qxe8; 20.Re1,
(20.bxc4,
20...Ne5; 21.a5 Bxc4; 22.Re1 Qd7;
23.axb6 axb6) 20...Qd8; 21.bxc4,
Bxc4; (Who is better here?)
Or 19.Bd5 Nc5;
(19...Ne5; 20.f4 Nd3;
21.Bxf7+ Kf8;
{21...Kh8; 22.Bxe8}
22.Qh5 Nxb4; 23.Bxe8) 20.Bxf7+, Kf8; 21.Bxe8 Qxd6;
22.Bb5 Bxb5;
23.axb5, "+/=" (Maybe "+/")
- Deep Fritz ] >>
So in the end, Nxf7 may actually
deserve a question mark. ('?') But Kramnik deserves
better; at
least some consideration for his
willingness to try this little
adventure against
the box.
(Bravery ... or foolhardiness?)
***
[ Clearly the best line was:
>= 19.Bd5!
Nc5; {Diagram?}
I don't know about this move.
(Maybe the move 19...Rf8; {Diagram?}
is a little better.) 20.Bxf7+
Kf8; {Box, Diag?}
This is forced.
21.Bxe8
Qxd6; 22.Bb5
Bxb5; 23.axb5,
"+/=" {Diagram?}
and White is clearly a little better
here. (To say the least!) {Line by ChessBase.}
The only real questions are:
Did Kramnik see this line? And
if he did, why didn't
he play it? Was he looking for more?
Also interesting was:
19.bxc4!?, "~"
{Diagram?}
with an approximately equal
position here.
{Maybe White has a small edge.} ].
[ 19.Nxe8?! ]
***
<< I tested this position on at
least 10 different programs and
different analysis engines.
From
ChessBase to ChessMaster,
Crafty, Rebel, Novag, etc. They
all consider this
position to be
better (or even winning!) for
Black ... in the current position
that we
have in this game. >> (Meaning White's sacrifice was
pretty much unsound.)
19...Kxf7; 20.Bd5+
Kg6; {Diagram?}
<< This ugly-looking move
is forced. >>
[ Clearly bad is:
20...Re6??; 21.Qh5+, {Diagram?}
and White is now winning.
("+/-") ].
21.Qg4+, {Diagram?}
<< This is probably the only realistic
way of pursuing the attack. >>
[ 21.bxc4?!
Ne5; "/+"
(Maybe "-/+") {D?}
and Black is better - if not
winning. ].
21...Bg5; {Diagram?}
<< This is forced as well. >>
***
[ Another line is:
21...Kh6!?; 22.Qh3+!?
Kg6!?; This is the safest.
(Maybe >= 22...Bh4!;
"~" {Diagram?} is a little better.
Definitely not: 22...Kg5??; 23.f4+
Kg6; 24.f5+
Kg5; 25.Qh4#
)
23.Qg4+
Kh6; 24.Qh3+,
{Diagram?}
is a draw by a repetition of
the position. ("=") ].
***
22.Be4+!?, {Diagram?}
<< Kramnik thought this was the
best method of continuing the
attack. >>
***
[ << The attack grinds to
a halt after: 22.f4!?
h5; 23.Bf7+
Kxf7; 24.fxg5+
Kg8;
25.Qxh5
Ne5; 26.g6
Nxg6; 27.Qxg6
Qd7; "/+" (Maybe
"-/+")
{Diag?}
and Black
should probably win.
(Kramnik said he saw this fairly
simple line, over-the-board.) >>
Not quite hitting the mark was: 22.h4?!
Nc5; 23.bxc4
h5; 24.Qxg5+
Qxg5;
25.hxg5
Nd3!; "/+" {Diagram?}
and Black is clearly better,
if not winning outright. ].
22...Rxe4; ('!') {Diagram?}
<< This is good, even forced. >>
[ A worse line (for Black!) is
the continuation of: 22...Kf7!?;
23.Bd5+
Kf6?; {Diagram?}
This is a mistake.
(The move: 23...Kg6;
{Diagram?}
probably leads to a draw by
a
repetition of the position.) 24.Qf3+
Ke5; {Diagram?} Sadly, this is forced.
(24...Kg6?; 25.Bf7+
Kh6; 26.Qh5#)
The next few moves are
all pretty much forced.
25.Rae1+
Be3; 26.Qe4+
Kf6; 27.fxe3+
Kg5; 28.Qh4+
Kg6; 29.Bf7#, {Diagram?}
This line represents just one
of dozens of pitfalls a human
player might have fallen into ...
if an organic intelligence were
trying to defend this position.
{A.J.G.} ].
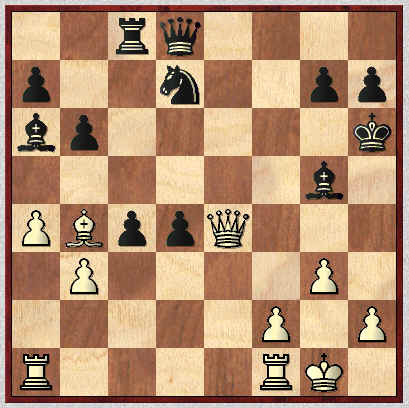
23.Qxe4+
Kh6; (king haven)
{See the diagram just below.}
<< The only good move for the
computer. >>
|
|
The position in the game after Black's 23rd move.
***
[ The continuation:
23...Kf7; 24.Qd5+
Kg6; 25.Qe4+
Kf7; "=" {Diagram?}
is simply repeating moves.
Of course not: 23...Kf6?;
24.Rae1!,
"+/" {Diagram?}
with a clear advantage to
White. (Maybe even "+/-") ].
<< White now continues the
attack. >>
24.h4
Bf6; 25.Bd2+
g5; 26.hxg5+, {Diagram?}
<< This appears to me to be the
best way of continuing the
attack. (Line opening.)
But Deep
Fritz pointed out that bxc4!? was
also possible. >>
[ Very interesting and playable
was the continuation:
26.bxc4!?, {Diagram?}
with some compensation for
White, due to the placement
of Black's unfortunate King.
(See the ChessBase analysis.) ].
26...Bxg5; 27.Qh4+!?, {Diagram?}
<< This is an extremely complex
position, it is not at all clear
what the best continuation
of
the attack would be. >>
<< The Fritz team - as well as many commentators - felt that Qe6+!? was a better continuation. >>
<< IM M. Pein - for the London
Chess Center - opined that the
best chance was Qe6+.
(But again, this is NOT 100%
certain.) >>
***
[ The main line of Qe6+ runs
as follows: 27.Qe6+
Nf6; 28.Qh3+, {Diagram?}
This is probably the best.
( A strange line is: 28.f4!?
Bh4!!; "-/+" {Diagram?}
(So that if White plays Pawn
takes Bishop, Black plays the
strong ...Qg8+!;
to trade the Q's,
and kill the attack.)
- IM Malcolm Pein. ) 28...Kg6!;
29.f4
Bh6!; {Diagram?} This appears to be the best
try in this position.
(Interesting is: 29...c3!?)
30.f5+
Kf7; "/+" (Maybe "-/+") {Diagram?}
and Black is clearly better,
if
not winning outright.
( - GM V. Kramnik.) ].
***
<< White continues to try to make
as much out of his position as
he possibly can.
(And the machine's program
continues to defend ...
in a nigh super-human manner.) >>
27...Kg6; 28.Qe4+
Kg7; 29.Bxg5
Qxg5; 30.Rfe1
cxb3;
31.Qxd4+
Nf6; 32.a5, {Diagram?}
<< White continues to try to open
lines ... this is his only hope. >>
[ If 32.Re7+!?
Kg6; "-/+" {Diagram?}
and Black is winning.
Maybe 32.Rab1!?, {Diagram?} is a try? ].
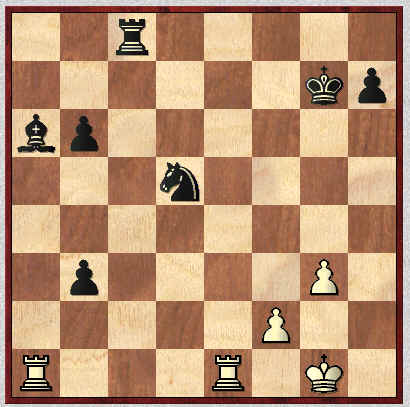
32...Qd5!; 33.Qxd5
Nxd5; 34.axb6
axb6;
axb6; "/+" (Maybe "-/+")
{Diagram.}
<< White Resigns, believing his
position to be hopeless. (0-1) >>
|
|
The final position. (White resigns.)
***
[ After the very likely line of:
34...axb6; 35.Rxa6
b2; 36.Ra7+
Kg6; 37.Rd7
Rc1;
38.Rd6+
Nf6; 39.Rdd1
b1Q; "/+"
(Maybe "-/+") {Diagram?}
and Black's position appears completely overwhelming.
[ Line by - GM V. Kramnik ]
( But is this position really lost for
White? Mig Greengard gives an
EXCEEDINGLY
complex line, of
which the following is just a
very brief look at: 39...b1Q;
40.Rxc1
Qf5!?;
This is good, ...Qb4;
was
playable as well. 41.Rc6!
b5!?; 42.Ree6
b4!?; 43.Rb6
Kf7;
44.Rxf6+!!
Qxf6; 45.Rxb4
Qe5!?; {Diagram?}
I don't think it matters what move
Black
plays in this position.
(45...Qa1+; 46.Kh2 Qa2; 47.Rf4+, {Diagram?} leads to pretty much the same idea.)
46.Rf4+, {Diagram?} (Is this position drawn? All the experts say that it is!)
White has erected a
FORTRESS ...
through which Black can not
penetrate. (Draw, "=")
[The White Rook only has to
move from f4 to h4.]
(But this is not the only line
for White ... it is very, very
difficult and a very complex line.
---> For the full analysis ...
see the ChessBase web-site.
You can also download
their very
deep analysis - in PGN format.) ) ].
***
Please visit my web page(s) at:
https://www.angelfire.com/fl5/human_fan02/index.html
for a
better look at this whole match.
(The Kramnik - Deep Fritz event
has its own section.)
Every game
is annotated in depth.
***
Copyright (c) A.J. Goldsby I. Copyright (©) A.J.G; 2002.
(Code initially) Generated with ChessBase 8.0
0 - 1
I
went to great pains to annotate this game ... NOT to benefit
a master, but to make it possible
for the average player to follow this game. I also tried to make this a
game a brief survey of the
opening, for any aspiring player who is trying to learn - and might not have
access to many books.
Click HERE to return to the page for Kramnik vs. Deep Fritz, Game # 6.
Click HERE to go to (or return to) the main (parent) page for the Kramnik vs. Deep Fritz Match.
Click HERE to go to (or return to) my Main (home) page for this site.
This
is a game I annotated especially for these web pages. I plan to annotate - in a
similar
manner ... all of these games. (For your study and enjoyment.)
If you would like a copy of this game to help you study, contact me.
Page
first posted, late October, 2002. Last/final
revision:
Tuesday; December 2nd, 2002.
(Page updated on: January 15th, 2003.)
If
you get the U.S.C.F.'s magazine, (Chess
Life); check out GM Danny King's interesting analysis
of this game. (FEB 2003, pages # 29 - 31.)
Copyright (c) LM A.J. Goldsby I
Copyright (©) A.J. Goldsby, 2001-2005.
Copyright (c) A.J. Goldsby, 2006. All rights reserved.