Firewood and the Emerald Ash Borer in Indiana DNR Campgrounds
If you plan to camp in Indiana this season, please take note:
You cannot bring firewood from that county to any Indiana state park,
reservoir, or state forest. These counties currently include Adams,
Allen, Blackford, Brown, Cass, Carroll, Delaware, DuBois, DeKalb,
Elkhart, Floyd, Grant, Hamilton, Harrison, Hendricks, Huntington,
Jay, Kosciusko, LaGrange, LaPorte, Lawrence, Madison, Marion,
Marshall, Miami, Monroe, Noble, Orange, Porter, Randolph, Ripley, St.
Joseph, Steuben, Tippecanoe, Wabash, Washington, Wells, White and Whitley.
You can check IDNR’s up-to-date interactive map of affected
counties on the web at http://www.in.gov/dnr/entomolo/5349.htm
before you load up your vehicle. Firewood may not be brought from
Michigan, Ohio or Illinois or from parts of Pennsylvania, Maryland,
Minnesota, West Virginia and Virginia. There are some limited exceptions.
Campfires
are one of the really enjoyable parts of the camping experience.
The
scent of wood smoke, the warm glow, hot dogs or marshmallows
roasting
over the coals,
the
trance we all seem to fall into when we watch the fire in the evening.
Campfires
may not always be allowed, so be sure to check with the campground
manager or the local forest service about any possible restrictions
due to forest fire hazards.
1.
Split dead limb into fragments and shave one fragment into slivers.
2.
Bandage left thumb.
3.
Chop other fragments into smaller fragments.
4.
Bandage left foot.
5.
Make structure of slivers (include those embedded in hand.)
6.
Light Match
7.
Light Match
8.
Repeat "a Scout is cheerful" and light match.
9.
Apply match to slivers, add wood fragments, and blow gently into
base of fire.
10.
Apply burn ointment to nose.
11.
When fire is burning, collect more wood.
12.
Upon discovering that fire has gone out while out searching for more
wood, soak wood from can labeled "kerosene."
13.
Treat face and arms for second-degree burns.
14.
Re-label can to read "gasoline."
15.
When fire is burning well, add all remaining firewood.
16.
When thunder storm has passed, repeat steps 1 - 15
Introduction
to Fire
This
intro goes through the various steps of building, lighting and using
a fire.
Each
section can be read by itself but for beginners it may be best to
start at the very beginning,
its
a very good place to start.
Elements required for a fire to burn properly.
When
one of these three things are removed, the fire stops burning. Example
-- Water cools fuel below ignition point, dirt cuts off the oxygen supply.
Fuel-
material that will burn The
most common fuel used is wood
Heat
- enough heat to bring fuel to ignition Heat
from the smaller fuel should ignite the next size up which should be
arranged around it
Air
- to provide oxygen to burning process All
surfaces that are trying to burn need oxygen. Make sure that the
fire is kept loosely packed to allow in as much air as possible.
Fuel
To
make a fire we need wood of all sizes.
There
are three different kinds of wood needed for a successful campfire
Tinder
- Tinder is material that catches on fire easily, such as dead twigs
the size of a match, shavings of soft woods, peelings of cedar, birch
bark or pine splinters, small twigs, dry leaves or grass, dry
needles, bark or dryer lint.
This
should start to burn immediately with a lighted match.
This
is what you actually set fire to and it will have to generate enough
heat to set your kindling
on fire.
You
will need a loose bundle that would over fill a large mug.
Kindling
- Kindling is the next size up, it needs
to burn long enough and hot enough to set fire to the fuel
around it.
small
sticks 1" around or less, twigs
between the size of a pencil and a Twix bar or larger wood that has
been split down.
The
guitar of the noisy teenager at the next campsite makes excellent kindling.
Fuel-
Fuel is larger wood that keeps the fire going. Generally hard woods
such as hickory, oak, maple and ash. These woods make steady, hot
fires and burn into good hot coals. Fuel ranges in size from good
size branches to logs.
The
thicker the wood the longer it will take to catch fire but once
burning will last longer.
How
much you collect will depend on the type of fire you are building,
these
are covered in the following sections.
The
gathering of fuel in natural areas is often restricted.
Cutting
of living trees is almost always forbidden -
but
neither is it very useful, because sap-filled wood does not burn well.
Squaw
wood (dead parts of standing trees) may also be prohibited.
Wood
lying on the ground is usually permitted.
Campfire Safety
The
center piece of any campsite is your campfire.
Whether
you plan to cook your meals by campfire, with a propane camp stove
or by other means the campfire is traditionally the center of camp.
Your campfire is also the most dangerous activity on your camping
trip if not planned and handled properly, especially if you are not
camping in a developed campground.
If
you are camping in a developed campground most Forests and Parks do
not require a campfire permit. If you are camping in a dispersed
area, Wilderness area or undeveloped Forest or Park lands check and
make sure you have the proper permits. Also check and make sure there
are no fire restrictions issued. Many times during the year high fire
danger conditions exists and all campfire permits are canceled. This
is especially of concern if your camping trip is in a dispersed area,
Wilderness, or undeveloped Forest or Park lands. The best approach is
to make a point to stop by the nearest forest ranger district office,
visitor center, ranger or fire stations to check on current fire
conditions just before you plan to depart on your camping trip.
If
you are camping in a developed campground the chances are there will
be some type of campfire pit or developed area for your campfire.
This is the best place to build your campfire. Building a campfire
more conveniently located will only scar the campsite for future users.
The dangers
A
campfire may burn out of control in two basic ways:
on
the ground or in the trees.
Dead
leaves or pine needles on the ground may ignite from direct contact
with burning wood. Alternatively, airborne embers (or their smaller
kin, sparks) may ignite dead material in overhanging branches. This
latter threat is less likely, but a fire in a branch will be
virtually impossible to put out without firefighting equipment, and
may spread more quickly than a ground fire.
Embers
may simply fall off of logs and be carried away by the air, or they
may be ejected at high speed by exploding pockets of sap. With these
dangers in mind, some locales prohibit all open fires, particularly
during times of the year particularly prone to wildfires.
Campfires
are prohibited in many public camping areas. Public areas with large
tracts of woodland usually have signs indicating the fire danger,
which usually depends on recent rain and the amount of dead growth;
when the danger is highest, all open fires are prohibited. Even in
safer times, it is common to require registration and permits to burn
a campfire. Such areas are often viewed by rangers, who will dispatch
someone to investigate any unidentified plume of smoke.
Acquiring Firewood
It's
probably a good idea to bring your own wood!
Small
town general stores & National Park services are out to make
their money off of seasonal campers buying wood & forgotten
personal items. These places tend to be extremely overpriced.
This
is where your so called "cheap camping trip" ends up
costing a lot more than you expected.
Plan
ahead.
Buy
lots of wood for a better price & have some left over for the
next trip.
Finding
wood in the wilderness can be a rough job.
National
Parks will not allow you to cut or even gather down wood.
You
must bring your own.
National
Forests allow cutting of wood with a permit in posted areas.
Campers can usually collect down wood unless otherwise posted.
State
Parks - check with the rangers on fire regulations.
BLM
- fires are allowed just about anywhere safe in a rock ring, always
use good judgment. Check with local officials for exact regulations.
Good
Campfire Wood
Hard Wood
burns longer
Oak
Eucalyptus
Citrus
Cedar
Almond
Mesquite
Ash
Beech
Hawthorn
Holly
Soft Wood
burns fast & splits easier
Avocado
Pine
Pinyon
Birch
Fir
Hazel
Larch
When
you need to cook or simply want to relax around a campfire, knowing
what kind of wood to use can eliminate frustration.
The
Burning Properties of Wood
Wood
from an evergreen tree, called "softwood," burns quickly,
lets off lots of heat and dies leaving no coals. It makes a
colorful bonfire, but you will need lots of it for a whole evening.
Deciduous
or "hardwood" takes longer to ignite, burns slowly and
turns to glowing coals. It is perfect for a cooking fire.
Remember
that good firewood is always dry. Rotten, crumbly, wet or
green wood will make a smoky fire. Poplar can smoke even when
it is dry. Avoid softwood with balls of tree gum attached, as
this will cause a fire to spit.
For
a great firestarter, use "fatwood" or dry wood from an
evergreen tree that is streaked with resins. Pine needles and Birch
Bark (never peel from a live tree) also work well. Don't try to
start a fire with other kinds of bark though, since bark does not
burn well.
Note: Never collect wood near Poison
Ivy or Poison Oak. The smoke from burning any part of the
plants can cause an allergic rash
Below
is a list of the most common woods for burning, there are more.
It is worth remembering that ALL wood will burn better if split.
There
is an old saying, "before starting a fire - collect the right
wood." It is worth learning which wood is best for your
fires as it will make life a lot easier. A natural result of tree
recognition is to learn the burning properties of their woods
Alder:
Poor in heat and does not last, to be seen growing beside ponds
Apple:
Splendid - It burns slowly and steadily when dry, with little flame,
but good heat. The scent is pleasing.
Ash:
Best burning wood; has both flame and heat, and will bum when green,
though naturally not as well as when dry.
Beech:
A rival to ash, though not a close one, and only fair when green. If
it has a fault, it is apt to shoot embers a long way.
Birch:
The heat is good but it burns quickly. The smell is pleasant.
Cedar:
Good when dry. Full of crackle and snap. It gives little flame but
much heat, and the scent is beautiful.
Cherry:
Burns slowly, with good heat. Another wood with the advantage of
scent Chestnut. Mediocre. Apt to shoot embers. Small flame and
heating power. Douglas Fir. Poor. Little flame and heat.
Chestnut:
Mediocre. Apt to shoot embers. Small flame and heating power.
Douglas
Fir: Poor. Little flame or heat.
Elder:
Mediocre. Very smoky. Quick burner, with not much heat.
Elm:
Commonly offered for sale. To bum well it needs to be kept for two
years. Even then it will smoke. Vary variable fuel.
Oak:
The novelist's 'blazing fire of oaken logs' is fanciful, Oak is
sparse in flame and the smoke is acrid, but dry old oak is excellent
for heat, burning slowly and steadily until whole log collapses into
cigar-like ash.
Willow:
Poor. It must be dry to use, and then it burns slowly, with little
flame. Apt to spark.
Yew:
Last but among the best. Burns slowly, with fierce heat, and the
scent is pleasant.
Where
to find FREE wood:
Behind
your local Home Depot, old lumber . . .
ask
when garbage day is & get there the night before
At
Construction sights, scrap piles,
but
don't be jumping any locked gates or fences
Inside
Industrial Parks, palettes & such can be found in abundance
behind these commercial concrete alleys
Local
Parks & Recr -
near
maintenance buildings, whenever they just trimmed the trees
Vacant
lots being cleared, real estate land that is recently under
development, trees being thinned out
Amount
:
super
market bundles -
Approx.
one cubic foot.
Small
wrapped campers packs. 6-10 pieces.
Sold
in grocery & general stores.
Overall
price per piece is expensive.
If
you have space for storage in the backyard, shed or garage, consider
buying larger quantities, such as:
cord - size 4' x 4' x 8', will fill up 2 standard pick up truck beds.
(level
w/ sides)
half cord - size 4' x 4' x 4', will fill the back of a standard pick
up truck bed (level w/ sides)
1/3 cord - size 16 cubic feet -
will
fill the back of a mini pickup truck bed. . .
perfect
for 2-3 camp trips !
-
$25 -$35 (usually it is a mix of hard / soft woods)
1/8 cord - equal to 12-16 supermarket bundles
Storing Your Firewood
Wood
Piles
A
wood pile is exactly that - a pile of wood!
It
is used to keep your fire going for the length of time you need it,
by having a supply ready on hand to add to the fire when needed
rather than having to go and get, then chop more wood whilethe fire
slowly goes out.
Place
two poles parallel on ground and stack firewood on poles to protect
it from dampness
Stack
wood at least 10 feet from fire Cover
with a tarp or plastic poncho
Remember to
care for the environment -
do not drag a
log out of a hedge if it means destroying the hedge.
Before
you begin, choose the site of your wood pile.
This
should be between the fire place and chopping area so that the wood
is within reach but not close enough that it will set on fire or you
will fall over it, and close enough to the chopping area so that you
are not carrying the wood to far but not too close that you are in
danger from flying bits while someone is chopping.
To
keep everything neat, you need to mark out your woodpile so
different sizes of wood can be collected together neatly, so when you
need to add wood you don't have to search through a great big heap to
find what you want.
Different
sizes of wood should be grouped together.
The
first should be kindling, the small thin bits to start the fire
with. This will be mainly small twigs, which can be found at the
bottom of hedges and in undergrowth. This should always be dead wood
- it should snap easily with a sharp 'crack' when broken.
You
can also collect the 'bits' from the chopping area that an axe will produce.
The
next section is the slightly thicker (around 5-15mm diameter) wood
to place on top of kindling to get the fire going. These can probably
be jumped on and snapped, or even broken by hand rather than sawn or
chopped (much easier) - these should be kept quite short so they can
lay on the kindling without being 'up in the air' when placed together.
The
next two sections are your logs, the real burning bits. How thick
these will be is for you to decide as to the type of fire you want,
fast and flames (thin, 15-30mm diameter) or slow and hot (thick,
30+mm dia). Chop the wood into lengths about the length of your fire
pit/altar fire.
You
may have more or less sections if you wish, but these are probably
all you will need for most fires.
The
pile should be kept dry at all times, as wet wood is very difficult
to burn.
The
best way is either to pitch a shelter, a tarp or old tent over the
pile, or at the very least drape an old groundsheet kept over the top
of the pile when it is not being added to or used. This will, of
course, not help if your campsite floods -
but
it will keep off most things except torrential downpours.
A
supply of kindling and newspaper should be kept somewhere dry (such
as in the trunk of your vehicle) so if everything gets completely
soaked there is still a chance of getting a fire going.
You
will find you need much more kindling with wet wood as it has to dry
before it burns.
Softwoods,
like pine, fir and cedar, are best for starting a fire.
Dry
hardwood, like birch, maple and oak, is best for making a bed of hot coals.
Preparation
before building your fire
Clear area of all debris
avoid
areas with overhanging branches.
Always
use an established fire ring if available!
Try
to use an area that has already been used for a campfire. You will
be able to tell where someone has built their fire previously due to
the ashen and scorched area of the fire.
Making a
Fire Ring
Ideally,
every fire should be lit in a fire ring. If a fire ring is not
available, a temporary fire site may be constructed.
One
way is to clear a circle 10 feet across down to bare dirt. Hollow
out a fire hole two feet across, and five or six inches deep. Pile
the soil around the edge of the fire hole.
Construct
a fire ring surrounded by rocks.
This
will help contain the campfire's ashes.
Another
is to cover the ground with sand, or other soil mostly free of
flammable organic material, to a depth of a few centimeters. The area
of sand should be large enough to safely contain the fire and any
pieces of burning wood that may fall out of it. Sand piles should be
scattered after the fire has been put out. If the topsoil is moist,
it may suffice to simply clear it of any dead plant matter.
Fire
rings, however, do not fully protect material on the ground from
catching fire. Flying embers are still a threat, and the fire ring
may become hot enough to ignite material in contact with it.
No
fire should be lit close to trees, tents or other fire hazards.
This
includes overhanging branches; some carry dead, dry material that
can ignite from a single airborne ember. In addition, a fire may harm
any roots under it, even if they are protected by a thin layer of
soil. Conifers run a greater risk of root damage, because they lack
taproots and their roots run close to the surface. Fires also should
not be lit on bare rocks, because the ash will leave a black stain.
An
additional safety measure is to have sand, a
bucket of water, shovel and a fire extinguisher on
hand to smother and douse the fire if it does get out of the fire pit.
It
is wise to gather these materials before they are actually needed.
Gather
wood and stack
in separate piles
away from fire area.
Do
not use green or freshly cut wood.
Many
parks and forest forbid gathering fallen branches.
It
plays an important role in the ecosystem
of the wilderness.
Keep
your fire small.
These
days a large fire in any wilderness area is frowned upon. Large
fires take more fuel to generate which means you will be using more
wood. Large fires can also easily become out of control. Keep it
small and to a minimum. By doing this not only can you save disaster
from happening but other campers in the area will not become annoyed
by the large fire.
Building
your fire
There
are several different types of fire, some are good for keeping you
warm, others are better for cooking,
however
they all follow the same design principals listed below.
Start
with:
10-12 sheets of newspaper
or
other
means of a fire
starter. I
haven't tried this one yet, but someone suggested I use a Duraflame Log.
Learn to start a fire simply with
paper, matches and kindling.
I advise
against using charcoal lighter fluid, gasoline or kerosene.
Place
your tinder in a small pile in the middle of the fireplace.
Crumple
the sheets of newspaper loosely and individually.
Mound
them in the fireplace, ring or pit.
Distribute
the kindling above the paper.
Fuzz
Stick
Sometimes
there are not enough small twigs and sticks around to start a fire
with. You
can always make
a 'fuzz stick' which, because of their curls of wood, catch fire
more easily than a solid stick. Something
for whittling away those spare moments of 'nothing to do'.
Gradually
add the fuel into the shape that you want. Don't rush this stage and
make sure that the wood you are adding is less than twice the size of
that which is already burning.
Larger
sticks & logs should be added as the fire is going well
Set
the firewood on top of it all.
Never
throw wood onto a fire, always place it carefully
Remember
do not try to compact your base materials because you must leave
them loose to allow for proper air passage. Any fire requires oxygen
and by leaving materials loose this allows for oxygen to pass through
the materials and ensure a good fire.
Once
it's going good add more firewood, 2-3 pieces at a time going up in
size and towards hardwood such as oak, ash and maple if you have it.
They will burn longer.
Aspen,
birch and poplar are quite common and they make good fires as they
burn hot
but
fairly fast.
Before
you know it you will have a campfire.
Once
a coal bed has been built add the logs in a crisscross pattern and
they will catch and burn nicely.
This
is all fine and good if you have primo wood to work with.
Unfortunately
if you're are relying on buying your wood at the campground store
you may very well end up with fairly green (wet, fresh cut) softwood.
The softwood part is OK, you'll just go through more. But what do you
do about the green part?
Start
by taking your camp axe
and shaving a piece or two to get a mound of chips or shavings. Then
split a piece or two into small sticks. You can substitute local
twigs and sticks if they are around. Kid's love rounding up that
stuff. Finally split a few pieces into a 1 inch size range.
I've
also found that there are often folks selling firewood near
campgrounds. Sometimes they have great dry wood all split and ready
for a reasonable price, keep your eyes open when you're near your destination.
Just
fill the back seat floor and let the kid's put their feet up on the stuff.
Now
build your fire.
Newspaper,
Shavings, sticks, split pieces.
The
trick here is that almost anything will burn if it's cut small enough.
Light
it off and away you go. If it stalls fan it with a sheet of
newspaper a little extra oxygen can also do wonders for a slow
starting fire.
Building
the fire in a teepee
shape is
also helpful since fire loves to follow the grain and move upward.
Now
just add wood, working your way up in size.
Before
long you will be able to burn anything you have.
The use of
fluids to start a fire:
The use of gasoline or kerosene
can be like poking a Bull Moose in the nose with a sharp stick.
It is just not smart and could be deadly.
Gasoline should NEVER
be used under any circumstances.
Kerosene on the other hand
has been used to start fires without any problems.
But, extreme care must be used.
Do not use this method if there
are flames or hot coals.
You may get the same effect as if
you tossed a lit match into a keg of gunpowder.
I have used charcoal fluid to
start fire in desperation and even that can flare up if hot coals or
flames exist.
Make it a
habit never to use fluids to start your fires. Be safe
and learn how to build fires using paper and wood.
If you want to cheat, buy a box
of fire starters.
Types of Fires
There are
many different types of fires to construct. Some are
more suited for cooking, some for burning overnight, some for warmth.
Fire's
for Cooking
When
building a cooking fire you need to make sure that the heat is
directed towards what you are cooking
and
not lost to the outside world.
The
normal way of doing this is to build a basic
fire and
surround it with something that will reflect the heat back in and
support a grid above the fire on which you can put your pots.
You
can try any of the following as fire surrounds:
Bricks are good because they will keep the grid you cook on, level
You can use two thick logs but soak them first to make sure they
don't burn down too fast
Rocks, but never use ones that have been in water as they
could explode when hot
Star
Fire
This
is basically one of the simplest fires to make.
A
star fire is formed by making a small fire and arranging logs around
the outside facing inwards to form the points of a star.
The
logs are fed in lengthwise and be drawn apart to leave glowing
embers and ash (for
cooking)
in
the centre. To start the fire going strong again simply push the
logs together again.
This
type of fire is very useful for conserving fuel. It produces little
flame or smoke when required and can be easily 'stoked' by sitting
back and pushing one of the logs inwards occasionally.
Trench
Fire
The
heat will be reflected up by the sides which will also provide a
really solid support for your grid and pans. This type of fire is
especially good in exposed or windy site. Try and keep one end open
towards the direction of the wind to make sure that the fire gets
enough air.
Altar
Fire
One
of the most popular cooking fires is called an Altar fire, which is
made of a raised platform on which the fire is lit. These can be made
from wood, but quite often metal is used, and half an old metal drum
used to hold the fire. This is very similar to a domestic barbecue.
This
type of fire is ideal for long stay camps as it helps eliminate
the-need for turf removal and low-level cooking. Watch the height you
build to. It is much safer to have it too low than too high.
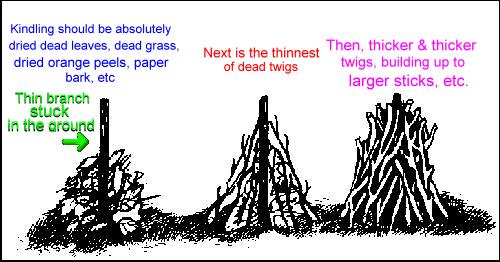
Teepee
Fire - good for quick cooking since the heat is concentrated in
one spot.
There
are many tricks and myths on the proper way to build a fire,
however, the best way is still how Native Americans have been doing
it for centuries. The Teepee fire is the most efficient camp fire
possible, it lights easily and burns well. The reason for this is the
large amount of air entering the heart of the fire which allows the
fire to burn easily and without fuss. Although some other fires are
better suited for cooking or heating, the Teepee fire is the easiest
to start, even in wet conditions. Always start with the
"Teepee", then make it into any fire you like, such as the
"Log cabin" fire better suited for cooking.
Lay
the fuel over your kindling like a teepee.
First
of all, stick a thin branch (1cm diameter) into the ground as above
Put
waded-up newspaper tightly around the base, or any of the things
mentioned above, but most importantly of all it should be dry.
Don't
use firelighters, that's cheating! NEVER
be tempted to use meths, petrol or otherwise to get a fire going.
Then,
build up your fire using progressively thicker twigs as you build
outwards, making sure you have a gap you can put the match in.
Before
you light the fire, make sure you have a good supply of small logs
and thicker wood to hand, as the thin wood burns very quickly.
Continue
to add more and more larger pieces as the fire burns.
DO
NOT SUFFOCATE THE FIRE.
Always
make sure that plenty of air gets into the heart of the fire.
At
this stage, one oversized log can snuff out the fire.
Sort
the wood into piles of similarly sized bits so you can get the right
wood to build the fire up just when you need it, rather than sorting
through a big heap.
The
secret to successful cooking is to build a good fire that will
provide hot embers,
for
it is on embers that we cook -
not
flames.
One
of the problems with embers is that they tend to become cool after a
short while. The keyhole fire solves this problem. Build the fire in
a large circle area and pull the hot ashes through into the smaller
circle where the cooking takes place, as they are needed. A two inch
bed of ashes is required for successful backwoods cooking, use beech
or oak logs, as these will give longer lasting embers.
Charcoal
can also be used and it will hold the heat longer than wood embers.
1. Prepare the Site
- Select a fire site at least 8' from bushes or any
combustibles. Be sure no tree branches overhang the site.
- Make a U-shaped perimeter using large rocks or green
logs. If using logs, they'll need to be wet down from time to time.
If breezy, have back of firepit face the wind.
- Put a large flat rock at the rear of the firepit to
act as a chimney. The "chimney rock" will direct the smoke
up and away from the fire area.
2. Lay the Kindling
- Fill the fire area with crumpled paper or tinder.
- Lay kindling over paper in layers, alternating
direction with each layer. Use thin splits of wood or small dead
branches. Do not put kindling down "teepee style". The
whole fire area should be covered with the kindling stack.
- Set a bucket of water near the fire area. Light the
paper to start your fire.
3. Build the Fire, Grade the Coals
- When kindling is in full blaze, add firewood. The
wood should be all the same size, as much as possible. Use hardwood
or hardwood branches if available. Distribute wood evenly over fire
area, not just in the center.
- As soon as the last flames die down leaving mostly
white coals, use a flat stick to push the coals into a high level at
the back end and low level at the front. This will give you the
equivalent of 'Hi', 'Med' and 'Lo' cook settings.
4. To cook, set the grill on rocks or green logs. Put
food directly on grill or in cookware and prepare your meal. If
cooking directly on the grill, a small spray bottle or squirt gun is
handy for shooting down any rogue flames, usually caused by food drippings.
As the fire diminishes, bank
the coals to get the most heat from them.
After cooking, throw on a log or two for your evening
campfire. Before retiring, extinguish thoroughly and soak with water.
Turn rocks in on fire bed. It will be easy to reassemble the next day
if required.
Pyramid
Fire
You
will need 10 or 12 large logs (4+
inches diameter, about a yard long - the exact size doesn't matter) for
the framework of the fire, plus lots of thinner wood to stack and
stuff it.
Stack
the larger logs into a pyramid, alternating the logs two by two and
starting with the biggest at the bottom and sloping the sides inwards (see
diagram below)
When
your framework is as high as you want it, give it a lil shove to
make sure it is stable -
you
want the wood to collapse INWARDS as it burns but just in case,
it
is a good idea to construct a safety ring of rocks or logs outside
the fire and a little way away, to trap any errant logs which try to escape.
When
you are satisfied, begin to insert long thinner branches downwards
into the heart of the pyramid -
at
this point it is a good idea to smuggle in a box of firelighters or
stuff the center with home-made fire starters and dry kindling, to
prevent embarrassment at the crucial moment. Continue filling the
pyramid with smaller branches and twigs, then finish it off by
lightly stuffing any cracks around the bottom of the fire with DRY
newspaper or any available dry paper, cardboard etc.
Providing
you have constructed the fire with plenty of dry wood and spaces for
air to enter, it should blaze away merrily for quite some time. Keep
it going by adding logs from time to time, although if you intend
cooking in the embers the original fire should be sufficient and will
provide charcoal embers that will continue to glow well into the night.
Reflector
Fire or Lean
To Fire
A
good simple fire.
Drive
two stout sticks into the ground so that they are leaning backwards
slightly. Lay some logs on top of one another against the sloping
back. Form a rectangle on the floor at the base of the slope as your
fireplace. By lighting a fire in the middle most of the heat will be
reflected back to the front of the fire, making cooking easy. Be sure
that you build it so the 'grate' or fireplace faces the wind.
Construction of
A Reflector Fire
A
good, solid reflector can be made by driving four uprights into the
ground a few inches apart. Then you simply pile sticks in between the
uprights to build up a "wall".
Ideally
you will want to fill the space in between with earth.
These
walls can be used for a variety of things, here as reflectors but
also as dams and shelter walls.
Uses of
A Reflector Fire
In
this section I am only interested in using these walls as reflectors.
A
good reflector close to the fire will help reflect the heat back
towards you.
Not
only this, but it helps to draw the smoke upwards instead of getting
in your eyes.
You
can use this to your advantage by also reflecting heat into your shelter.
LOG
CABIN FIRE
No
we don't mean an actual cabin that you live in, it relates to the
position of the firewood. Once you have a good teepee
fire going, you
can begin placing logs in a log cabin formation. Two to three logs
per layer, with each layer being perpendicular to the next.
The
slow efficient burn makes this a great cooking fire, it generates a
good amount of heat and coals without much flame. Using smaller sized
wood, you can create a low fire with uniform heat over a large area,
great for grilling large amounts steaks. The log cabin fire allows
air to enter over the entire area which the wood occupies. The
smaller the pieces the more control you have over a larger area.
In
the backcountry you can use oversized logs letting the fire burn
them in half for you and still plant your frying pan right over the
heat. Actually you don't really need a grill for your pots and pans,
when built correctly it's like cooking on your stove at home. Use two
thick logs to create a level platform for your pot, slide some
smaller pieces of wood into the crevasse created between the logs.
Keep adding small wood under the pot, which water will be boiling in
no time. When the logs begin to burn down, add another two logs
perpendicular to the ones underneath. This is very similar to a long
fire but can be done in a standard park fire pit.
Crisscross
Fire
Good
for a long lasting fire with a lot of coals.
Excellent
for a campfire.
Lay
the fuel over the kindling in a crisscross pattern.
Excellent
for use after a rain . . .
Anyone
can start a fire on a bone-dry day, or when they're armed with dry
newspaper, kerosene or charcoal lighter. But
let the day deteriorate to persistent rain, and
where there's smoke there won't be fire!
Learn
how to make
and keep a fire in the rain, Click
Here!
Make
sure someone is responsible for the fire at all times, and a bucket
of water (and
fire extinguisher if possible)
close
by in case of any emergency.
Make
sure that you are all aware of the fire
procedures, should any accident occur, such as grass,
trees and tents catching fire.
Make &
Maintain A Fire in The Rain
Here's
how to make and maintain fire when
foul weather comes to stay:
You'll
need a sharp knife, hand axe, and a saw (folding saws are highly
recommended). Contrary to the ravings of some "authorities,"
it is nearly impossible to make fire in prolonged rain without all
these tools.
Procedure
1.
In an evergreen forest: Collect several handfuls of the dead lower
branches of evergreen trees (commonly termed "squaw wood").
Wood should grade in size from pencil-lead thickness to no bigger
than your little finger, and it should break with a crisp, audible
snap. If you don't hear the positive "snap," the wood is
too wet, in which case proceed directly to step 3.
If
"squaw-wood" is suitably dry, it will burst into a bright
flame the moment a match is applied. Use a small candle to provide
sustained heat to your tinder ball if the bark of the squaw-wood is wet.
From
this point on, it's simply a matter of adding more wood and
protecting the developing blaze from rain.
(see
To maintain fire in driving rain).
2.Look
for resin blisters on the outside bark of balsam fir trees. Break a
few blisters with a sharp stick and collect the highly bile resin.
Use the resin as a "chemical fire-starter" to propel your
tinder to flame.
3.Locate
a dead, downed tree and saw off a portion which does not touch the
ground. Grounded wood rots quickly, so is apt to be unsound.
Especially search for deadfalls which overhang into Un-lit clearing
or waterway. These are almost certain to be rot free, as sunlight
kills microorganisms which cause decay. If you cannot find a dead
downed tree to saw up, look for any floating log. If the log
"floats," the center is dry. Splittings taken from the
heart will burn.
4.
When you have completed your first saw cut through the Wall, check
the center of the cut log with your hand. Is it bone dry? It should
be. Even a month long rain will seldom soak through a six inch log!
5.
Saw the deadfall into 12 inch sections then split each with your
handaxe by the method illustrated
in the AXE page.
It should require only a few minutes to reduce each log chunk to
half inch diameter kindling by this procedure
6.
Cut wafer-thin tinder from a few splittings with your pocket knife.
The key to producing long thin shavings rather than little squiggly
ones is to use a sawing, rather than whittling action with your
knife. Even a small dull knife will produce nice shavings if
you persistently saw the blade back and forth.
Build
a well-ventilated platform fire of logs, thick sticks or flat stones.
Step
1
Establish
a fire base of one inch diameter sticks as illustrated. Place
pencil-thin "support" sticks at right angles to the fire base.
Step
2
Meticulously
stack wafer-thin shavings on top of the kindling to a height of
about one inch. Place the shavings so that plenty of air can get
between them.
"Smoke"
is nature's way of saying you're smothering the flame!
Next,
put two half inch diameter "support" sticks at right
angles to the fire base. These will support the heavier kindling
you'll add over the tinder in step 3.
Step
Three
Now,
pile on fine split kindling above the tinder box to lock the tinder
in place. Again, leave space between the splittings so your fire can "breathe."
Your
fire is now ready to light. Apply flame directly below the tinder
(shavings). A small candle will furnish the sustained heat necessary
to ignite damp wood.
Hand
feed shavings (not kindling) one at a time into the developing flame.
Don't
heap kindling on until you have a bright reliable blaze.
Other
Platform Styles:
Rock
Style Platform
Hints:
Carry strike anywhere matches in addition to a butane lighter and
candle. Keep matches in a plastic jar with a cotton wad on top. A
spent 16 gauge shotshell nested inside a 12 gauge case makes a tough
watertight match safe.
Some
campers' waterproof matches by painting on nail polish, but this
causes match heads to deteriorate. A waterproof match case is a
better idea.
An
effective method of drying matches is to draw them briskly though
your hair. Don't use your clothes; they are too abrasive.
"Fire-Ribbon"
- a semi-liquid fire-starting paste is available at most camp
stores. Just squeeze it on like toothpaste. A summer's supply will
fit in a 35 mm film can.
You
can make your own fire-starters by soaking miniature logs" of
rolled newspaper in paraffin.
Cotton
balls dipped in Vaseline make wonderful fire-starters!
Banking
the fire to preserve fuel:
Use
this procedure when you have a good hot fire but little wood to
maintain it.
"Bank"
your fire by setting small logs, parallel to one another, across the
top. Rule-of-thumb for a smoke-free flame is to allow a "radius
width" between parallel pieces of wood. Thus, a pair of two inch
thick logs should be separated by a full inch to ensure equate
ventilation. "Banking" will reduce this distance to a mere
(though identifiable) slit, which will naturally diminish use of
oxygen and slow combustion. You should also shut off any breeze
coming into the fire. A large flat rock or a tier of logs will work fine.
Extinguishing
the fire:
Throwing
water on a fire is not good enough. You must ascertain it is out by
checking the fire bed with your hands. If water is in short supply,
use the "stir/sprinkle/stir" method outlined below.
1.
Sprinkle a handful of water on the flames with your hands.
Continue
to sprinkle until the fire has gone out.
2.
Stir the fire with a stick and sprinkle some more.
Repeat
as needed until the fire is DEAD OUT!
Even
if you had a fire the night before & the fire seems out.
The
coals are still cooking way underneath.
Pour
water on it & hear the sizzling.
Put
your fire dead out at least 1/2 hour before you start to break camp.
Let
the coals die down, then pour water over the ashes, and spread soil
over them.
Mix
soil, water, and ashes until all embers are completely out.
Fire
used haphazardly can not only cause damage but can cause death.
It
creates death to animals, people, and an environment that took
billions of years to create and none of these things can ever be replaced.
Remember, "Only
you can prevent forests fires!"
Before you turn in for bedtime,
make sure there are no flames,
windy conditions
&
remember to fold up your
camp chairs & lay them down.
Winds have been known to blow
them into the fire & ignite.
Emergency
Fire Procedures
Thankfully,
serious fires on camp outtingss are relatively rare.
However,
fire is a potentially dangerous thing, intentional or otherwise, and
this section is designed to give suggestions on how to prevent such
accidents from happening.
Cooking
Open
wood fires are actively encouraged wherever possible, and as long as
people do not mess about there is no real danger.
However,
there are a few things that should be borne in mind when using an
open fire:
LIGHTING
If
the fire does not seem to be catching, NEVER
be tempted to throw some flammable liquid on to try and get it to
light. It will break up into little drops, and the smaller drops will
ignite easily. This can easily turn into a fireball with serious consequences.
PLAYING
WITH FIRE
While
waiting for the fire to burn up efficiently, kids often want to poke
the fire with sticks, then when the end catches wave it around like a
sparkler. Apart from the fact that poking doesn't help it start,
there is a danger of burning people by hitting them with a stick, and
also burning clothes.
GRASS
Although
there should be no risk if you have dug your fire pit big enough,
grass around the edge of the fire pit can catch fire, and if the
ground is dry it can quickly spread.
You
should always have a bucket of water, and a beater if possible, next
to each fire.
This is one
of the reasons why a fire should never be left unattended.
AFTERWARDS
When
you have finished with a fire, such as last thing at night,
make
sure that the fire is fully out before going to bed. Give it a good
poke and rake the ashes, but if need be throw some water on it.
Tents
In
theory, tents should never catch fire.
However,
accidents or stupidity can cause this.
There
are several points to be aware of:
SITE
PLANNING
Make
sure that all fire pits are well away from all tents. This may sound
obvious but it is surprising how often it is forgotten!
SMOKING
A
cigarette is sufficient to ignite a tent -
especially
if you have just sprayed deodorant or hairspray and some insect reppellants
inside
a tent!
COOKING
Regardless
of the weather, you should never be tempted to cook on a small gas
cooker inside a tent.
If
the door flap blows into the flame, the tent could catch fire, and
you could get trapped inside.
Rather,
set up a 'fire shelter' type tent outside, and put the cooker on a
table underneath it. Proprietary fire shelters can be bought, but in
their absence it is possible to tie an old flysheet between trees (make
sure it is a good distance above ground).
When
tents do catch fire, they do ignite very quickly.
Below
are some photos of a typical nylon hike tent and canvas patrol tent
which have been purposely set on fire -
within
2 minutes of ignition there is nothing left, and anyone trapped
inside will almost certainly have been very seriously burnt or killed.
A-Frame Tent in first 9 seconds
A-Frame Tent in 1 minute
A-Frame Tent after 2 minutes
Family-Size Tent in first 9 seconds
Family-Size Tent in 1 minute
Family-Size Tent after 2 minutes
Photos courtesy of Scouting Magazine
GAS
APPLIANCES
Cooking
on gas and reasons
not to cook inside a tent are covered
within this site.
However,
similar safety procedures cover gas lamps.
You
should never
have a gas lamp inside a small tent,
although
it is permissible to have a large gas lamp on a table inside a
dining tent.
never
change a gas bottle inside a tent -
any
gas that leaks while changing the bottle will linger, and possibly
ignite from a nearby source of ignition.
Also
be aware of any naked flames nearby -
this
may be sufficient to ignite gas escaping from a bottle as you change
it, and possibly cause the bottle to explode with disastrous consequences.
For
further information on safety with gas, click
here.
HEATH
FIRES
From
time to time, large forest fires start, and there is no way to do
anything about it except get away from it as fast as you can. Make
sure you know of at least two escape routes by road in all
directions. If a large forest fire is heading your way, never stop to
'strike' your site -
if
there is time gather up personal kit and get away as soon as possible.
Please
ensure that your campfire is completely out before leaving. Douse
with water, scatter cinders and cover with dirt. Check
it at least twice by pouring water and checking for "hisses".
REVIEW:
Circle
the pit with rocks or be sure it already has a metal fire ring.
Clear
a 10 foot area around the pit down to the soil. Just
a Little Common Sense
Situate
your fire at least 10 feet away from tents, trees, roots and
flammable items.
Keep
plenty of water handy and have a shovel for throwing dirt on the
fire if it gets out of control.
Stack
extra firewood upwind and away from the fire.
Keep
the campfire small.
A
good bed of coals or a small fire surrounded by rocks give plenty of heat.
NO bonfires please!
Build
a fire only as big as you need.
Small
fires are easier to tend, you can sit closer to them without getting
a tan, and the wood pile will last longer.
Besides,
you don't want kids roasting marshmallows or wieners over a bonfire.
After
lighting the fire, make sure your match is out cold.
Never
leave a campfire unattended. Even a small breeze could quickly cause
the fire to spread.
When
extinguishing the fire drown the fire with water.
Make
sure all embers, coals, and sticks are wet.
Move
rocks, there may be burning embers underneath.
Stir
the remains, add more water, and stir again.
Feel
all materials with your bare hand.
Make
sure that no roots are burning.
Do
not bury your coals -
they
can smolder and break out.
fire
restrictions
Before
building any fires outdoors, check to be sure there aren't any fire restrictions.
Ask
the attendants when you arrive at the campground; or, if primitive
camping, call the local forest district for information.
Fines
are heavy in any area that has fire restrictions so
it is always in the best interest of everyone to check the situation
out first.
Supervision
Supervise
children at all times when fires are burning or when grills are in use.
STOP,
DROP, AND ROLL.
Make
sure everyone knows how to put out a clothing fire -
STOP,
DROP, AND ROLL. See
Emergency Fire Procedures
first
aid for burns
The
first response to a burn should be to apply ice or cold water.
And
it's also good advice to include burn ointment and bandages in your
camping first aid kit. Sparks and dust flying around campfires can
get into the eyes, so include saline eye wash in your kit too.
Unless
you are experienced, campfires don't make very practical stoves.
Sure,
some foods taste good and are fun to cook over the campfire,
but
without appropriate utensils and a proper fire, the food will not
cook correctly and you'll likely wind up with blackened cookware.
Do
not build a fire on top of pine needles
Dig
down to the bare soil. Clear fire (sparks fly out) radius at least 8
feet around pit.
Burnable's
Only
Do
not throw plastics, glass or aluminum into the campfire.
It
is very difficult to clean up.
Use
only dead and down wood
Never
break branches from standing trees, even if they appear dead.
Bring
along a small amount of firewood.
The
understory might already be picked clean of wood from earlier campers.
Be
prepared.
bring
on the marshmallows
But
what's a campfire without the marshmallows?
Just
be careful to supervise young children and remember that
marshmallows and other foods cooked over a campfire will be very hot
at first.
Little
Tid Bits
In
the absence of wind, smoke will always draw toward the nearest large object.
This
is why the person sitting closest to the fire may have the smoke
follow them no matter where they sit.
To
avoid this effect, try building your fire close to a large immovable
object such as a rock.
Have
you ever found your hands, hair or clothes covered in sticky pine or
evergreen sap, when you've been searching for your firewood in a forest?
Washing
the affected areas with baking soda instead of soap, really helps to
remove the sap effectively!
Simply clicking on the image
above will open your default E-mail Writer and have a pre-determined
subject line. You can simply send this
E-mail with nothing to write and I will be alerted with the Page that
has a broken link. However it would be nice if
some input from you of exactly which link is broke. Thank You!!!!
DISCLAIMER:
PLEASE READ - By printing, downloading, or using any info from
this site, you agree to our full terms. Review the full terms by clicking
here. Below is a summary of some of
the terms. If you do not agree to the full terms, do not use the
information. All information on this web site is provided as a free
service. Under no conditions does it constitute professional advice.
No representations are made as to the completeness, accuracy,
comprehensiveness or otherwise of the information provided. This site
is considered publishers of this material, not authors. Information
may have errors or be outdated. Some information is from historical
sources or represents opinions of the author. It is for research
purposes only. The information is "AS IS", "WITH
ALL FAULTS". User assumes all risk of use, damage, or injury.
You agree that we have no liability for any damages. We are not
liable for any consequential, incidental, indirect, or special
damages. You indemnify us for claims caused by you.