For a verbal description click here.
The output transformer is the Edcor CXPP50-8-3.4K available from the Edcor web site.
For a verbal description click here.
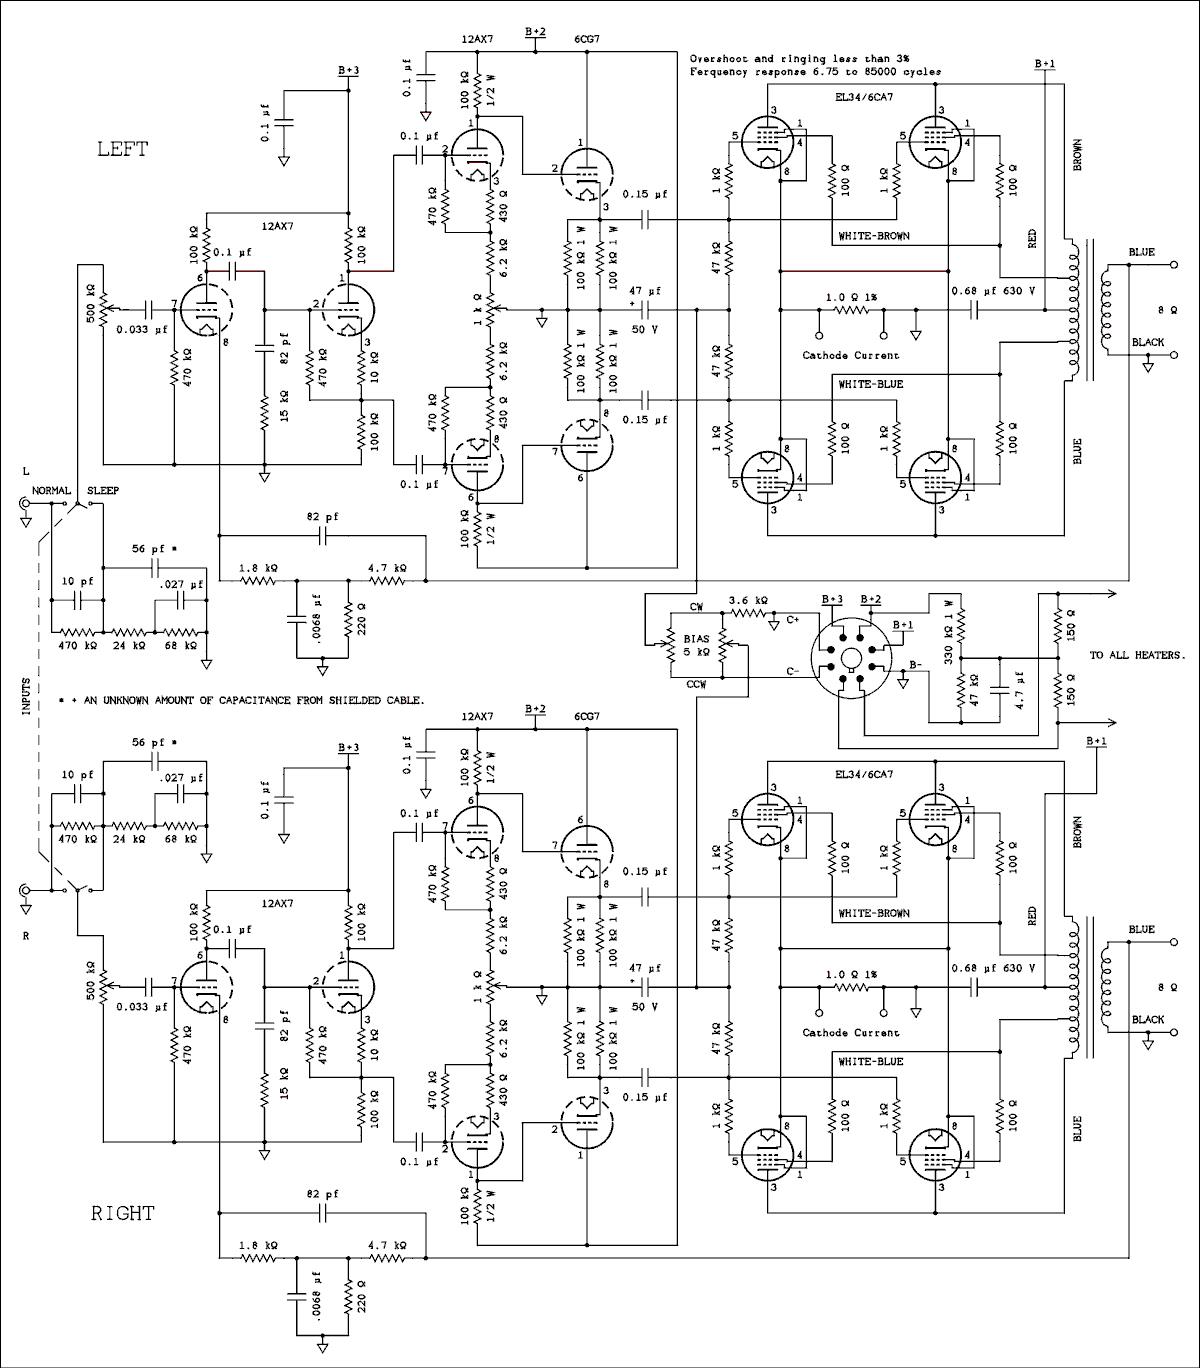
First of all, for the early stages I chose hi mu triodes because of their inherently low distortion. Also because I didn't need all the gain available I can leave the cathode resistor unbypassed and lower the distortion even further. If simply leaving off the bypass cap doesn't lower the gain enough an additional resistor can be added in series with the optimum cathode resistor as seen in the push-pull 12AX7 stages. The grid return is connected to the bottom of the original cathode resistor so the operating point is not effected by changing the amount of cathode bias. The grid bias is the difference between the grid and cathode not the grid and ground. Low mu triodes produce considerably higher distortion which accounts for the high distortion of the Williamson circuit.
The first two triodes may look familiar. It's that same split load phase inverter from the Newcomb amplifier that was in my first high fi set. The first stage has been modified from a zero biased to a cathode biased stage. When the circuit was tried with the plate of the amplifier directly coupled to the phase splitter the best I could get was 0.5 % distortion. With the circuit as shown it came in at 0.08% with an overall gain of 21 and 2.1 volts output. When the grid resistor is tapped on the cathode resistor it is bootstrapped, a kind of positive feedback, which increases it's effective resistance. From measurements made on the circuit the effective resistance of the grid resistors has been calculated. The effective resistance at the grid of the phase splitter is 3.29 Meg ohms. The effective grid resistance of the two push-pull drivers is 2.19 Meg ohms.
The second 12AX7 and 6CG7 make up the amplifier and driver. It has a gain of 10 and distortion of 0.14 percent. That gives a combined gain of 210 which is needed because the EL34s require 21 volts RMS per grid to drive them to 50 watts. So after the application of 20 dB of feedback the amplifier needs 1 volt to drive it to full power. The amplifier is directly coupled to a cathode follower which is required to drive the 47 k ohm grid resistors of the output tubes.
The maximum grid resistance for most power tubes using fixed bias is 100 k ohms. My tube manual didn't give this data for a 6CA7, the US equivalent of the EL34. All I can do is to assume it is the same. That's 100 k ohms per tube. When each side has two in parallel that calls for 50 k ohms so a 47 k ohm is used. When the common cathode amplifier was connected to the 47 k ohm load without the cathode follower the distortion was almost 10 times as high. The cathode follower brings it inline with what I want.
My tests have indicated that AC drive balance is very important so the circuit has an AC balance control in it. The Test Bed includes a DC balance control but the distortion seemed to be fairly insensitive to changes in the setting of this control. As long as you order matched tubes, which I did, it should work just fine.
I have shown 0.68 microfarad capacitors from B+1 to ground, and 0.1 microfarad capacitors from B+2, and B+3, to ground. This is always a good idea because electrolytic capacitors tend to have a higher impedance than the calculated value of Xc because of internal inductance. In my case I plan to build the power supply on a separate chassis which I may place on the floor behind my equipment rack. The inductance of the intervening wire might cause problems so the non electrolytic capacitors are there to keep the impedance to ground low.
Frequency Compensation.
Frequency compensation is very important because if it is not properly done the amplifier will oscillate at some frequency. At the high end the output transformer is the main culprit. It has inductance and parasitic capacitance between turns and to ground. The inductance and capacitance form a resonant circuit at some frequency which is well above human hearing. This causes a lot of phase shift which eventually reaches 180 degrees. When this happens the amplifier may oscillate at this frequency. I say "may" because it depends on the loop gain at that frequency. If the loop gain is greater than unity you have an oscillator.The loop gain at the frequency where the phase is 180 degrees may be less than unity and the amplifier won't actually oscillate but if driven with a square wave it will ring at that frequency. It's the same as a ringing bell. The square wave makes it sudden transition which hits the "bell". It generates a sine wave which slowly decays to zero. How quickly or slowly it decays depends on how close the loop gain is to unity at that frequency.Digression. What is the loop gain?
The global feedback forms a closed loop. You can trace it around and around. If you break it open somewhere and inject a signal at the exposed input and measure the output at the exposed output you can measure the loop gain. Theoretically you can break the loop at any point but from a practical matter there are limitations. The best place to open the loop in this amplifier is where the secondary of the output transformer connects to the 4.7 k ohm resistor and 82 pf capacitor. The amplifier from input to speaker terminals has a designed open loop gain of 200. The "gain" (attenuation) of the feedback network at mid frequencies is 0.045. Multiplying the two together gives 9. That may not seem like very much but it's enough to provide 20 dB of feedback.Low Frequency.
If you have difficulty understanding the following discussion you may find help on the Electrical Fundamentals, Basic AC Circuits page.There are two different causes of low frequency roll off. One is the output transformer and the other consists of several RC (resistance capacitance) coupling networks. In this amplifier there are three. Yes, I do know how to count. The two capacitors coupling into pins 2 and 7 of the second 12AX7 count as one because they are at the same point in the signal path just on opposite phase sides. Similarly, the two capacitors coupling to the EL34 grids count as one. So, counting the output transformer there are a total of 4 roll offs.
Suppose all four were set to the same frequency. At the corner frequency the amplitude of one roll off is down by 0.707 and the phase shift is 45 degrees. The phase shifts add and the amplitudes multiply. So at the corner frequency the amplitude is down to 0.7074 and the phase shift is 180 degrees. Remember that the loop gain is 9 at mid frequencies so the gain at the roll off frequency is 9 x 0.7074 which is 2.25. That's grater than unity so the amplifier will oscillate at this low frequency.
The roll off frequency of any device is very hard to measure at such low frequencies. The RC networks can be calculated with little error but the output transformer is very difficult to model and so about all we can do is guess.
The trick is to place the roll off of one RC network high enough that the loop gain is well below unity before the others begin to roll off. The corner frequency of an RC coupling network is given by.
f = 1/(2 Pi R C)
Where R is the resistance in ohms, C is the capacitance in farads and Pi represents the Greek letter by that name and the numerical value of 3.14159. I have set the highest of the low frequency roll offs at the grids of the EL34s. The frequency for a 0.15 microfarad capacitor and a 47 k ohm resistor is 22.6 cycles. Now the loop gain will come to unity when the attenuation of this network comes down to 1/9 because the loop gain is 9. The attenuation of a high pass RC network is 1/10 at 1/10 of the corner frequency and 1/100 at 1/100 of the corner frequency. So it stands to reason that it is 1/9 at 1/9 of the corner frequency. 22.6/9 = 2.5 cycles.Now to avoid adding to the phase shift the other RC roll offs have to have their corner frequencies well below 2.5 cycles. Lets see where they are. Looking at the schematic you might think that the other two RC roll offs consist of a 0.1 microfarad capacitor looking into a 470 k ohm resistor. But look again. The bottom end of each 470 k ohm resistor is connected to a tap on the cathode resistor. This causes the resistor to be bootstrapped. The effective AC resistance is increased because the other end of the resistor is connected to a signal source that is in phase with and a lower amplitude than the driving signal. A calculation of this effect can be found on the Phase Inverters, Phase Splitters, and Drivers page. The 470 k ohm resistor connected to pin 2 of the first 12AX7 has an effective resistance of 3.29 Meg ohms and each of the two 470 k ohm resistors connected to pins 2 and 7 of the second 12AX7 has an effective resistance of 2.19 Meg ohms based on AC measurements in the actual circuit. The first corner frequency is 0.484 cycles and the second is 0.727 cycles. These are well below the other corner frequency of 2.5 cycles.
The output transformer is pretty much an unknown quantity. AC meters don't respond accurately at these low frequencies and the dot on the oscilloscope is moving so slowly that it is impossible to read with any accuracy. A storage scope would be nice but they are still beyond my reach financially. The only thing to do is put it together and see if it oscillates or rings. It didn't do either so all is well.
High Frequency.
The high frequency compensation was arrived at purely by experimentation. It began with the 82 pf capacitor and 15 k ohm resistor from pin 2 of the first 12AX7 to ground. The value of the 82 pf cap was calculated based on the 100 k ohm resistor connected to the plate, pin 6, and the upper frequency of 20,000 cycles. The calculated corner frequency for these values is 19,400 cycles. An experimental check showed it to be a bit higher because of the effective resistance of the tube which was not accounted for in the calculation.At this point the two capacitors in the feedback network were not there, just the 4.7 k, the 1.8 k, and the 220 ohm resistors. A resistor substitution box was connected where the 15 k ohm resistor is now and the 4.7 k was connected to the output transformer secondary. What value to start with is a good question and there is no fixed answer. At some settings of the RSB (resistor substitution box) the amplifier did oscillate. Such oscillation would be instantly fatal to a transistor amplifier and if allowed to continue very long would likely have damaged the output tubes. I observed plate currents of over 350 mA. I started with 10 k just because it is the middle value in the RSB. Then I connected the scope and drove the amplifier with a square wave. I kept the power low, less than 1 watt. This yielded the value of 15 k ohms which is now being used. Because the next step down on the RSB is 10 k ohms and the next step up is 22 k ohms, I checked it by soldering in resistors having the values of 18 k, and 12 k, then the 5% values of 16 k, and 13 k. 15 k ohms persisted in giving the least amount of ringing.
The ringing was about 30% and although it damped fairly quickly that was still too much for me. My next attempt was to connect a capacitor in parallel with the 4.7 k ohm resistor. This is a standard method of lead compensation and is seen in many commercial amplifiers. It only helped a little being hardly noticeable. I decided to give the capacitor a much greater effect by taking it straight to the cathode of the tube. That made a huge difference and the value was too small to find using a capacitor substitution box. The ringing was still more than I was willing to tolerate. I remembered having seen a bridge T network in the feedback loop of the Eico ultra linear amplifier whose performance I am pursuing. I tried the capacitor in parallel with the 220 ohm resistor and that did it. By juggling the values around I got the ringing and overshoot down to less than 3%. The ringing damped out after one cycle so that made me a happy cat.
All of this nauseating detail is given for anyone who may want to use a different output transformer or who doesn't want to take my word for it but find the best compensation for themselves. If you get the ringing lower using the same output transformer, please let me know how you did it.
The Sleep Switch.
The switch in the input circuit may be a little puzzling. Its purpose is to help me sleep. I suffer from mild insomnia and low level music helps me to sleep. Turning down the volume on my preamp was not a good option because it was barely cracked open and the correct setting was hard to find with any consistency. I found that 26 dB of attenuation would allow a similar setting to normal daytime listening. Such a circuit is installed in the A-300 I am currently using.The resistors give 26 dB at mid frequencies. The 10 pf and 56 pf capacitors, in conjunction with an unknown amount of capacitance from shielded cable, provide high frequency compensation to keep the high end from rolling off. Stray capacitance can cause high end roll-off when large resistor values are used. The 0.027 microfarad capacitor in conjunction with the 68 k ohm resistor provides a 10 dB bass boost which I am now achieving by turning up the bass control when I switch over to sleep mode. Sometimes I forget to turn it up and other times I forget to turn it back down for the next day's listening. In this amplifier I will get both in one action.
The Heaters.
You will notice that I have placed the heaters above ground as in the headphone amplifier. In this case it's about 50 volts. That's mainly to relieve stress on the 6CG7 whose cathodes are at about 230 volts. The maximum heater to cathode voltage is 200 volts. I might have made it 100 volts except that is the maximum of some of the tubes when the heater is positive. 50 volts seems enough to bring the 6CG7s within spects without pushing any of the others to the edge of their limits.The Cathode Current Sampling Resistors.
I have specified 1 ohm 1% resistors. The only problem is that I can't find any in electronics catalogs. No problem though, we'll make them. DMMs have become so inexpensive there's no excuse for not owning one or even two. We will start out with a 1.1 ohm resistor, pass a known current through and parallel larger resistors with it until we get the voltage that indicates the value is 1.00 ohms. These instructions will appear on the Final Tests and Adjustments page.
- Introduction.
- Power Supply Schematic and Circuit Description.
- Amplifier Schematic and Circuit Description. (You are here.)
- Power supply chassis layout.
- Amplifier chassis layout.
- Initial tests and adjustments.
A foolish man dreams of wealth,
a wealthy man dreams of wisdom,
and a wise man dreams of tubes aglow all in a row.
Amplifier Smorgasbord.Or use your "Back" button to return to where you were.
This page last updated April 3, 2006.