
|
|
||
|
5. Mirroring |
||
 You will oftentimes have to mirror things so that they are symetrical left-to-right. The human body and face, an archway, an airplane... Although it is easy to turn on the mirroring feature, it is much harder to understand it. IMPORTANT - If you've been working in LightWave before this tutorial to first save out your work as an object so if you want to fool around with something later on, you can just load it back in again. After saving your work, do a 'File' button, 'Close All Objects' to get you back to a blank slate. MODELER, WHEN MIRRORING, TURN ON THE GRID Before we begin, when working in the Mirror mode, it is best to turn on the Grid. This will allow you to see what 'center' is, and since mirroring always has to do with centering around the Y axis. "Around the Y Axis" means to the right or to the left of the Y axis all the way from way 'down below' to 'way up above' like the Y axis was splitting it in half. Press the 'd' key to bring up the 'Display Options' panel. Make sure that 'Show Grid' is checkmarked and click 'OK'. 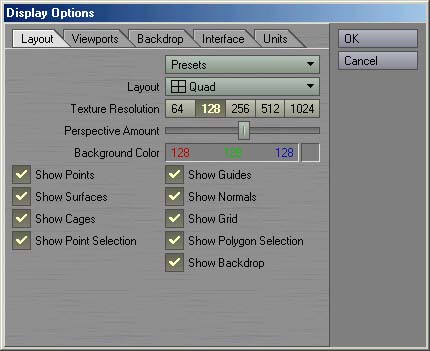  MODELER, CREATE TAB vs MODIFY TAB The Create tab implies certain things. It implies that you are about to draw something that has never been there before. The Modify tab implies that you already placed something down, and you wish to do something to it such as move it, or warp it. The Multiply tab means that you are going to select something (polygons or points), and are going to make multiples of that thing in some way. It would make no sense to do Multiples of nothing, so it doesn't let you do it. Although YOU want to multiply things from the beginning, the program says, 'sorry, all things under the Multiply tab you do to EXISTING POINTS OR POLYGONS only. It keeps things consistent throughout the program so that you can expect certain things about the things you find there. It helps you determine where one of the thousands of functions may be hiding. You just have to think, "Am I going to create something, or modify something, or multiply it, or..." MODELER, PLACE SOME POINTS ON LEFT SIDE OF 'Y' AXIS So, lets go to the Points mode, make sure no tools are currently chosen, and make sure the Points cursor is showing. You know that drill by now. Go to the Create tab, select 'Points' or press the '+' key (on numeric keypad, or SHIFT plus + or = key next to numbers on top row). Clicking with the right mouse button, create four points on the left side of the Y centerline in the lower-left 'Back View' port so that they're roughly in a square. Use the square lines as guides, but not right on the intersection points of the grid. Press the spacebar to have the four points 'set' and the cyan crosshairs go away. MODELER, MOVE THE POINTS Go to Modify tab and select 'Move' or Press the 't' key. Center the four dots around the X axis by clicking in among the four dots somewhere, holding the left mouse button down, and dragging the mouse around until the points are where you want them. Make sure that all four dots remain on the left side of the Y (up and down) axis. 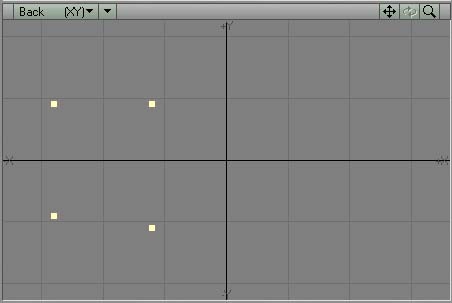 MODELER, DRAG INDIVIDUAL POINTS FOR FINER ADJUSTMENT Now, readjust the points by going to the Modify tab and selecting 'Drag' or by pressing CTRL-T, and drag each point close to the closest crossing intersection. You'll find that the points 'snap to' where the intersections cross like a magnet were drawing them there. Go to the bottom-right window and drag the two sets of points you see one-by-one so that they snap to the thicker darker line (if they aren't already there). Once you're done, you should have a perfect square that is centered both above and below the X axis, and to the left of the Y axis by one square. 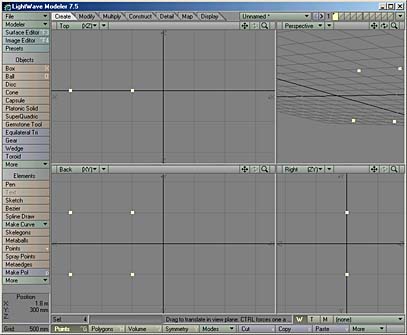 MODELER, ADJUSTING GRID AND 'GRID SNAP' PARAMETERS You can always adjust the grid's particulars and snap adjustments. You probably guessed where it may be hiding... Press 'd' to bring up the 'Display Options' panel, clicking the Units tab. One very important thing is if you wish to TURN OFF grid snap. For, it will always atract your points so that they stick to the closest grid line if you get too close to them, so turn them off if you don't want it to do that.  MODELER, MODIFY POINT'S X,Y,Z WITH 'POINT INFO' PANEL Also, you can set any point's X, Y, Z positions manually. Sometimes that is the easiest way to clean points back up again if they lose Symmetry, for example. Unselect all points, selecting one point and press the 'i' key. Down at the bottom of the 'Point Info' panel you'll find the X, Y, Z values that you can change. You can also highlight many points, do an 'i' on them, and change any particular X, Y or Z value to force all the points to suddenly snap to the zero line for that dimension. This is particularly important if you are using the Symmetry button, which I will soon be explaining. IMPORTANT - Symmetry won't work right unless every point in your world has a corresponding point on the other side of the Y axis. If it is off by even a fraction of an inch, they won't both act together at the same time. I'll say more on that topic later. MODELER, CLOSE, BUT NO BANANA... Here is a good example of why you might run into problems. Look at the Z value. Although I snapped it to the grid, it is not exactly zero, but is equal to -.0015 micrometers.  MODELER, FORCING POINTS TO LIE EXACTLY ON AN AXIS So, you might highlight all four points, press 'i' to get the info, and where it says '(mixed) under the Z axis, change that to zero and return. Press 'OK' and all four points will now be firmly adhered to the zero Z axis. The same is true for Symmetry and the Y axis, a thing that you may have to do over and over if you are building a very complex object. It is common to mirror something, creating the thing that's on the left on the right hand side, turning on 'Symmetry' mode to have LightWave keep track of every left-to-right corresponding movement. MODELER, EASY TO FORGET YOU'RE IN SYMMETRY MODE However, it is VERY EASY to forget you're in Symmetry mode. Oftentimes you turn Symmetry mode off for a second, doing forty movements thinking you have Symmetry mode on. And, it's highly possible that you don't have the Undo amount set to 40. In a case like that, you have no recourse but to delete half your object, do a Mirror of the object along the Y axis, and go back to Symmetry mode. Things will be symmetrical again. But, I've described many things here that I haven't yet covered so lets continue... Deselect all points, selecting points in a clockwise direction and press 'p' to create a polygon. 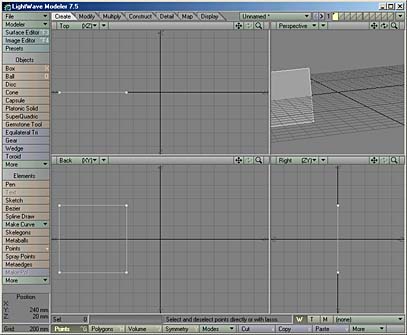 MODELER, ALWAYS SAVE YOUR WORK BEFORE YOU START MIRRORING It is VERY easy to mess up something when you mirror, so you should ALWAYS save your work before you attempt a mirror and remember to use the really handy undo and redo features of Modeler (You DID change the number of undo levels to be higher than 8, didn't you? See the 'Getting Started' Tutorial for more info on that). Go to the Multiply tab, select the 'Mirror' button, or press the 'SHIFT-V' key. You will see little happen except the cursor will turn into this:  MODELER, USING THE NUMERIC ENTRY PANEL Now, you could just click the Y axis, but you run the risk of it not being a perfect zero Y value if you do that which would make the Symmetry button not work, so instead press the 'n' key to bring up the Numeric panel for the Mirror tool. Most tools allow you to enter values by numeric values by using the 'n' key after you have chosen a tool. 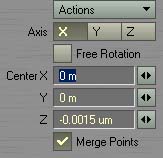 MODELER, HUH? Here is a surprise. Wouldn't you think that since we're mirroring 'around' the Y axis that it should say Y in this panel as the Axis choice? But, instead, it says X so you have to think of it as 'mirroring out towards what axis direction which breaks all the rules of 3D, as you generally think of doing something 'around an axis'. Oh well. They at least let you click the three buttons until you see the axis that mirror's in the direction you want to mirror. Merge Points checkmark is an important one. With it turned on, when it mirrors the left side, any points which happen to lie exactly on the Y axis (in this case) will be welded together. Remember welding, and 'Merge Points'? Well, this lets you mirror while merging points along the axis of mirroring (Y, I would call it, X they say). The most useful direction to mirror in is the X Axis as we're about to do. Close the close gadgets and BE VERY CAREFUL. It is SO EASY to do the mirror more than one time. After you have mirrored it, remember that you are still in mirror mode. IMPORTANT - TURN OFF MIRROR MODE WHEN YOU'RE DONE WITH IT Turn off mirror tool by pressing the spacebar to 'Set' the mirror and it's done. You now have two polygons mirrored around the Y axis or 'along' the X axis which is how you can remember it because of their mistake.  Also, if you move any point that is exactly on the Y axis, it will be sure to lock that point along the Y axis as long as you have symetry tool on. That ensures that no Y axis point gets off the pure zero value it needs in order to stay 'in the middle'. All other points, beware. If you drag them too close to the center Y axis line, they could 'snap to' the center line and become thought of as stuck to the center line, thus welding two points into one at the Y axis. So, don't let up until you are sure points that are not on the Y axis do not snap to the Y axis by mistake. MODELER, USING MIRROR ENSURES POINTS ARE PROPER FOR SYMMETRY MODE The symmetry mode is almost like magic. However, remember that if you highlight a polygon or even many polygons AND THEY'RE NOT ON THE Y AXIS AT ALL, using Mirror to reflect them across (turn off symmetry mode before you try clicking 'Mirror' or you'll get strange things occurring) you will HAVE TO WELD ALL POINTS that were mirrored. I often use this to replace accidently deleted polygons. It's very easy to be working on one side of an object in Wireframe ViewType and accidently highlight some polygon way down by the toes when you're working on the head, lets say. You delete the polygon on the head and away goes the one on the foot and you don't even know its gone for years. When you back away, there are missing polygons. But, if you have been using Symmetry mode. And you deleted the polygon when you WEREN'T in symmetry mode, the 'other' polygon might still be there. If so, you can use Mirror to mirror it over, but you will have to make sure that you Weld every point around the mirrored polygon (very important if you are using Subsurfacing mode) because you have to remember that Mirror will only auto-weld points along the Y axis (If you mirrored 'across the X axis'). Mirror is perfect for doing such things as noses, eyes, breasts, arms, hands, or whatever else has two symmetrical sides. And that concludes the Tutorial on Mirroring. |
||
