
 Ring & Pinion Install
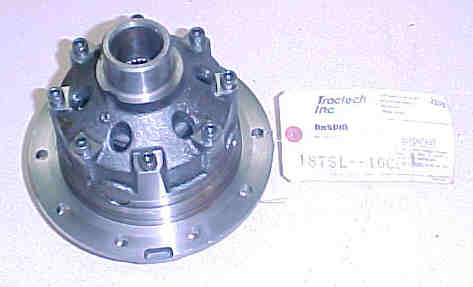
In an effort to improve my Jeep's off-road capability and power, I have decided to install lower gears, and add a second locker. I already have an E-Z Locker in the rear, so I'm going to move that to the front axle, and install a new Detroit Locker in the back. I have decided on 4.89:1 gears, to replace my stock 3.54 gears. The 3.54 gears are marginal with the 33" tires I have now, and since I'll soon be moving up 35" meats, I've settled on changing to 4.89 gears. I sat on the fence for a while trying to determine if I should go to 4.54 gears or 4.89, but I eventually went with the 4.89s because my Jeep spends more time going as slow as possible then it does going as fast as possible.
Having the experience of swapping engines, changing the gearing in my transfer case, and changing the output shaft of my transmission, I felt I should be able to manage changing gears. I've already pulled out and installed the rear gear carrier when I installed the E-Z Locker, so I was already half way there right? Wrong. Setting up ring & pinion gears is an arduous task, which is mostly a lot of trial and error. It can be very time consuming and at times frustrating. After the first couple of attempts at getting the gears right, I became comfortable working on them, but the first few hours were hell. By the time I got to the second axle, things were going smoothly, and I felt like a pro. Now that I've finished this project, I can't remember it being that tough, but time heals all wounds. If you are looking into doing this project, read the rest of this article, and maybe you will be able to skip the "sucky" parts.
My personal savior has been an article in JP magazine, called "Do-It-Yourself Dana Part II" (March 2002, page 90), which detailed this same project. What made this article so important is the lack of instructions available anywhere else. This article is the only place I have seen instructions specifically for setting-up gears in a Dana 44 axle. I have several service manuals for Jeep CJs, Jeep Grand Cherokees, and Scouts, yet none covered anything more then changing the pinion seal. I even bought a drive line service manual, and it too only brushed the differential service, focusing mostly on maintenance. The instructions that came with the gears are good, but they focus on the concepts and how to read the gear patterns. The information provided in the manuals is almost priceless when it comes time to interpret the gear pattern. The instructions do not cover any specifics or methods for disassembly or assembly of any particular axle. No matter what axle you have, you get the same instructions.
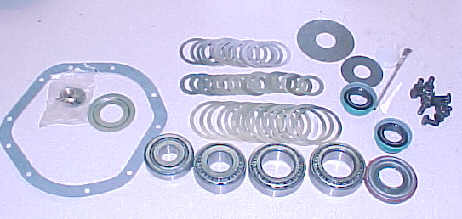
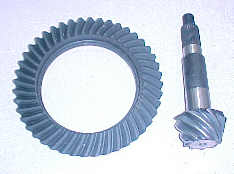
I bought my gears, install kits, and locker from Randy's Ring & Pinion ( www.ring-pinion.com). I told them what I wanted and they quoted me a lump price for all the materials. I had already been researching this purchase and new what competitive prices should be, and their prices were very competitive. They were not the cheapest, but they were close. What earned them my business was the quality name brands I was getting. The gears are Dana Spicer gears and the bearings are all Timken. You can save some money if you aren't particular with the brands you want. Here is an itemized price list of what I got.

One thing you need to take into account when considering installing ring & pinion gears yourself is the cost of tools. If you want to do this job yourself to save money, you may not be able to do that if you have to buy a lot of tools. I wasn't really interested in saving money, but I didn't want to have to sell myself on a street corner either. It is my understanding that it costs about $250 per axle to have a pro swap gears. Using that as a guideline, I figured if I spent less then $500.00 in tools and related junk, I was coming out ahead. Here are the tools I used, along with comments on how important they may or may not be.
Press- ($250.00 - Napa)
You don't have to have a press for this job, but it is conceivable that you may have to install and remove and re-install both carrier bearings 10 times (maybe more). A press makes that easy. A press also works well for pulling on and push off the rear pinion bearing. There are no shims under this bearing, so it's a one-time deal. You could get away with simply pounding the bearings on with a piece of pipe and a hammer.
Bearing Splitter- ($67.00 - www.matcotools.com )
This is a required tool. Unlike what it's name suggests, it doesn't split the bearing. It is a tool that slips around the base of a bearing, and allows you to pull on the bearing. Most, if not all of the bearing have very little surface visible to hook a gear puller to, so the splitter is your friend in a big way. This tool is a must.
Big Gear/Bearing Puller- ($30.00 - Hardware Store)
Even with a press and a bearing splitter, it is very difficult to remove the carrier bearings because of the shape of the gear carrier. If you plan to use a press, you'll need a lot of blocks/supports in order to catch the bearing splitter and push the carrier out. Since I couldn't come up with a way to support the bearing splitter in my press to get the carrier bearings off, I used a big gear puller on a bearing splitter and pull the bearing off. I tried a 6" gear puller and an axle flange puller, but these could NOT pull off the bearings. I ended up buying a new 10" gear/bearing puller. This big puller, with an impact wrench worked well.
Caliper- ($40.00 - Auto Zone)
I had a hard time finding a nice caliper. I found a lot of plastic calipers, but they sucked. The one I found at Auto Zone was a nice stainless steel unit with a case. There are a lot of shims that need to be measured. The shims that I have measure between .002" - .030". (Try to gauge that with a ruler).
Dial Indicator- (Free - Christmas Gift)
The backlash is measured with a dial indicator. I also used a magnetic base to hold the dial indicator, but you could come up with some complex contraption to hold the indicator. You have to measure how much the ring gear rotates. It should be in the range of .006" - .010". I think this tool is a must. The difference between .009" of backlash and .019" is almost unperceivable without a dial indicator.
Inch-Pound Torque Wrench- ($??.?? - www.matcotools.com )
The pinion bearing preload is measured with an inch-pound torque wrench. It should be in the range of 6-9 in. lbs. for new bearings. After doing the rear axle, I was able to judge the pre-load of the front very closely without an inch pound torque wrench. Even with my new gained skill, I still consider this a required tool.
Foot-Pound Torque Wrench- (Free Christmas Gift - Sears)
The pinion nut, ring gear bolts and carrier bearing cap bolts are measured with a foot-pound torque wrench. The pinion nut gets tightened to 250 ft. lbs., the ring gear bolts get tightened to 55 ft. lbs, and the cap bolts to 60 ft. lbs. My torque wrench only goes to 150 ft. lbs, so I couldn't actually measure how tight I got the pinion nut, but lets face it, 250 ft lbs equates to "as tight as possible". I just set my impact wrench on its highest setting then let it pound on the nut for a while and considered that to be exactly 250 ft. lbs.
Long Punch- ($5.00 - Hardware Store)
I used an 11" long steel punch to push out the old bearing races out of the axle housing. The forward most race is tough to get out with a 6 or 8" punch, so having something long is nice. It is probably better to use a brass punch, but I couldn't find one. (see footnote 1)
Bearing Race Driver Set- ($55.00 - Snap-on)
These are probably not necessary items, but are handy. They can be used to install races, install seals, and are handy in the press.
Want to send me e-mail?
Want to go back to page 2?
Want to go back to page 3?
Want to go back to front page?
