|
BACKGROUND  |
2nd Fallschirmjaeger Regiment of Washington
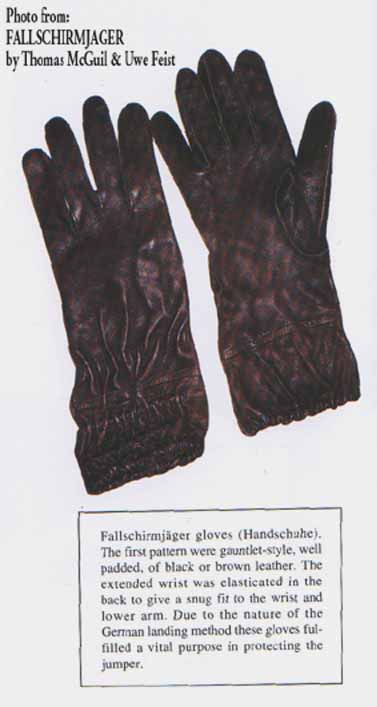
Gauntlets I don't know how accurate our guantlets are, I have been told that the originals have 3 steel coil springs (about the diameter of ones used in ball point pens) sewn into the cuffs, 1 inch apart, center to center. Also, there is thin elastic in the cuff hem and on back of the wrist. I have never been able to examined originals, I made mine from looking at this picture:
 I used surplus U.S. NAVY unlined black leather gloves for about $20-$25 and added "gauntlet cuffs". You could use lined gloves, if you can find them, for the extra padding like some originals. For cuffs I went to a Thrift Shop and bought a pair of woman's leather high top boots for about $7 that matched the color and texture of the gloves. I cut the tops off and opened them up and cut out pieces about 15" wide and 6" high (I ended up with enough for 2 pair). Make sure you get leather boots not vinyl, or you could just buy some "glove leather" at a Leather $hop. 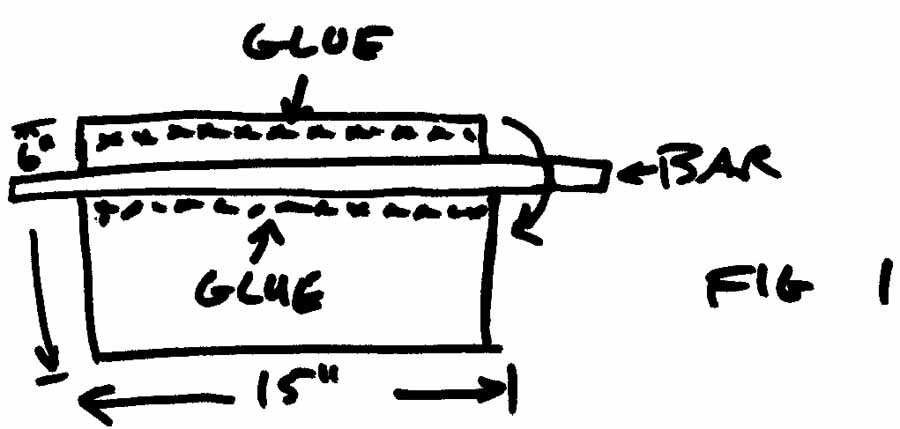 I folded the top 1" over a piece of steel file folder support bracket (any steel bar about 3/8" wide 1/16" thick and 18" long will do) and rubber cemented the folded edge to the inside of the leather, this will create a "tunnel" for elastic when the steel bracket is removed after the glue dries. Care must be taken when applying glue to the edge and inside of the leather not to slop any onto the metal bar or it will be difficult to remove and the elastic will "stick up" when you try to pull it through later. You should now have a rectangular piece about 15" wide and 5" high with a "tunnel" for elastic at what will be the forearm end. 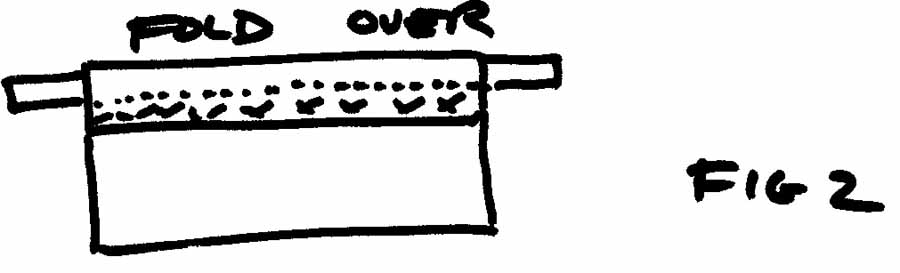 Next remove the edge trim from the wrist end of glove, use the length of this trim plus 1/2" to determine the wrist end width of the cuff piece. What you want to do is center this measurement (for me it was about 11") on the bottom or wrist edge and cut equal angles on both width edges up to the top forearm edge. You should end up with a trapezoid about 11" on the bottom wrist edge and 15" on the top forearm edge with matching but opposite angles on both sides. 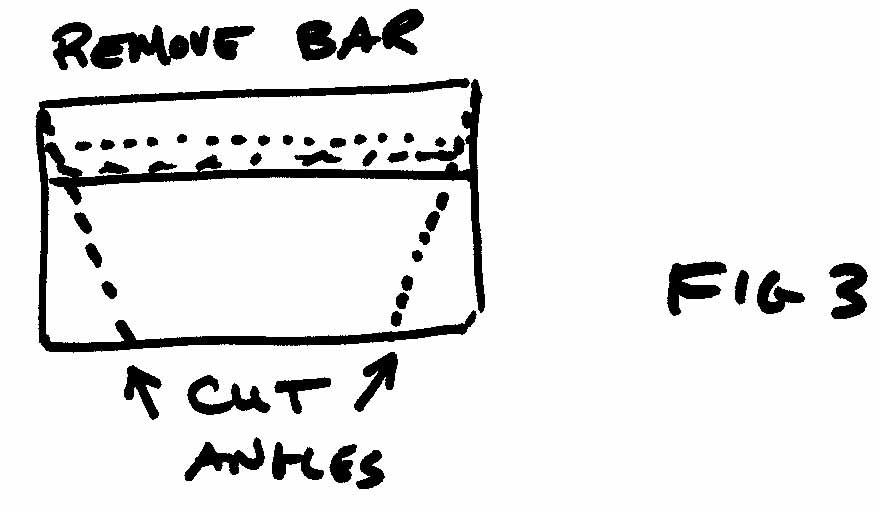 This will form a funnel like piece when the angled ends are joined, 15" circumference at the top forearm end and 11" circumference at the bottom wrist end. With me so far? Now thread some 1/4" elastic through the tunnel, sew it only to one end anchoring it and closing off that end of the tunnel. Cut that end flush and leave about 3 or 4 inches on the other end to be able to pull it later. Pin the piece together (pin in about a 1/4" from the edge to give you enough to sew together later) along the angled edges, outside surface to outside surface, to form that cuff funnel shape with the leather INSIDE OUT. 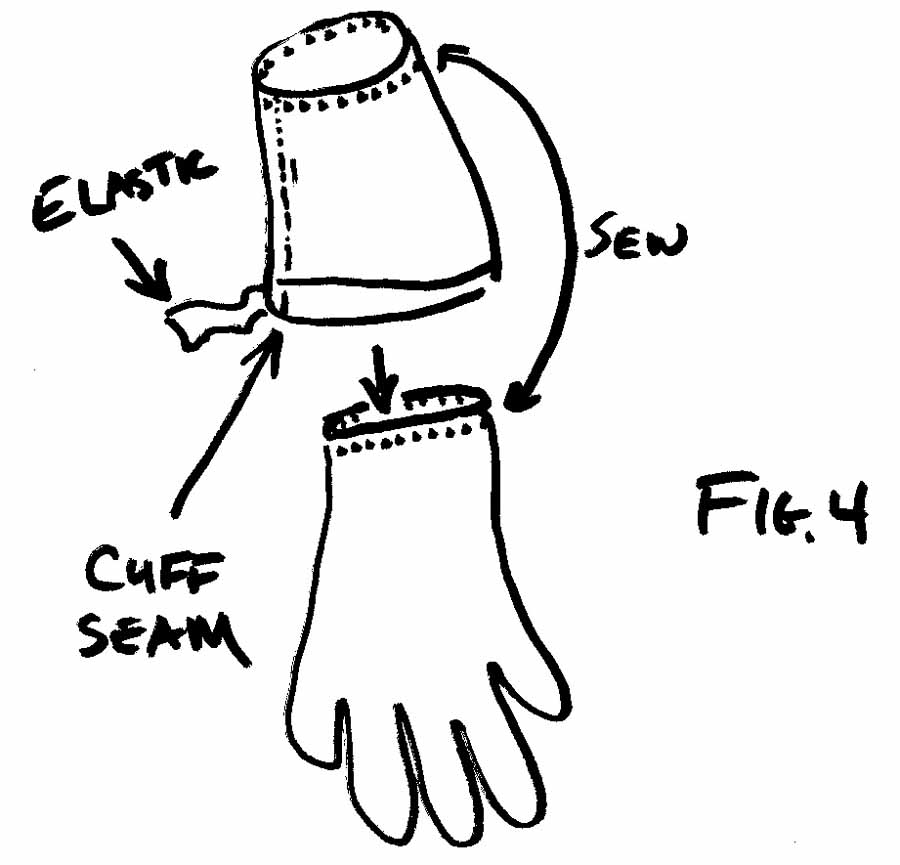 Put the glove into the cuff funnel so that the wrist edges match up and the forearm edge (with the elastic) is hanging down over the fingers of the glove. Line the seam of the cuff (the pinned part) up with the seam of the glove running along the thumb side. Sew the wrist edge of the cuff to the wrist edge of the glove using the holes from the glove edge trim that you removed as a guide. Now sew the cuff seam together removing the pins as you go and stop just as you get to the elastic "tunnel". Leave the needle and thread in place as you will continue after you finish pulling the elastic. Pull the elastic so that the leather ends up with that bunched up look and anchor it to that open end by sewing, thus closing the other tunnel end. Cut the elastic off flush with the tunnel end. Continue sewing up the cuff seam to join the two tunnel ends together. You should now have something that looks like this: 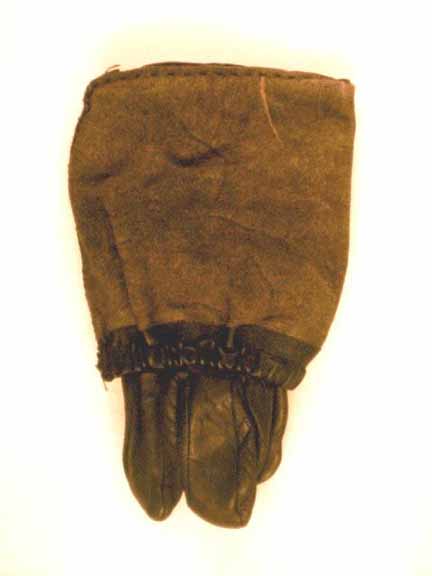 Now pull out the cuff and you have yourself a close approximation of a jump gauntlet!  Simple no? If you have any questions about these short and simple (ha!)instructions feel free to contact me.
Marc McDaniel |