
![]()
| Building a book and generating files |
| Book-related tasks |
To prepare Framemaker documents for printing purposes or for PDFs, you need to add the front matter (title and copyright pages, table of contents) and an index. Also, some background information is provided for the page layout of the template and the document headers and footers.
In this section we will cover how to create and add these components to the book. These tasks include the following:
| Page layout |
The page layout characteristics are defined on the Master page and must not be changed in the standard template. The Master page determines the top, bottom, left and right margins of the page, page numbering, headers and footers, etc.
When you enter text in a document, you are working on the Body page. The Master pages lie in the background and supplies all the page characteristics for each page in your document.
As you write using the template, the template applies the appropriate master page (left or right master page) as you add pages to your document.
This template has three master page layouts:
The page size is set to 8.5" x 11" and the left and right margins are set to 3/4" and the top margin is 5/8" and bottom margin is 3/4".
| Headers & footers |
The headers and footers are setup on the master pages of the template. The template uses footers on the first, right, and left pages. The header does not appear on the first page, but appears on subsequent right and left pages.
The running headers are defined by variables on the master pages.
| Adding title page and copyright info |
The copyright information is imported by reference from the master copyright file kept in the MST_Master folder. Update the copyright file in the Master folder to update all the copyrights in all the books.
Use the designated templates for the title page and copyright information for the book.
| How to use other templates |
The most current FrameMaker templates are located in the Online Documentation folder, Templates folder, for each release.
The templates that you will need to create a document for printing purposes are shown below. These templates contain all the tags that you will need to create the contents.
Templates used to create a book
| Note | Suggestion: make a copy of the template(s) before using them so that you don't overwrite them. |
You can use the text_template.book, a ready-made book. To use this book, open the book and rename it. You will also need to rename the table of contents and index files.
The illustration below shows the order in which the files should be arranged.

For the regular book files, use the text_template.fm template.
Select File menu and select Import. Framemaker comes with a Word filter, but it does not always work. If importing the file does not work, try converted the Word file to RTF in Word, and then try importing to the template.
| Creating a standalone table of contents |
If you modify your document, you need to regenerate the standalone table of contents to update the links. Check these links periodically as these links will be carried over to the HTML files.
To create a standalone table of contents to insert at the top of the document, do the following:
| Creating the book |
To create a new book:
In Frame 6, this step is optional. You can create a book without any documents open.
You need to update the book by clicking on the Update icon located in the lower right corner of the Book window. Or, select the Edit menu and select Update Book.
Updating the book is required to preserve the changes you have made to it. Updating the book also allows you to update and generate the table of contents and index and other types of generated lists.
Update the book if you have done the following:
Updating the book generates the Book Error Log which you can use to check for broken cross-references, inconsistencies in conditional text settings, and other comments which you can click on to go to the source.
You can add, remove, and rearrange files in the open Book window:
| Tip | To add more than one file at a time, open the Add window. With the Ctrl key pressed, click on the files that you want to add. The files you want to add appear in the File Name field. Click on the Add button. |
Some other book-related features:
| Generating table of contents and index |
The table of contents and index for the book are generated files that must be added as generated files, otherwise you won't be able to update these lists. The generated lists need to be added only once to the book and can be updated (regenerated) by clicking on Update Book.
To create these generated files, you need to have a book created and you generate these files from the book. You can also create a standalone table of contents for a single document which is a different procedure.
To add the table of contents to the book and to generate it:
The table of contents is generated and added to the book, but will not have the proper formatting. For how to add the formatting, see Designate Templates for Table of Contents and Index.
To add the index to the book and to generate it:
The index is generated and added to the book, but will not have the proper formatting. For how to add the formatting, see Designate Templates for Table of Contents and Index.
Use the designated templates for the book table of contents and index to achieve the proper formatting. You can generate the files and import the format to the generated files.
Or, you can use the method described below. In this method, the table of contents and index are generated in the appropriate template. You don't need to import formats to them.
For example, if your book is named cpt_concepts.book, save templateTOC as cpt_conceptsTOC.fm.
For example, if your book is named cpt_concepts.book, save templateIX as cpt_conceptsIX.fm.
After generating the files, some manual formatting may be necessary, especially if you are creating printable PDFs:
Generated files don't automatically update when files in the book are edited or rearranged. When you regenerate the files, the manual formatting will be removed.
If you changed the pagination in your book or rearranged files, you need to update the book to regenerate the table of contents and index. Otherwise, the page numbering in these files will not coordinate with the pages in the book.
To update the book:
| Note | If your generated lists do not appear in this window, then you must not have added the files as generated lists, or you may have saved them to another folder. Add the generated files to the book again. |
| Set up page numbering |
The books are printed double-sided and numbered sequentially. The first chapter file starts on page 1 and the page numbers in the remaining files continue.
The Title and copyright pages are numbered 1 and 2 and the table of contents starts on page 3. The index is numbered sequentially following the last chapter in the book.
Setting up files in a book
| 1 Restart paragraph numbering so that the Chapternumber autonumber is restarted. |
To set up the numbering properties:
| Note | You can also open the Numbering Properties by right-clicking on the file and choose Numbering from the menu. |

Select the Restart Paragraph Numbering to restart the paragraph numbering in a file.
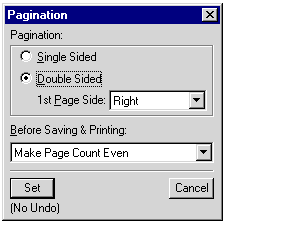
Writers should use the default setting for the Pagination and they don't need to adjust it.
To open this window, select Format menu-Page Layout-Pagination. For this template, the settings should be double sided, 1st page side: read from file, and select Make Page Count Even (default setting).
Sometimes in a Framemaker document, you end up with a couple of blank pages at the end of the document. To remove these blank pages, open the Pagination window, and change the Before Saving & Printing setting to Delete Empty Pages.
You can now apply bookwide settings to all, or selected files, in your book.
To apply bookwide settings:
You can select from the following bookwide operations:
You can do a bookwide search and replace. That is, find text and replace it with different text at the book level or in a document.
You can search for more than just text. To see these other options, open the Find/Change dialog box (Ctrl f) and click on the pull-down list for the Find field. For more information on how use these, see the online Help or a Framemaker manual.
If you want to search a selected document in a book:
If you click on Change All for multiple files or book, this is undoable. Be aware that this could change text that you might not want changed.
If you have the Book window open and you wish to search the open document only, click on the Document or Selection option. Then you don't search the entire book.
|
JH Consulting mrycove419@yahoo.com Last modified: January 2003 |
