
Pottery Tips and Techniques
- Ribs: why use them?
- test for and locate center
- recenter or "truing"
- get height through a vertical stack
- make a juicer
What are they and why use them? From animal rib bones to a scratched and unplayable cd, almost anything can be used as a rib. Ribs are used for forming specific, repeatable, uniform shapes. Ribs are to your fingers what shoes are to your feet, and the right shoe for the right reason can make all the difference, like cleats on grass or ballet shoes for dancing on point. They enhance performance by providing stability and control where the flesh is weak. Even if your fingers are very strong, the application of ribs can provide endurance and uniformity with less effort and more consistency from day to day. On a day when your fingers "just can't remember the shape," the rib always does. Finding and using the right rib can mean the difference in quality and production efficiency that can turn "a real pain" piece into a profitable addition to your line of work. It can also make the difference in simple ability to play, to perform, to participate at all. For people with physical handicaps or limitations including geriatric grip strength weakness to children and small people with young or undeveloped muscles, ribs provide the extra muscle and control that can get or keep you in the game. For able-bodied folks, they are like performance enhancing steroids. Ribs are simply great tools.
Yet there is always debate on virtually any topic in existence. There is some debate on rib use and it goes like this. Using ribs with beginning students can get them up to speed so quickly that much frustration and wasted clay and energy is avoided. They will develop finger control and strength in time, but ribs give them enough initial success that they will keep at it. Some experienced potters contemptuously call it a crutch and say that your fingers are the "best and only tool you need". I contend that crutches are great for people with trouble walking. It is indeed true that a potter can make most forms with just their fingers. It is magical to observe accomplished potters do this. But it is a parlor trick. Most professional and production potters use ribs on a daily basis, not as a crutch but as performance enhancing tools, sometimes as literal crutches, to prop up tired fingers on a long day. There is no imperative to abandon the "crutch" once the potter can control their fingers enough to make pots with "the only tool you really need". And for some applications, your fingers are simply the wrong tool for the job. Ribs are the mainstay of the production potter and can make the all difference in professional quality work made on any scale. Here are some reasons why. The following sections show samples of appropriate use of different types and composition ribs.
. They enhance appearance with reproducible details and surface textures.
. They increase endurance and control in production throwing by allowing the finger grip to change while keeping the same form from piece to piece.
. They provide uniformity of size and shape in duplicate work by providing size gauges for centering and opening forms.
. They are structural aids in forming intricate curves and tall straight walls.
. They save your finger tips and nails in repetitive or abrasive work.
. They provide simple assistance for lid gallery fitting.

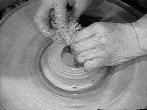
When centering, lots of beginning potters find it hard to check for center. You can use your rib point, or the point of you nail, to mark a ring in the clay at the outermost point where there is enough clay to make a complete circle. If the difference from that line to the outer edge of the clay mound is the same all the way around, the clay is centered vertically. Now make more rings coming in 1 centimeter each til you get to the center. If the rings can be made without having to lower or raise the marking tool, the top is level and you can open the piece without much distortion.
The question, "Is it centered, yet?", can be one of the most frustrating for both the instructor and the student. The instructor can't see how you can have your hands on it and not know; the student hasn't "felt" it yet and so he has nothing to compare it to. If the instructor will demonstrate centering and let each student feel the spinning clay as it rotates on center, this self-directed test for center should save everyone from this infernal question.
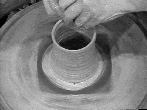
Recentering or "truing" the rim
To re-center after opening: you hold the left index finger straight up at the inside of the opened clay, your left thumb directly across from the index, and a sponge or your finger across the top of the shallow wall of clay. Hold your hands steady, your elbows down on either your splash pan or your knees, and apply just enough pressure to force the clay into a straight, shallow wall. Keep everything wet, but not slippy. If slip is forming, use more water and press more firmly. A properly compressed ball of clay will let the water ride its surface and act as lubricant for your hands. Too little water or too little pressure and the clay will make a layer of soft slippy clay that looks centered, but is physically out of balance. You can't pull walls from this type of clay.
Here is an obtuse analogy: It's like spinning a dense cake with a thick layer of fluffy frosting in your hands. You can make the frosting look smooth, but the cake underneath doesn't change. Centering and recentering has to move the cake, not frosting. The water should be like a layer of oil on the surface of the cake, not thick frosting(slip). Throw clean, with clean hands and tools.
Think about it this way: you only have to touch the clay in one place as it spins to change it all the way around. This is why you use a wheel instead of hand building, to keep from turning it in your hands. The wheel spins it, the water lubricates your hands, your hands work in one spot. Now, just think about the one spot where you are touching it. If the clay is made of particles suspended in water, you are trying to stack the particles up like blocks when you make a pull. If you make a block tower, the blocks have to be stacked directly on top of each other or they fall down. Some domino masters can make bridges and towers out of little blocks. Good potters are like them. They know just how far off and out they can force the stack of clay particles. Beginning potters know, too. When it crumbles underneath their fingers, it was too far to pull it out! The trick is to get ALL of you vertical height out of the clay BEFORE you try to make the stack shift out and then back in to make a curved shape. If you get all of your height first, the shape only has to spin and hold the curves for a few seconds/minutes before you stop the wheel. With this in mind, you experiment with water content in the clay, grog, and geometry to work out fancy angles. Work on a straight cylinder, put your shapes in starting from the top and working down, and use the firmest clay you can center. Ribs help. Slow speed as you shape is essential. And at the end of each pull, recenter the rim by holding one finger inside, one outside, and your sponge across the top.
