|
Best viewed with a screen setting of 800x600 with color setting of True Color (32-bit).
Please be patient while graphics upload to your browser.

TopLists
Bobs/Bobbins/Butterflies
( also read Changing/Adding Colors, Gauge, & Tangles )
What are bobs or bobbins or yarn butterflies?:
- Bobs or bobbins are plastic and available at all craft stores (such as WalMart's, Michael's, etc.). Mine are about 4 inches long. Some people make their own, but I have enough challenges without going down that road. If you try to keep the yarn on skeins, you need too many at a time. Sometimes you have 3 or 4 yarn bobbins with the same color on them at a time. You should only carry a color across 2 stitches. If there are 3 or more stitches of one color, and then you go back to your main color, you need another bobbin with your main color. I know this sounds confusing, but as soon as you start, you will understand. The light bulb will go on! -- Wild Di
- Bobbins are plastic items you wrap the thread around to change colors. They come in many sizes and shapes. Go look at marymaxim.com or any of the yarn stores. They all carry them. I know Wal-Mart has them because I just bought them. -- Janet La R.
- Yarn bobbins are made for the purpose of holding small amounts of yarn for multi-color work. -- Sandi Marshall
- Thanks to a tip from Becki and doing some online research/searching, I found out that yarn butterflies are simply hand-tied "bobbin-less bobbins" that are wound around your fingers. Apparently, yarn butterfly "bobbins" are used frequently in Intarsia knitting.
- To make a yarn butterfly "bobbin-less bobbin," simply wrap yarn in a figure-8 around your fingers until you have the desired amount and secure it by wrapping the tail around it. (Use the yarn from the center of the butterfly and not the secured tail.) For more detailed instructions with some photos, try this link to a graphic that I created using the information and photos that Becki shared with me - yarn butterfly instructions.
- (FYI - This is something that I myself have done before but never knew there was a name for it and never really thought of it as a bobbin. *L*)
-- Cheryl
 What do bobs or bobbins look like?: What do bobs or bobbins look like?:
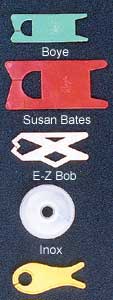
Here are some photos of different kinds of yarn bobbins available at stores that I have found on the 'net. Click on a link below to see the kinds/types or look at the photo on the right to get a quick look at some. Each link below should open up in a new browser window. The number of bobbins that you will get in a package may vary depending on manufacturer and/or store.
-- Cheryl
Bryson EZ BobbinsClover BobbinsBoye BobbinsInox Bobbins
Susan Bates Yarn BobsSusan Bates Regular BobbinsSusan Bates Bulky Bobbins
Using Bobbins:
When using bobbins, I find it's helpful to know how much yarn to wind on. Just take the hook and yarn you will be using, make 20 stitches and 20 rows (doesn't take long) and measure stitches per inch so you know your gauge if you want to, then pull it out and measure the yarn. Soon as you know how much yarn you use for each stitch, your graph tells you how many stitches for that color patch and you wind your bobbin accordingly. -- Brenda in Onalaska, WA, USA (formerly Brenda in AZ)
Bobbins To Make
- Drinking Straw Bobbins:
 "Just get a drinking straw. I get the big thick ones from Jack in the Box (for milkshakes?) and cut them in half. Then wrap the yarn around the middle a couple times to anchor it, then continue in a figure 8. That for me is clockwise around the top, holding the straw in the middle, and down counterclockwise around the bottom crossing where I'm holding the straw. Rotate the straw a quarter turn every five wraps or so to avoid the big bump where it crosses. Figure out how much of that color you want (gauge and number of stitches for the color), wind that much, thread the yarn down through the straw, and work with the end that comes out. A yarn needle helps it go down through the straw. Oboy! That reads funny, but I just tried it following instructions and it actually worked! Try it and see, then ask questions if I can help any more." -- Brenda in Onalaska, WA, USA (formerly Brenda in AZ) "Just get a drinking straw. I get the big thick ones from Jack in the Box (for milkshakes?) and cut them in half. Then wrap the yarn around the middle a couple times to anchor it, then continue in a figure 8. That for me is clockwise around the top, holding the straw in the middle, and down counterclockwise around the bottom crossing where I'm holding the straw. Rotate the straw a quarter turn every five wraps or so to avoid the big bump where it crosses. Figure out how much of that color you want (gauge and number of stitches for the color), wind that much, thread the yarn down through the straw, and work with the end that comes out. A yarn needle helps it go down through the straw. Oboy! That reads funny, but I just tried it following instructions and it actually worked! Try it and see, then ask questions if I can help any more." -- Brenda in Onalaska, WA, USA (formerly Brenda in AZ)
I saw this on the web somewhere and thought some of you might be interested in making these to use as bobbins. Cut a soda straw into 4-inch pieces. Wind your yarn around the middle for about an inch, then switch to winding in figure-8 style. Put the end THROUGH the straw and out the other end, and use that end to knit. The bobbins hang neatly and unwind one loop at a time. -- Rhonda from IndianaIf you aren't able to get yarn bobbins I have done the following: Roll up a small amount in a tight ball over a piece of cardboard, place a small slit in the cardboard and this will help when you aren't using the yarn you can secure the yarn in the slit until you need it. Hope this helps. (I have run out of bobbins before doing cropoint and did this, it worked well.) -- HelenRemember that plastic milk jugs can be cut into really nice bobbins that are larger and hold much more yarn for our larger projects. They don't wear out as fast as the cardboard ones either. I found it was easier to use a little sandpaper on the edges - not necessarily easy to do sometimes, but smoothes just enough that the yarn doesn't catch. I only get milk in 1/2 gal bottles so that is what I use. I cut off the top where is starts to slant in and the bottom as close as I can. Then I cut along the 4 sides (picture this as the up/down corners that make the bottle 4 sided) so that now I have 4 pieces. One piece makes a small bobbin as I cut off below the handle. The others allow much larger bobbins. I draw my outline with a sharpie magic marker and then cut. Imagine that in the picture below everything that is grey is cut as one piece. Basically - it is roughly shaped like the store bought bobbins but much bigger.-- kathy
 For those looking for bobbins, while working on my larger afghans with a repeating pattern or just with colors that you will eventually use a lot of for that section (like a border around a character) I've found it more useful and easier to make small pull skeins and use them instead of bobbins. For those who don't know how to make them, there is a good tutorial at: http://www.onceuponapattern.com/Hit enter and when in the frames portion of the site, scroll down the left side, toward the bottom there is "making a pull skein." This is also useful for storing remnants of yarn that are unwound and constantly tangle. Hope this helps someone. -- BridgetIn regard to the bobbin thing a majigs. You can take hard plastic or card board and cut a rectangle. Groove a U in the top and bottom. Put a slit on the side to hold your yarn when you don't want it. The deeper the u groove the more yarn you can put on. I wish I could draw a picture on this but I can't. I hope you understand what I am trying to say but this way it is free. -- Micki from WVTo make a bobbin just cut a piece out of a plastic ice cream container about 3 inches long by 1-1/2 inches wide. Then cut a V shape in the top and bottom and wind your yarn on it. -- JacquiI just finally starting using the scoopable cat litter and discovered how wonderful the plastic container it came in is. Wonderful, nice body, clean, white. It makes great bobbins of what ever size you want. I just used a utility knife to cut them out and a file to smooth the edges. You could get really huge if you were a glutton for punishment. I also found that if I cut a nice window (3 sides only) in the side, I could put my really large balls of thread or cones of thread/yarn inside and run the thread out the top. Keeps it clean while I work and keeps the cats out of the yarn/thread. The cones of Peaches/Cream don't fit on the paper towel holder I usually use as the inside cone is too small. This keeps it nice and clean. -- KathI copied this from another list. Hope it helps -- Linda For those looking for bobbins, while working on my larger afghans with a repeating pattern or just with colors that you will eventually use a lot of for that section (like a border around a character) I've found it more useful and easier to make small pull skeins and use them instead of bobbins. For those who don't know how to make them, there is a good tutorial at: http://www.onceuponapattern.com/Hit enter and when in the frames portion of the site, scroll down the left side, toward the bottom there is "making a pull skein." This is also useful for storing remnants of yarn that are unwound and constantly tangle. Hope this helps someone. -- BridgetIn regard to the bobbin thing a majigs. You can take hard plastic or card board and cut a rectangle. Groove a U in the top and bottom. Put a slit on the side to hold your yarn when you don't want it. The deeper the u groove the more yarn you can put on. I wish I could draw a picture on this but I can't. I hope you understand what I am trying to say but this way it is free. -- Micki from WVTo make a bobbin just cut a piece out of a plastic ice cream container about 3 inches long by 1-1/2 inches wide. Then cut a V shape in the top and bottom and wind your yarn on it. -- JacquiI just finally starting using the scoopable cat litter and discovered how wonderful the plastic container it came in is. Wonderful, nice body, clean, white. It makes great bobbins of what ever size you want. I just used a utility knife to cut them out and a file to smooth the edges. You could get really huge if you were a glutton for punishment. I also found that if I cut a nice window (3 sides only) in the side, I could put my really large balls of thread or cones of thread/yarn inside and run the thread out the top. Keeps it clean while I work and keeps the cats out of the yarn/thread. The cones of Peaches/Cream don't fit on the paper towel holder I usually use as the inside cone is too small. This keeps it nice and clean. -- KathI copied this from another list. Hope it helps -- Linda
http://www.woolworks.org/misc/bobbins.txt
Straw Bobbins(It's easier than it sounds.)1. Grab a plastic drinking straw and cut it in half.2. Begin by winding the yarn around the middle to establish a secure start point.3. Now with your left hand, pinch the straw lightly in the middle where you've wound the yarn - I use my thumb and pointing finger.4. With your right hand begin to wind the yarn over base yarn in a figure 8 while slowly twirling the straw with your two left fingers.5. You'll end up with an egg-shaped blob of yarn in the middle of the straw and one free hanging yarn end.6. Cut a 1/2 inch or so slit in one end of the straw.7. Thread the free hanging yarn thru the uncut end of the straw.8. When the yarn emerges from the end with the slit, slip it into the slit to anchor it.When using these bobbins for intarsia, pull the working end of the yarn out of the slit and allow the yarn to feed into the bit of intarsia you're working on. When you're ready to change colors, anchor the yarn in the slit again and continue with your next color.No tangling. It's easy to flip the bobbin over or under the next strand. The bobbin weighs nothing. (Unlike the plastic doughnut bobbins which, I think, add weight and stretch the yarn.)Try making a butterfly bobbin. -- Becki
Bobbin Substitutes & Bobbins To Buy
- I prefer the bobbins that have a slit on the top that will let you pull off the amount of yarn off that you want and the flexible slit lets you. I got them at Walmart - they are longer than the ones from Hobby Lobby. Those are square looking and you have to put the yarn in a slit at the top and bottom. They are stiffer and you have to deliberately remove the yarn from the slit and put it back. Takes longer but still works better than a bunch of balls getting tangled. -- Val
- I use those little perm rollers the smallest ones with the rubber stretch band, it's amazing how much yarn they hold, when you finish with a colour you wind it up close to the work and it doesn't tangle also holds well. Best thing is the price I paid $1.95 for a pkt. 10 -- Patricia
- I tried the bobbins and they would get hung up on each other and then I tried the little bags and they would get tangled together so what I finally done was..I bought this 24 compartment tackle box thing...it's about 3" tall (I bought it in the sporting goods section at Walmart for 3.95....there was one in the craft section that was a lot smaller and it cost about 8.95!!) and has these dividers that you slide in to form the compartments...then I just drilled me a hole in the lid over each compartment....then I just put my little balls of yarn in each compartment and it feeds out thru the hole!! Works pretty good and I can sit with my box in my lap and get to all my little balls of yarn!! Works real good in the truck while we're traveling !!-- Phyllis
- I like the bobbins I found at Needles! web site that are made by Clover. They look like a big capital I (or an H laying on its side) with slits in the top and bottom. They hold a lot more yarn than the other bobbins I have tried from local stores in my area. Look under knitting at the site and then knitting accessories to find the yarn bobbins. Should be showing under Clover Products and/or Knitting Bobbins. There's 6 in a pack. -- Cheryl
- I use the ziploc bag method. I found that the ziploc bags have less of a tendency to get tangled up with their neighbors than my bobbins did; don't "slip" too much yarn off on me; I can make bigger mini-skeins that I could get on a bobbin, so there is less tying-on in the middle of big sections; and since I'm crocheting with two kids and a cat in residence, the ziploc bags keep cat hair, fuzzies (housekeeping is not my forte) and kid stuff from getting stuck in my mini-skeins as I work. -- Mary in West Michigan
- I thought I would pass on a hint I heard a couple of years ago. When working on a big crochet project save up the 2-liter soda containers. If you cut the bottom off and feed the yarn through the lip then put the yarn in the bottle and tape the bottom back on, you should not have a big tangled mess. Even better is if you can get one of the trays that they ship them on or make a box for them. You can keep your yarn in the bottle and just pull out the color you need. Just thought I would pass it on. Hope it helps. -- Diann P.
- I just found this idea at the Sweaterscapes web site for learning intarsia knitting and thought some might like to give it a try - use a wooden (or plastic) spring clothes pin as an inexpensive bobbin. The Sweaterscapes web site has a picture of the clothes pin used as a bobbin. -- Cheryl
- Can use the old sponge rollers once you remove the sponge(s). Wind the yarn on the spindle that the sponge roller was on and can close it once yarn is on it so it doesn't unravel on you if you don't wind too much yarn on it. -- ??????
How do you prevent your bobbins from becoming all tangled?:
- Bobbins are the answer when you are doing the afghans that continually change color. It helps to keep the yarn from twisting in the back. You run out of yarn but not as quickly as you might think. I use the background color with skeins so I don't run out as fast and use the bobbin colors just for the designs in the middle. All you have to do is tie on any additional yarn that you need. Yes, you heard me, I tie on my yarn so I can throw mine in the washing machine and not worry about anything coming undone. I don't have any knots showing, I tuck all the loose ends in and hide the knots. No problem. I started knotting after my first granny square afghan, I made it for my Mom. The first time she laundered it it started falling apart. Never again would that happen to me. It hasn't!
- Keep the yarn on the bobbins short so you don't have long strands to tangle. When they are short, they don't reach around each other.
- With the double strand, you can use large "bobs" or roll small balls and I use those barrettes that just snap closed (the metal ones), unroll a small amount at a time so it stays closer to your work and then put the barrette on. Keeping the yarn closer to your work it keeps it from tangling. -- Val
- As soon as I'm done with that color for the row, I wind up the loose yarn and secure it so that my bobbins are very close to the work and don't have room to tangle.-- Kathy
- You can also place all your bobbins into a gallon size freezer bag (with zipper closure) and then you zip it as closed as you can and still have the yarn feed through the opening. I do this and have it sit on my lap while I work. If it feels awkward then you can pull out the color you're working with and then exchange it with your next color in the bag. -- Debra ~aka~ Crochetmama
- Instead of bobbins, I make the pull-out skeins and put them in a plastic sandwitch bag (the cheaper one with the flip top - not zip lock) and fasten in with a rubber band wrapped about 5 time (depending on the band size) to hold the yarn so that you have to pull it out as you need it. This keeps the "balls" closer to the work and lessens tangling very much and what does tangle is easy to untangle. I have found that this works better for me than bobbins. -- Nita
- I find that keeping them as short as possible helps yarn bobbins from getting tangled. Also, if you have a large block of time to sit down and work it is better. If I have a project with a lot of bobbins and the kids keep making me get up and put my work aside it gets tangled. Just as I get them squared away again, they ask for something else! Some yarn tangles more than others. I like the Bernat, So Soft. The Jiffy by Lion Brand is good also, but it does tangle a bit more than the bernat. -- Wild Di
- I use very small bulldog clips and clip bobbin and thread to the back of work or where there a few colours together, I clip them all together. Sometimes I use bigger bulldog clips instead of bobbins and they work well also. -- Patricia
- Thought I'd post what I do when working on the graph afghans. Whenever I make them, (I'm in the middle of a very large one at the moment) I never use those little yarn bobbins. Even the large ones are
to small for me. I HATE to weave in a ton of ends, so the less the better. I usually divide my skeins before I start the graph then get a large empty box from the grocery store and since I'm a coffee drinker, I save all my coffee cans, large and small ones. I place each ball of yarn in a coffee can in the order that it is needed and place the cans in the box. When I complete a row, I place the afghan on top of the box, turn the box around and pick up my afghan. My yarn never gets tangled this way and I have less ends to weave in. When I need to stop working on the project, I just set it in the box and slid the box out of the way. :o) Hope that helps some of you out there. It's the best way I know to enjoy making those large graph afghans.
- To clear up (hopefully) a few questions some of you had on my graph box, what I do is have the box at my feet. When I finish a row, I lay the afghan directly down on the box, then I turn it around (doesn't matter if its clockwise or counterclockwise) so that the ghan is upsidedown. I then pick it up and have to sort of flip it so that the top of the ghan is at the top. :o) (Boy, this is harder to explain than I thought. LOL Hope that helps a little?)
- As for how it reduces the number of ends to tie in. I usually use large skeins and most of the time I don't divide them. I just have one skein for each color section that is needed. For example, I am making a Pgh Penguin hockey team emblem that at the moment has 4 colors going at once, but I have 6 balls of color attached because of placement. Some of these are full skeins, but some are smaller balls because the section that needs that particular color isn't very big. It really isn't as complicated as it sounds. But it does really help on the tangle problems.
- Any more questions and I'll try and explain it better. This graph afghan was started before I learned of the MoEZ hooks so it is being done in all sc's, hence the turning. But I still feel the box method would help doing the afghan stitch, you'd just omit the turning part. The skeins or balls of yarn would still be in the coffee cans in the box in the order that you are using them. -- Karen in PA
- I use half bobbins and half baggies. If you use different kinds, they don't tangle with each other as much. If it is a small section I use a bobbin (they get too heavy and pull on my afghan if I load them up), and sections that need more yarn I use a baggie. I make a small pull skein and then stick the yarn in a sandwich size zip lock bag. When it is time to tie on a color as I am working an afghan, I look down at the completed part and see if there is a bobbin of that color I am done with. If so, I just clip it off (leaving a long tail, about 3 inches) and tie it on again where I need it. This will help you keep from making too many bobbins that you might not need. I also keep my leftover bobbins and yarn from a project (if I think I may make that one again) in a large baggie, along with the pattern and notes about what hook I used, etc.
- One other tip, I use full skeins on each side. What I mean is that if I have an afghan with a character in the middle and space all around, (this color would be your background color), I use full skiens on each end. They don't tangle up because they are on either side. This keeps me from tying on my main color too often and I think it makes a stronger afghan if you tie on as little as possible. -- Wild Di
- At first, I used my old kn***ing bobbins, but they were too small. I sent for something called Bryson EZ bobbins (http://www.needlepointjoint.com/- look under knitting notions there) and they came Friday. I do love them - they are like bagels that you pop open, wind the yarn (the large ones hold quite a lot), and just pull to unwind whatever you need.
- The large ones do hold about 2x as much as the mediums, but they come fewer to the package so they are more expensive, and when loaded they are heavy. When they are very full, I give a good tug on them as I get to the end of that color area to "lock" them - otherwise they tend to go rolling off. They are more appropriate for the large areas - of course, for huge backgrounds, I would still advise working from the skein.
- The mediums hold a pretty good supply of yarn too, and work really well for the small and medium areas. One package of smalls is all you should ever need unless you do lots of fine multicolor work, or if you use them for knitting.
- The best thing - they are nice and round, so they don't catch on each other and tangle so much.
- The secret to bobbin kn***ing and MoCheting is to keep those bobbins short when not in use, and deal with tangles as soon as they happen while they are small. -- maddy
Note from Cheryl (a.k.a. Cinnaminn): I've gotten the Bryson EZ Bobbins from the Needlepoint Joint and I do recommend both the bobbins and the store/web site. *S* The Needlepoint Joint has the Bryson EZ bobbins at one of the best prices that I have found online so far for the different sizes/quantity. The link to their web site can be found on my useful links page.
- I tried the baggie thing to keep my yarn from tangling and it just didn't work out for me. I thought, and thought about what would work for me and VOILA, I came up with an answer!
- For each ball of yarn I have on the back of my work, I wrap a rubber band securely around each ball. The bigger the ball, the longer the strand I leave hanging down since it's heavier than the smaller balls. The smaller balls I wrap closer to the stitches.
- When I am working my stitches in, I can move/untangle the yarn next to the one I am working on VERY easily. After playing with it for a while, I discovered if you want, you can hold the ball wrapped by the rubber band and pull out as much yarn as you need for that color without taking the rubber band off. It isn't damaging my yarn and the tangling has been minimized and easily rectified!
- I hope this works for you, give it a try! I am using a thinner type of rubber band but maybe a thicker one would work too. I'll pick some up today while I am out. Play with it like I did to get it so the heavier balls hang lower than the lighter balls. Let me know if you try it....you may not like it, we all have our own "ways" of doing things.
- Hair bands that have a protective coating on them might work. They don't hurt your hair so they won't hurt your yarn! -- Laurie in TX
- Scrunchies would work better than rubber bands -- Deb on the web in FL
Continued On Next Page
back - top of page - Home - Welcome - E-mail Cheryl - TOC - Next Page

 Sign Guestbook Sign Guestbook  View Guestbook View Guestbook 


Web page background, site, and design created by Cheryl (a.k.a. "Cinnaminn").
Originally created 16 August 2002 and updated as of 17 Nov. 2007.
Guestbook courtesy of HTML Gear. Some graphics courtesy of Lacefairy.
 
|