|
Here are links to the different items on the
bike
Carb Chassis
Parts Fiche
Frame Misc_Parts
Tear_Down Tripple_Clamp
Final_Product

Welcome to my web site
This site has information about my Project
bike.
A 1983 XR350R
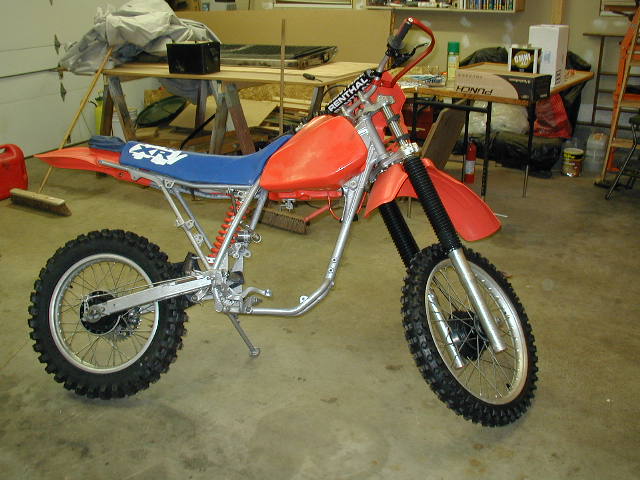
This is a pic after new plastic, tires, seat cover, and
painted the frame.
This bike started out life way back in 1983. It was first owned by one person and then one of my buddies bought it when he was still in High School. He owned it for quite a long time. He joined the military and
then started to ride 4 wheelers instead of bikes. So he sold the XR to another
person in the military. Well he owned it for a few years and did not have time to ride or work on it anymore so it was sold again . Now it is the year 2000 and the bike is in pretty rough shape. It got some work done on it due to some oil leaks and a grooved clutch. The person who owned it then decided he wanted to get a new bike that was less of a headache and easy to start. So he sold it to me!
Now that I have the bike in my possession I have given it a complete
makeover. The things that needed the most attention were the motor, tires,
and suspension. But I started by disassembling the entire bike and
cleaning and replacing any worn out parts. And let me tell you that this
bike was very dirty to start. I also got a gasket kit for the carburetors
(yes it has dual carbs). I cleaned them up drastically by removing any
screw, nut, and washer that could be removed and dipping everything in some
pretty high quality carb cleaner. The result was great. I have
several photos of the entire project basically from start to finish. I
have a Clymer manual but it is not always the best reference on how things come
apart or go back together. So I kept a Photo archive of everything I did
so I would know how it went back together. This is a very good idea to do
and having a digital camera makes it a snap to take the pics and save them to
the computer for future reference. Here
is a list of what I have done in order.
Ok, Here is the
breakdown on what I did to my 1983 XR350R
First step was to tear the thing down to each nut and bolt (the only
exception to this is the suspension and engine)
I put all new o-rings and gaskets in the carbs and soaked all of the carb
parts in a bucket of high grade parts cleaner - this stuff is potent.
Its
the stuff that you have to wear goggles and gloves to handle or else it will
cause severe chemical burns.
I took all the suspension linkage apart and replaced some grease zirks and
pressed out the bearings to give them a good cleaning out of the old crusty
dried up grease.. I replaced all of the end cap seals for the
suspension
linkage and swing arm.
I stripped the black paint from the tipple clamp and found a pretty sweet
looking brushed aluminum tippled clamp hiding underneath. I also
replaced
the steering stem bearings and races.
I took all the old tape off of the wire harness and made sure all the
connectors had dielectric grease on them and then re-wrapped it with some
red electrical tape.
I took both the front and rear Magnesium brake drum covers and stripped the
old black paint off of them. Then I repainted them with some thick
black
paint. I also replaced the breakpads on the front and back.
Now for the fun stuff...
I tried to strip the old orange/red paint off of the frame as best as I
could but was unable to do a very good job of it.. So I took it to a paint
shop and they sand blasted it along with some other parts, foot pets, kick
stand and swing arm.. They applied a pretty tough primer coat for me
as
well. Then I picked up some nice Metallic silver paint and clear coat
and
applied that in my buddies garage.. The paint job turned out very
nice. It
now looks like a more up to date frame. But if I were to do it over
again I
would just send it off to get powdercoated because that would have actually
been cheaper.. The sanding/priming costs $150 and the paint supplies
cost
like $120.. and you can get a frame/swingarm powdercoated for about
$230
with sandblasting included..
I had the rear shock and forks rebuilt with new springs in the forks and set
up for my type of riding and weight.
I had the engine bored out to the next size with a regular piston/rings put
back in. Along with some other seals and a valve job done. The
engine
leaked oil around the head and other places pretty bad before and was all
sealed up with JB weld and silicone.. I had all this cleaned up and
fixed
right..
Not long before I got it the clutch plates and springs were replaced along
with the clutch side cover due to a pretty bad crack around the kick start.
I was able to find replacement front and rear fenders and front headlight
plastic but Nobody makes replacement side covers and the stock ones are
discontinued.. So I had to clean them up as best I could and I put
some
white number plate background stickers on them.
I ordered a High flow header from XR's only (because no body else in the
world makes a new header for the bike and the stock part is discontinued as
well as the exhaust. So I got a supertrap tail section to put on it as
well.. This upgrade alone makes the bike look 10 times better. I
got new
jets for the Dual carbs from XR's only who told me what I should be using in
them. This was good because trying to dial in dual carbs is a pain in the
arse.. It is still a bit off in the jetting but its to the point that
I can
live with it for now until I can take the time to get it right.
I also picked up an XR-250 Seat cover in the bargain bin at the Honda shop
for $5 and it fit perfect. And since it only says XR on it I will take that
any day.
I ordered a new MSR easy pull clutch and MSR Red Anodized bark busters and
all new clutch, break, and throttle cables. They don't make the
decompression cable anymore so I am stuck with using the original one unless
I can find one that is close enough to fit it. But for now I don't
even
have it on the bike.
I replaced the wheel bearings and spacers in both the front and rear wheels.
As well as a new chain, front 1 tooth less sprocket and stock tooth rear
sprocket.
Other than those things I did a good cleaning with a wire wheel any other
parts such as the engine mounts and various nuts bolts.
So as it stands now.. before it took about 785 kicks to start it and
about
25893 kicks to start if it was flooded and now it starts on the first or
second kick. I made me smile from ear to ear when I had first put it
all
back together, filled it with oil and gave it a drink of gas.. Then it
was
time to kick it over for the first time in about 6 months or more..
And
VVRRROOOMMM... first kick and it started. Yippy!!!!
I am going to take it on its first real ride other than in my yard this
coming up weekend. We are going to the Hatfield McCoy trails down in
South
Western, West Virginia. That is where the real test will be.
Also the pipe is pretty sweet and it is considerably louder than stock but
at idle its not bad. When it opens up though its pretty loud but not
like a
Big Gun or similar pipe.
Well if you made it this far into the e-mail then thanks for reading and by
the way the grand total expense less the slave labor for it was some where
in the range of $2500 .. That includes the price I paid for the bike witch
was $750. So for $2500 I got a practically brand new Old Bike. hehe..
That's better than $5k for a new one..
| 
