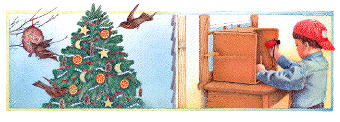
My family's Bird Blind
For some genuinely cheep thrills, try this easy-to-assemble windowsill 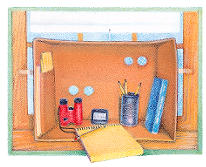 bird blind. It's just a cardboard box with strategically placed peepholes (for eyes or binoculars) and a pocket to hold field guides, sketching paper and a bird-watching log. We added a small clock to help us keep track of our sightings (learning, among other things, that the early bird may get the worm, but dusk-feeding cardinals get their share of the birdseed).
DIRECTIONS FOR BLIND
1. To accommodate your child's head and shoulders, use a craft knife or scissors to cut the box to a depth of about 6 inches on the top. The sides can remain deeper—about 10 inches or so. For the pocket, cut a rectangle from the scrap cardboard, bend the sides, and secure it with masking tape to the inside walls of the box, as illustrated.
2. Set the box in the window to determine the best place for your viewing holes (we added two sets, one level with the feeder and the other closer to the nearby bushes, where birds tend to congregate before and after a meal). Place the box bottom side down and trace around your binoculars' lenses, then cut out the traced holes with a craft knife.
3. Secure the blind to the window with masking tape. For extra support, place it on a table.
THE BIRDING LOG: Using a ruler, draw two vertical lines down several sheets of notebook paper so that you end up with three columns. Label the columns (in order): "Date and Time," "Bird(s)," and "Observations."
SUPPLIES: Store pens and pencils in the coffee can; slip your field guide, sketching paper and birding log into the cardboard pocket; and tuck clock and binoculars next to the coffee can. When your birding is done, the blind can serve as your supply storage box.
MATERIALS
Sturdy cardboard box (slightly narrower than the window)
Craft knife
Scissors
Masking tape
Notebook
Coffee can
Birding supplies (field guide, sketching paper, binoculars, pens and pencils)
Small clock
This nesting bag—a supermarket onion sack filled with soft and colorful nesting 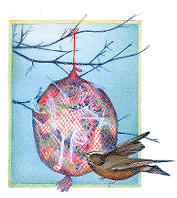 materials—lets you play interior designer to your feathered clientele. Starting in early spring, set out an appealing variety of nesting materials, then watch as the shoppers rummage for their favorites. You won't make a dime, but you'll have the most entertaining yard sale on the block. You might even spy a piece of your abandoned knitting woven into a nearby nest.
DIRECTIONS
1. Carefully open the onion bag by removing the clasp or making a cut with scissors just below the clasp. Take out the onions.
2. Fill the bag loosely with nesting materials. Make sure that nothing exceeds 8 inches or so; longer pieces can strangle small birds. Also, choose materials that can easily be pulled through the mesh.
3. Tie the top of the bag back together with twine or string, leaving an extra foot or so of string to secure the bag to the branch of a tree or bush.
MATERIALS
Mesh onion bag
Scissors
Nesting materials
(string, yarn, dryer lint, dried grass, feathers, fabric scraps, dog combings)
Twine or strong string
This project turns your old Christmas tree—or a small backyard shrub—into a gift for 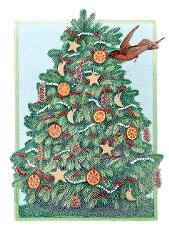 the birds. Decked out in peanut butter pinecones, orange-slice ornaments, colorful cranberry-and-popcorn garlands, and cookie-cutter bird treats, it not only makes a festive feeder, but also provides shelter for small birds like sparrows and juncos. Place it within prime viewing range of the bird blind and watch the feathered crowds gather.
THE TREE
Set up your tree where you can observe it from
a window. To keep it standing upright, use a tree stand or make one by nailing the wooden boards in an X to the bottom of the tree, hammering through the wood and into the trunk.
THE DECORATIONS
Dress up your Tree Feeder with any of the following edible "ornaments":
PEANUT BUTTER PINECONES: Wrap one end of a pipe cleaner around the top of each pinecone, leaving enough at the top to serve as a hanger. Using a spoon, slather each cone with peanut butter, then roll it in birdseed.
ORANGE-SLICE ORNAMENTS: Poke a hole with a pencil at the top of each orange slice. Thread with raffia or ribbon; when it's time to deck the tree, tie each slice to a branch.
CRANBERRY-AND-POPCORN GARLANDS: Insert a 2- to 3-foot length of thread through the needle. Sew cranberries and popcorn together in an alternating pattern, ending with a firm knot. Repeat and tie the sections together, until you have enough garland to drape the tree.
COOKIE-CUTTER BIRD TREATS: Friends think we're nuts to bake for the birds—except, of course, our feathered friends.
1 cup unsalted butter, softened
3 eggs, beaten
3 1/2 cups all-purpose flour, sifted
1 tsp. baking soda
1 1/2 tsp. cream of tartar
1/2 tsp. salt
Mixed birdseed
Cream the butter, then beat in the eggs. Sift together the flour, baking soda, cream of tartar and salt. Gradually add the dry ingredients to the butter-and-egg mixture. When well mixed, cover and chill. Flour a wooden board and roll out the dough to about a 1/4-inch thickness. Cut out shapes with cookie cutters; at the top of each cookie, make a hole with a drinking straw. Press in a coating of birdseed. Preheat oven to 350 degrees and bake for about 12 minutes. When cookies are cool, insert a length of ribbon through each and tie.
NOTE: In wet or humid weather, these may drop from the tree. To make a more durable alternative, trace cookie-cutter shapes on cardboard and cut them out. Coat the shapes with peanut butter, dredge in birdseed and hang.


 Birding