
|
|
[] IowaZ Sitemap []
Send Email [] FZ1
Owner's Association [] IowaZ
Vmax Sitemap []
IowaZ
V65 Magna Page []
Use the FZ1
Sitemap to navigate all of the FZ
pages.
Yamaha FZ1
Carburetor Removal, Separation, Disassembly
by the manual

Outline of what follows below:
....Removal of the seat, sidecovers,
fueltank.
....Draining the coolant.
....Removing the air filter case.
....Removing the carburetors.
....Separating the four carburetors.
....Disassembling a carburetor (there are four to disassemble).
Then move to carb inspection and jet/needle kit installation.
Remove the Seat, Fueltank and Sidecovers
....Since the fuel tank will be completely removed is is a good idea to have most of the fuel run out of the tank before starting. Several gallons of fuel is heavy and hard to handle. You might run until the warning light turns on, at least.

....Remove the seat (1).
....Remove the left and right side cover (2).
....Remove the fuel sender coupler (3).
....Remove fuel tank (4). There is a bolt at the back and one on the
front.
....Remove fuel tank breather hose (5).

....Remove fuel tank drain hose (6). Note, before disconnecting the fuel
hose, turn the fuel cock off at the tank.
....Remove fuel hose (7).
....Set the tank aside where it will not get damages. You might protect it
with a cover/rug.
Drain the Coolant
....The carbs are preheated with coolant so it
must be drained before starting to remove the carbs.
....This will be just a simple drainage of opening the drain plug and radiator
cap, and not complete remove of the reservoir, and a flushing of the system.

....Remove the front right cowling cover over
the radiator cap.
....Disconnect the coolant reservoir hose (1). You might gently plug the
hose opening with something.
....Remove the radiator cap.

....Remove the coolant drain bolt, along with
the copper washer on the bolt (1).
....If you are going to save the coolant for replacement, drain it into
something very clean, then pour the coolant into a clean gallon water jug and
cap. This is just a good time to replace with a fresh coolant/water
mixture of choice. Remember, coolant taste sweetish to animals and is
quite toxic. Keep it out of your eyes. Wash with a lot of water if
it does splash into the eyes.
....Inspect the copper washer and drain plug, then replace them after the
coolant has drained. You can replace the radiator cap also, to keep
"things" out of the radiator.
Removing the Air Filter Case

Removing the Air Filter Case (Reverse
the procedure for installation).
....Remove both the left and right air
filter case panel (1).
....Remove the battery negative (2) and then the positive lead (3).
....Take out the battery (4).
....Remove the stay (5).

Removing the Carburetors (Reverse
the procedure for installation).
....Disconnet the throttle position
sensor (TPS) lead.

....Remove the four air filter joint screws
(1).
....Remove the four carburetors joint screws (2).

....Remove the Carburetor inlet/outlet hose
(3).
....Remove the carburetors assembly (4).
....Remove the starter cable (5).
....Remove the two throttle cables (6)
Separating the Carburetors (Reverse the procedure for installation).

....Remove the throttle stop screw (1).
....Remove the coolant hose (2).

....Remove the starter plunger link (3).
....Remove the connecting bold (4).
....Remove the spacer (5).
....Remove the connecting bolt (6).
....Remove the three spacers (7).
....Remove the fuel inlet pipe (8).
....Remove the two fuel feed pipes (9).
....Remove the two springs (10).
....Remove the two vacuum chamber air vent hoses (11).
....Remove the two float chamber air vent hoses (12).

....Remove the throttle position sensor (13).
....Remove the throttle position sensor bracket (14).
....Remove the four carburetors from each other (15).
Disassembling a carburetor

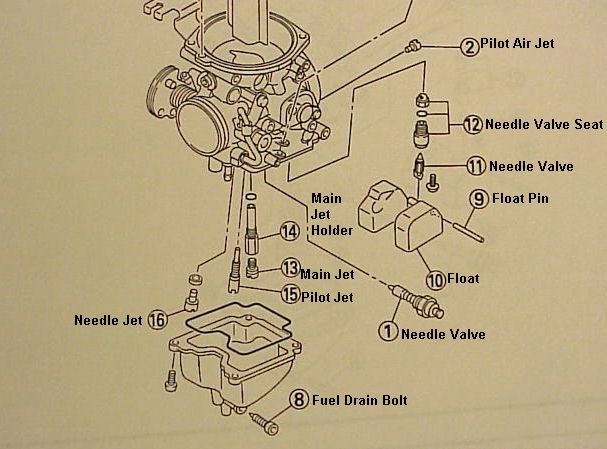
....Remove the starter plunger (1).
....Remove the pilot air jet (2).
....Remove the Vacuum chamber cover (3).
....Remove the piston valve spring (4).
....Remove the piston valve (5).
....Remove the jet needle holder (6).
....Remove the jet needle kit (7).
....Remove the fuel drain bolt (8).
....Remove the float pin (9).
....Remove the float (10).
....Remove the needle valve (11).
....Remove the needle valve seat (12).
....Remove the main jet (13).
....Remove the main jet holder (14).
....Remove the pilot jet (15).
....Remove the needle jet (16).
....Reminder, you reverse the procedure on this page after inspection of the carbs and/or installation of jet and needle kits.
Go
to the page on carb inspection and jet/needle kit installation.
Use the FZ1 Sitemap to navigate all of the FZ pages.
|
|


[] IowaZ Sitemap []
Send Email [] FZ1
Owner's Association [] IowaZ
Vmax Sitemap [] IowaZ
V65 Magna Page []


Any reproduction of this site or it's contents requires express written consent.
|
To Open a Search or Find-a-Word Window, press "Ctrl" and "F" at the same time. |

