Configure your Newsgroups with I.E. -
Lesson3
Using Internet Explorer to access
Newsgroups?
You can contact your ISP and ask any of the Technicians to
help out, should you run into problems setting up your own account. We will have
a minor problem setting up Newsgroups using Outlook Express at the College,
since they have restricted access to the Tools, Account, Internet Options from
the menus system. This exercise may be one you wish to practice by trying it at
home using your own computer. If you only have Netscape at home, then you can
move on to the next lesson in the series.
What to do?
- Open Outlook Express
 ,
now click on Tools, Accounts, from the dropdown menu
,
now click on Tools, Accounts, from the dropdown menu
 Click
on Accounts from within the Tools menu.
Click
on Accounts from within the Tools menu.
- Next you will click on the
 tab at the top of your screen, which will allow you to Add tab (
  ) on the right side of your screen. You will then be asked some questions of
how you wish to setup your Newsgroup account. You see questions such as
Name, Email address, Name of the News Server, which you may have to get from
your ISP or other sources related to your account. Then you will receive a
success message telling you your News account is ready for action.
) on the right side of your screen. You will then be asked some questions of
how you wish to setup your Newsgroup account. You see questions such as
Name, Email address, Name of the News Server, which you may have to get from
your ISP or other sources related to your account. Then you will receive a
success message telling you your News account is ready for action.

 These
are some of the screens you will have access to within the News account you have
just setup. Remember your account and ISP will differ from mine, and should you
have problems at anytime call up Tech support and have them give you a hand. It
will only take approximately 5 minutes to set up this entire feature.
These
are some of the screens you will have access to within the News account you have
just setup. Remember your account and ISP will differ from mine, and should you
have problems at anytime call up Tech support and have them give you a hand. It
will only take approximately 5 minutes to set up this entire feature.
- Next on the left side of your screen within
your open window showing Outlook Express you will see an entry of the Newly
created Newsgroup similar to this
 .
Remember if your ISP is different then your Newsgroup server should not
state news.golden.net. Can I use your newsgroup, no most ISP's wish for you
to belong subscribe to the news server you are trying to access.
.
Remember if your ISP is different then your Newsgroup server should not
state news.golden.net. Can I use your newsgroup, no most ISP's wish for you
to belong subscribe to the news server you are trying to access.
- What we will have to note is how the Outlook Express
screen should look at this point. You should have your screen split into
three (3). The left side will show the Newsgroups we are currently connected
too, top right side will display all header messages within the subscribed
Newsgroup and the bottom right content area will display the actual message
once the header portion has been highlighted.
- The only mechanism missing is actually subscribing to
some desired Newsgroups under the categories previously outlined in
Lesson1.
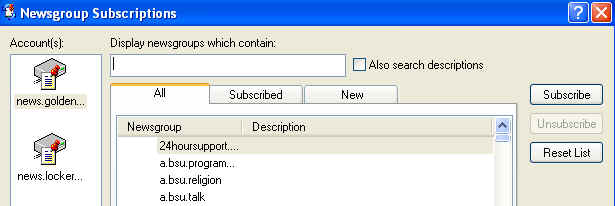
- On the left side of your screen click on the
 Newsgroup account name. You now see tab buttons at the top right hand side
of your screen similar to these listed below.
Newsgroup account name. You now see tab buttons at the top right hand side
of your screen similar to these listed below.  The one we will be needing is the Newsgroups Tab, this will allow us to view
all the related Newsgroup categories listed on your ISP's News server. Once
you click on the Newsgroup tab you should see a screen display similar to
this. The groups are all Alphabetically listed, allowing to scroll, type
group names you may know. Highlight any newsgroup of interest and click on
the Subscribe button similar to example displayed within this screen shot.
The one we will be needing is the Newsgroups Tab, this will allow us to view
all the related Newsgroup categories listed on your ISP's News server. Once
you click on the Newsgroup tab you should see a screen display similar to
this. The groups are all Alphabetically listed, allowing to scroll, type
group names you may know. Highlight any newsgroup of interest and click on
the Subscribe button similar to example displayed within this screen shot.
- Here is an example, I place the letters KW
into the Display Newsgroups which contain field:
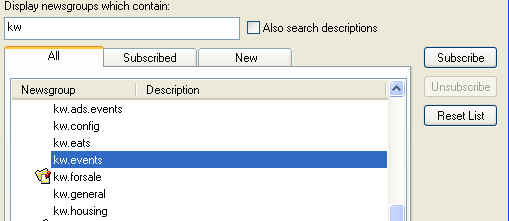 Note the KW
added to the empty field, which resulted in the list dropping or displaying all
related Newsgroups associate to KW heading.
Note the KW
added to the empty field, which resulted in the list dropping or displaying all
related Newsgroups associate to KW heading.
- Once you have subscribed to the Newsgroup
categories of your choice, you will notice these selections on the left
hemisphere of your screen as show here. From the KW section Newsgroup I selected
kw.forsale and kw.jobs. What we need to do next is highlight either of these
items and the messages headers within (80 & 507) will appear at
the top-right of your screen
Output from kw.forsale

 Now all that is needed will be to click/highlight one of message headers on
the top-right side of your screen the actual message will appear within the
bottom-right portion of your screen. Once you have read the message, you
will be able to Reply (re:) feedback the Newsgroup for all to read your
reply. You choose to select Reply to Sender only, this message will be
sent directly to the individual who posted the message.
Now all that is needed will be to click/highlight one of message headers on
the top-right side of your screen the actual message will appear within the
bottom-right portion of your screen. Once you have read the message, you
will be able to Reply (re:) feedback the Newsgroup for all to read your
reply. You choose to select Reply to Sender only, this message will be
sent directly to the individual who posted the message.
On to Lesson 4
Lesson2 
 Lesson4

