This
is a game that is mainly just (in) text-score - with only a few diagrams.
You will probably want (or need)
a chessboard. (!)
Click HERE to see this game in a java-script re-play format.
*** Click HERE
to see an explanation of some of the symbols ... that I use in annotating
chess games. ***
|
|
******************************
One of Tony's finest games.
---> It has been printed ... and
also reprinted ... in many magazines
and books.
(I am almost sure I saw
it in at least one chess magazine
shortly after it
was played.)
---> It is in several famous game
anthologies.
---> Several GM's said this was one
of Tony's very best games.
---> Soltis puts it in the "TOP FIFTY,"
(# 36); of the best games of the whole
of the Twentieth (20th) Century!
*******
( The ratings here are exact, -
adjusted for inflation - and
come from
J. Sonas's web site.
{See the January, 1993; rating list.} )
******************************
1.d4 Nf6; 2.c4 g6;
3.Nc3 Bg7; 4.e4 d6;
A standard King's Indian Defense.
White now chooses the very
sharp Samisch ... a line which
often leads
to a strong K-side
attack for White.
5.f3 0-0 ; 6.Be3 c5!?;
An extremely sharp gambit ... that was in vogue in the late
1980's and
(the) early 90's.
[ More often played is: 6...e5!?;
{Diagram?}
putting pressure on key dark
squares in this position. ]
White decides against accepting
the proffered pawn gambit.
(He also continues to develop.)
7.Nge2,
Simple and solid development.
[ The main line of the gambit
(accepted) runs as follows:
7.dxc5!? dxc5;
8.Qxd8 Rxd8; 9.Bxc5 Nc6; "~"
{Diagram?}
and Black is supposed to
have VERY good play ...
and EXCELLENT 'comp'
for his {small} one-pawn
disadvantage.
[ See any good openings book.]
NOTE: This gambit was all the rage
at the GM-level in the
late 1980's. ]
Black continues to leave his c-pawn
as bait - developing all the while.
7...Nc6; 8.Qd2 e6;
9.Rd1 b6; 10.Bg5 Ba6!?; 11.d5 Ne5; ('!')
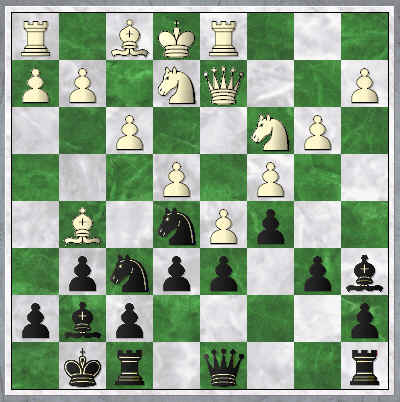
12.b3, "+/=" {See
the diagram just below.}
While virtually forced, this appears
to be good for White. The first
player
has a significantly greater
control of the board, (= space);
than does his
opponent.
[ 12.Bh6? Nxc4; "/+" ]
*************************
|
|
*************************
It is not clear how Black will
manage to create any meaningful counterplay.
(From the position given above.)
12...h6!;
A second offer of a pawn,
this time on the h6-square.
13.Be3,
Once again White passes on
taking Black's gambit pawn.
[ After the moves: 13.Bxh6!? Nxe4!;
14.fxe4!? Qh4+;
15.Ng3
Bxh6; "=/+" {Diagram?}
Black is at least slightly better.
- GM's Miles and Soltis. ]
Without going into a very detailed
analysis, I will simply tell you that
all of the next few moves are the
best - for both parties.
13...exd5!; 14.Nxd5! Nxd5!;
15.Qxd5 ('!') 15...b5!!;
Black's play here is incredibly
vigorous. In some lines, GM
Tony Miles could
be down ... THREE PAWNS!!!
But with White's King stuck in the
middle of the board, he really can't
afford to be too greedy.
[ Possible was: 15...Qh4+!? ]
White's next two moves look
forced.
16.cxb5 Bxb5; 17.Nc1 Bc6!;
18.Qd2!? f5!; 19.Qxd6,
It is humorous to note that this
is the third pawn gambit Tony
has
offered in this game.
(The first was the pawn on c5,
which was left hanging for several
moves; then Black tried to gambit
his King's-Rook-Pawn.)
[ 19.Nd3!? ]
19...Qe8!;
(Maybe - '!!') {Diagram?}
Tony's pawn gambit has appeared
to give him fantastic play. Note
the
distant alignment of Black's Queen
and White's King.
(It plays a role
in many complex variations.)
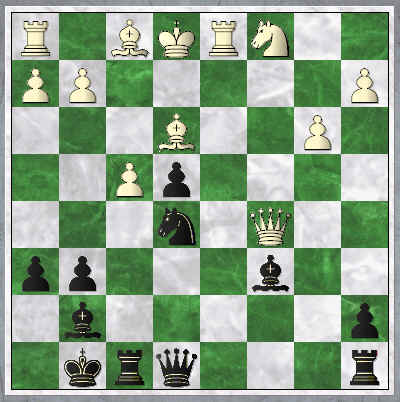
20.Qxc5!? fxe4!; 21.f4!,
{See the diagram just below.}
Soltis awards this move an exclam,
and calls it a good attempt at
trying
to, ... "close the flood-gates."
[ The move: 21.fxe4!?,
{Diagram?}
is probably just too dangerous.
(For White!) ]
*************************
|
|
*************************
How does Black continues his assault?
21...Nd3+!?;
(Maybe - '!')
This is sharp and interesting.
[ The move: 21...Ng4; {Diagram?} was also interesting. ]
22.Nxd3!?,
{Diagram?}
The indicated and the natural
move in this position; it is also
the first choice
of most of the
strong programs that I tested this
game on. (Soltis questions
this,
but his analysis is flawed.)
[ Maybe 22.Bxd3!?, {Diagram?} was playable as well? ]
22...exd3; 23.Kf2,
This looks to be the best move for
White in this particular position.
[ 23.Bxd3!?; or 23.Rxd3!? ]
23...Rc8!; 24.Qc4+!? Kh8!;
25.Qxd3 g5!!;
Tony had several different (very)
attractive moves to choose from
at this point, but he finds the very
best continuation of all.
[ Maybe 25...Be4!? ]
26.Rc1!?,
Possibly an attempt at play
along the c-file? (anticipation)
{It looks like the move loses
tempo over some of the other
lines.)
Soltis does not comment at all at this point in the game.
[
Maybe the move: >/= 26.Qd6,
{Diagram?}
would be an improvement for
White here? (I think so.) ]
Now Black finishes off in style ...
real style.
The kind that just blows
you away!!
26...Rd8!; 27.Qe2,
Believe it or not, this is 100%
forced for White here.
**********
[ After the seemingly plausible
move Qc2, White gets blown
right out
of the water: 27.Qc2!? Rxf4+!!;
28.Bxf4 Bd4+!!; 29.Kg3, {Diagram?}
This is, of course, completely
forced.
( Of course not: </= 29.Be3?? Qxe3# )
29...gxf4+; 30.Kh4 Bf6+; 31.Kg4,
{Diagram?}
Once again - completely forced.
( </= 31.Kh3?? Qh5# )
31...h5+!; ("-/+")
{Diagram?}
and Black (and White) can
choose between several
different ...
"Mate in 3 moves."
( </= Kxf4, Qe5# Or Kh3, Qe6+; and mate next
move. )
( For example: 31...h5+!; 32.Kf5 Qe5+;
{!?} 33.Kg6 Qg5+;
34.Kf7 Bd5#. {Diagram?}
This is just one of the many
amazing variations I found in
the many months I spent studying
this game.
(I began analyzing
a few of Miles's games shortly
after his
passing in Nov. 2001.) )
*****
After the moves: </= 27.Qb1?! Rd2+!;
{Diagram?}
Black has a powerful attack.
(...Rxf4+!! probably also works.) ]
**********
27...gxf4!;
(Maybe - '!!')
At first this looks like the wrong
approach for Black here.
[ 27...Qg6!? ]
28.Bc5, ('!?')
{See the diagram just below.}
Soltis writes that this move
appears to liquidate forces
while retaining a
material
advantage.
[ 28.Bxa7!? ]
*************************
|
|
*************************
It is Black to move ... you will not
believe how Tony decides to conclude
this particular game.
The lowly pawn ... that started
the game on the g7-square ...
is now destined to be White's
complete undoing.
(THREE zwischenzugs in a row!)
28...f3!!; 29.Qxe8 fxg2+!!;
30.Bxf8 gxh1N+!!; {Diagram?}
White ... RESIGNS!
Soltis informs us that White can
choose between check-mate,
(Kg1?, Bd4+!); or suffer large
material losses. (Ke1, Rxe8+; etc.)
An unbelievable combination ...
and one of the best and grandest
examples of UNDER-PROMOTION
that I have ever seen.
(In an actual game - as compared
to a composed problem.)
**************
BIBLIOGRAPHY:
I have seen this game MANY times
in print.
(It was in all the magazines
shortly after it was played.)
But my two main sources for my
attempts at annotating this game
have been:
# 1.) "The 100 Best,"
by GM Andrew Soltis.
# 2.) The INFORMANT for 1993.
(Published in {former} Yugoslavia.)
******************************
Copyright
(c) A.J. Goldsby I.
Copyright (c) A.J. Goldsby, 1993 - 2002.
Copyright (c) A.J.G; 2003.
******************************
This is a game that I started working on - again! - right after I heard the terrible news that Tony Miles had passed away. I did NOT forget about this game ... I worked on it many times. (But many other paying projects got put ahead of this one.) But at least it is done. I hope you enjoy it! And be sure to let me know what you think!
|
|
Tony Miles was taken from us all too early. This could be his best game.
I pray for Tony's family. I pray he will always be fondly remembered. |
This page first posted in June, 2003. This page was last updated on 01/09/06 .
***
Click HERE
to go to, (or return to); my (Geo-Cities)
page
on the Best Chess games of all time.
Click HERE
to go to, (or return to);
my Geo-Cities page
on the Best Chess Players who ever lived.
Click HERE
to go to (or return to) my HOME PAGE ...
of my Geo-Cities web site.
(Click HERE
to return to my Geo-Cities web page on Miles.)
***
Click HERE to go to, (or return to); my Home Page for this site.
Click HERE to go to, (or return to); my End-Game School on this site.
***
Click HERE
to go to, (or return to); my page on Mikhail Tal.
(Click here
to go to - or return to - my Geo-Cities
page on GM
Mikhail Tal.)
Click HERE to go to, (or return to); my page on Emanuel Lasker.
Click HERE to go to, (or return to); my page on Paul Morphy.
(Or click the 'Back" button on your web browser.)
***********
This is my relatively short version of this game. (I have annotated this game three or four times.)
I hope you have
enjoyed this game half as much as I have. If you would like to obtain a copy
of this game for your own study and enjoyment, (for a modest fee, mainly
to defray postage);
... ... ... please contact
me.
Copyright (©) LM A.J. Goldsby I
Copyright © A.J. Goldsby; 2003, 2004, 2005 & 2006. All rights reserved.