***********************************************************************************************************
Click HERE to see an explanation of the symbols that I use in annotating a chess game.
Click HERE to see this game in a java-script re-play format.
This is MOSTLY a text-based version of the game with just a few diagrams.
(You might need a chess board to follow the
game AND the variations.)
***********************************************************************************************************
One of Tal's better games.
(Played when he was 19, and
making his first appearance
in the finals of the Championships of the
{old/former} Soviet Union.)
It is also very interesting, very
complex, and perhaps the first
game to bring international
attention to this player.
(As Tal would write, it was reprinted
in virtually all of the periodicals
of
that time.)
***
This game is probably the first example
of the fire and the brilliance, {of the
tactics};
of the future World Champion.
*****
The ratings are only estimates.
[ Jeff Sonas gives Tal as about 2430.
V. Simagin (2551) was # 40 in the
world at the time, according
to Sonas.
{At the end of 1955.} By comparison ... for the year 2003, the # 40 player is
...
GM Aleksei Aleksandrov, (2650); who
is from Belarus. ]
***********************************************************************************************************
1.e4 c6; 2.d4 d6!?;
An invention of Simagin's, who
won MANY games with this line!
But it is an odd and curious method of opening a chess game,
which really fails to impress.
[ Better is: >/= 2...d5!;
{Diagram?} with a Caro-Kann.
(And good play for Black.) ]
3.Nc3!?,
(Maybe - '!')
Simple development ... that leads
to a position that will emphasize a
lot of piece play.
[ A more positional approach would have been:
3.c4!?, {Diagram?}
again hitting the d5-square, and
building on White's obvious space
advantage. ]
3...Nf6; 4.f4!?,
A pawn move - which hits e5.
[ 4.Nf3!? ]
4...Qb6!?;
An interesting and not completely
illogical move by Black ... designed
to pressure the dark squares, and
keep White from moving his QB.
[ The system after the moves: 4...Qa5;
5.Bd3 e5; 6.Nf3 Bg4;
was all the rage in the late 1980's
in GM chess.
(It also occurred in a few U.S.
Championship games ...
I know,
I was there watching when GM's
Benjamin and Wilder played
this {line} in one of their games.)
Now after the moves: 7.Be3 Nbd7; "~" is a position that is rather unclear.
GM A. Vaisser - GM J. Dorfman; 21st Aubervilliers Open, 1994.
(The game was drawn after 45
very hard-fought moves.) ]
Both sides now continue to develop.
5.Nf3 Bg4; 6.Be2 Nbd7!?; 7.e5! Nd5; 8.0-0 Nxc3;
9.bxc3 e6!?; (Maybe - '?!') {Diagram?}
A perfectly normal-looking move ... that some authors have criticized
as being
somewhat doubtful.
[ Probably better was: >/= 9...g6!; "~" when Black may have a playable position.
***
Too slow would have been: 9...a6!?; ('?') 10.Ng5! Bxe2;
11.Qxe2 g6?;
12.e6!, "+/-" {Diagram?}
which is darn near winning for
White ... and illustrates clearly why
Black felt it necessary to prevent
the pawn advance to the e6-square. ]
Now Tal vigorously exploits his
lead in development.
(And begins
a combination that is over 25
moves in length!!)
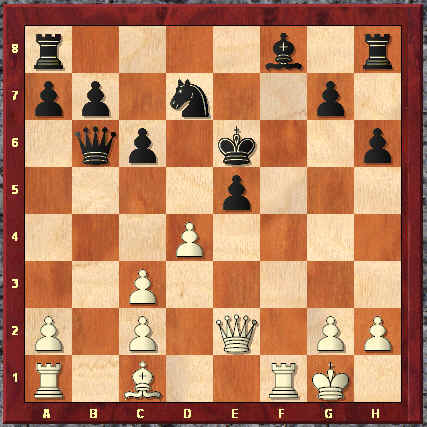
10.Ng5! Bxe2; 11.Qxe2 h6!?;
{See the diagram just below.}
Black tempts fate, and creates a
new weakness. But why should he
be afraid?
(His opponent is a young
player, and a nobody ... at least at
that time.)
|
|
(The position immediately following Black's 12th move, here.)
White now - it seems - is forced to retreat his daring horseman.
[ 11...Be7!? ]
(White to move... what move would YOU make here?)
12.Nxf7!!, (Maybe - '!!!/!!!!')
{Diagram?}
It is no exaggeration to say that
this move literally electrified the
gallery and the
casual onlookers
of this game.
(To say nothing of the
surprise his opponent must have
experienced.)
(The main referee for this event
threatened to clear the hall ...
before
order and silence were restored.)
My instincts - when I first saw this
game - said: "This move cannot
be sound."
While this MIGHT be true,
the number of problems that Tal
lays before his opponent ...
is
beyond virtually anything but a super-computer to solve!
**********
[ In hindsight, both of the following
continuations favor White:
12.Nf3 d5;
13.f5 c5; "~" {Diagram?}
& White's advantage in development
could amount to something.
***
Or White could have tried:
12.Qh5!? g6!?;
13.Qh3 Qa5; 14.Rb1!, "+/=" {Diagram?}
and White seems (again) to be
just a little better.
***
I think most modern GM's would
have chosen to play one of these
two lines - as there is less risk
involved.
***
Of course not: 12.Ne4?! dxe5; 13.fxe5
Nxe5!?; "=/+" {Diag?}
and White has dropped a Pawn.
(But White may gain some play.) ]
**********
12...Kxf7;
This is forced.
[ Black could not play: </=
12...Rg8?; 13.exd6 Kxf7; 14.f5,
"/\" {Diag?}
and White probably has a winning
attack. ]
White - now a piece down - has to
try and open lines against Black's
King in
this position.
13.f5 dxe5!?;
It is hard to come up with a solid
and viable improvement here for
Black.
[ Black obviously cannot play: 13...a5?;
14.fxe6+ Kxe6??; {Diag?}
Here everything probably loses,
but this is suicide.
(Black probably had to try: 14...Kg8; 15.exd7 dxe5;
16.Qxe5, "+/-" {Diagram?} but White is clearly on top.)
15.exd6+ Kxd6; 16.Bf4+, "+/-" {Diagram?}
and Black is completely lost.
***
Soltis gives the variation:
13...Nxe5!?;
14.Kh1!?, {Diagram?}
GM A. Soltis
gives this an exclam. (And stops here.)
( Even better was: >/= 14.Be3!, '±' )
14...Qb5; {Diagram?}
Black has no choice here.
( Of course not: 14...Nd7??; 15.Qxe6#. )
15.fxe6+ Kxe6; 16.Qf2!, "--->"
("+/=") {Diagram?}
and White has both the initiative
and an attack in this position.
***
Not attractive to Black was: </= 13...Kg8?!;
14.fxe6 Nxe5; {Diag?}
This is literally forced.
( </= 14...Nc5?; 15.exd6!, "+/-" )
15.Kh1!?, {Diagram?}
Soltis gives this move no mark,
and provides no alternative or
commentary
at this point.
( Probably a little better was: >/= 15.Qf2 d5; 16.Be3!, "--->"
{Diagram?}
with a very strong attack. )
15...Ng6; 16.Qh5,
"~" {Diagram?}
and White has a nice attack, and
a lot of play for the material.
- GM Andrew
Soltis. ]
14.fxe6+
Kxe6[]; {See
the diagram, just below here.}
Once again, Black has few good
alternatives in this position.
|
|
(The position immediately following Black's 14th move, here.)
*******
Now the stage is set for a real stroke of genius by Tal.
[ </= 14...Kg8?; 15.exd7, "+/-" ]
Tal's next move defies superlatives,
or any attempt to describe it with
'normal' adjectives.
(It was ... "the only move to cause
me any difficulties," says Tal!)
15.Rb1!!, (Maybe - '!!!!!')
{Diagram?}
Having already sacrificed a horse,
Tal throws a whole ox onto the
bonfire ...
just for good measure!!!
All of White's pieces are on the first
or second row, which meant his
position
did not really look all that
menacing.
This move, (Rb1); is very difficult to
find. But once you realize that Black
must capture ...
and lose his Queen
to a discovered check ... it is a little
easier for the rest of us to grasp.
[ 15.Qc4+!?; or 15.Bf4!? ]
15...Qxb1;
{Maybe 'box?'}
This is probably forced for Black.
(Or so say several GM's.)
[ Black could not play: 15...Qa6;
16.Qg4+! Kd6?; {Diagram?}
This is inaccurate.
( >/= Better is: 16...Ke7[]; 17.dxe5 b5; 18.Qf5, "~" with an attack. )
17.dxe5+ Kc7; 18.Bf4!,
'±' {Diagram?}
when White is clearly better.
(Line by - GM A. Soltis.)
***
If 15...Qa5; then White will simply
play: 16.RxP/b7, "~"
{Diagram?}
with good play. - GM
Mikhail Tal.
***
Interesting was: 15...Qc7!?; {Diagram?} when it is not clear how White
will follow up on his attack.
(White is still on the offensive however ... Black's
position remains very congested
and uncoordinated.)
Maybe 16.Qh5!?, "--->" will do the trick? ]
Black's next few moves appear to
all be forced.
16.Qc4+ Kd6; 17.Ba3+ Kc7; 18.Rxb1 Bxa3;
Is Black defending?
(He has a Rook, a Bishop, AND a
Knight for the Queen.)
19.Qb3!,
It is this double attack on a3 and
b7 that decides the game. Tal
would have
had to foreseen this
position BEFORE sacrificing his
Knight on f7.
[ 19.Qf7!? b5; "~" or "/+" ]
19...Be7; 20.Qxb7+ Kd6[];
This is absolutely forced.
[ Not </= 20...Kd8??; 21.Qxa8+, ("+/-") ]
Once again, Black has almost no
choices over the next series of
moves.
21.dxe5+ Nxe5; 22.Rd1+ Ke6; 23.Qb3+ Kf5; 24.Rf1+ Ke4!?;
{Diag?}
Black - seemingly - has to keep
his King in the center, to avoid
losing any more
material.
[ RR </= 24...Kg6?!; 25.Qe6+ Bf6; 26.Qf5+ Kf7; 27.Qxe5, "+/-" ]
25.Re1+!,
Again Tal finds the best move.
[ Several of the Masters watching
this game predicted that Tal
would probably
play: 25.Qe6!?,
'±' {Diagram?} which is also good for White.
]
25...Kf5; 26.g4+! Kf6!;
Black continues his little dance,
trying to avoid shedding any more
valuable material.
[ </=
26...Kxg4??; 27.Rxe5,
"+/-" {Diagram?}
***
Soltis gives the continuation: RR 26...Kf4!?;
27.Rf1+!? Ke4; 28.Qe6! Bc5+;
29.Kg2 Rae8;
30.Re1+ Be3; 31.Qf5+ Kd5; 32.Rxe3,
"+/-" {Diagram?}
and attributes this line to the
well-known English analyst,
P.H. Clarke.
(But >/= Qa4+! on move # 27 would
probably lead to a forced mate.) ]
27.Rf1+ Kg6; 28.Qe6+ Kh7!?;
This is probably best - the Black
King wants to be as far away from
the
action as possible.
[ Or Black could play: </=
28...Bf6!?; 29.Qf5+ Kf7;
30.Qxe5,
'±' (Maybe "+/-") {Diagram?}
but his King is more exposed
than in the game. ]
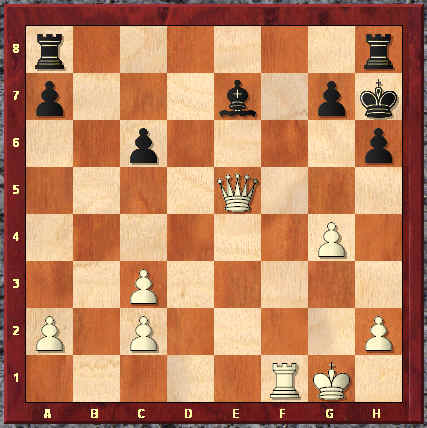
29.Qxe5
('!'), '±'
(MAYBE "+/-")
{See the diagram just below.}
The correct capture ... now the win
is ... "only a matter of technique."
( Actually, I am being sarcastic, the
win would be impossible for the
average
player here. {Black has a
great degree of counterplay, and
White's King is
partially exposed.} )
|
|
The actual game position after White's 29th move, Qxe5.
**********
The game takes a new turn, and Tal
decides to force his opponent to:
(eventually) ATTACK HIS KING!!!!
Needless to say, this is not the
procedure that most of us would
have chosen
in this position!!
Tal has also envisioned a possible
a march ... of his King! ... all the way
to the g6-square!!
And while this is
mostly a flight of pure fancy, Tal
comes remarkably close to making
the
whole thing work!!
[ Not as good would have been: 29.Qxe7!? Rhe8;
30.Qc5 Rad8;
<=> {Diagram?}
and Black's forces work well
together in this position. ]
29...Rhe8; 30.Rf7 Bf8[];
Of course this is forced.
[ </= 30...Bf6??; 31.Qxf6, "+/-" ]
31.Qf5+ Kg8; 32.Kf2!?,
A VERY provocative move from Tal ... who seems to be daring his opponent
to whip up some play!
( GM A. Soltis gives this a dubious
appellation ... but does not bother to
inform
us which move would have
been better. )
[ Safer was: >/= 32.Kf1!,
"+/-" {Diagram?}
when Black has no Bishop check
on the c5-square.
***
I think most analysts had
recommended that White play:
32.g5,
("+/-") {Diagram?} in this position.
]
22...Bc5+; 33.Kg3 Re3+;
34.Kh4! Rae8!; {See
the diagram just below.}
This is the best move for Black,
and is even awarded an exclam
by Grand-Master Andrew
Soltis.
Please to note:
Black has MANY (!!)
threats in this position, beginning
with the move, ...Be7+.
[ Tal's dream comes true ...
in the
following variation:
RR
34...g5+;
35.Kh5 Rh3+; 36.Kg6 Rd8!?; {Diagram?}
Black seems to be on the verge
of a decisive attack.
( Fritz says the move: 36...Rf3!?; {Diagram?} is forced for Black. )
37.Rg7+ Kh8; 38.Rh7+ Kg8; 39.Qf7#. ]
|
|
The actual game position ... just after Black's thirty-fourth move.
**********
35.Rxg7+!,
(Maybe - '!!') {Diagram?}
Tal eliminates most of his opponent's
threats in this position ... but seems to
enter an arena completely devoid of
any winning chances at all for White.
(Normally, two Rooks are better
than a Queen ... all else being equal.
But here all other things are NOT
equal - the main factor is that Black's
opponent's name is ... TAL!!!!!)
[ White should not play: RR
35.a4? Be7+; 36.Kh5?
Rd8; "~" {Diagram?}
and Black might save the draw here.
]
35...Kxg7;
Definitely no choice here.
[ </= 35...Kh8; (????) 36.Qh7#. ]
36.Qxc5 R8e6!?;
(Maybe - '?!')
Not the best move, but Black
was already in time trouble
at this point.
(And according to
the computer, Simagin was lost
no matter what move
he played.)
Soltis gives this move a full question
mark, ('?') explaining, in some detail,
the technical reasons behind his
decision. While he may be correct,
my
research and (very detailed) analysis indicates
that White may yet retain some
winning
chances, no matter what.
[ Probably it was better for
Black to play: >/= 36...R8e7!;
"<=>" {Diag?}
and the win is MUCH more
difficult for White than in the
actual game. ]
37.Qxa7+ Kg6; 38.Qa8!,
A good move that is pretty sneaky,
and also contains a drop of poison.
[ RR 38.a4!? Rxc3; "<=>" ]
38...Kf6;
Black is forced to move his
King yet another time.
[ </= 38...Rf6??; 39.Qg8#. ]
White now runs his RP down
the board, but Black is powerless ...
to stop White from doing this.
39.a4 Ke5!?; 40.a5 Kd5;
Normally the game would be adjourned
after forty moves, especially in the
"good old days" of chess.
(I am not sure if this game was
adjourned or not.)
41.Qd8+ Ke4!?;
Black's King spends a lot of time
in the center in this game. (!!!)
[ Black cannot play: </=
41...Rd6?; 42.c4+! Kc5; 43.Qb6+,
43...Kxc4;
44.Qxe3, "+/-" which wins for White. ]
White now wraps things up.
42.a6 Kf3; 43.a7 Re2; 44.Qd3+ R6e3;
This was pretty much forced.
Tal had a sense of humor, his
next move clearly shows this.
45.Qxe3+!, "+/-" Black Resigns.
A most magnificent and very
memorable victory.
(And one of my favorites. It is also
a game that as recently as the year
2000-2001,
completely baffled and
befuddled the best computers.)
[ White could have also played: 45.Qd1!?,
"+/-" {Diagram?}
which will win in the long run.
***
Karpov - at the height of his powers
- would have probably played:
>/=
45.Qd6!!, "+/-" {Diagram?}
which also forces resignation.
***
To show Black's position was
not completely harmless:
</= 45.Qd4?? Rxh2#.
{Diagram?}
for those who like to fall asleep,
... in won positions. ]
(All HTML code initially) Generated with ChessBase 8.0
********************************************************************************************************************
BIBLIOGRAPHY:
I have practically every Tal book
ever printed, but the main resource
that I used in annotating
this game
was the excellent book: "TAL, The
Magnificent," by GM Andrew
Soltis.
Copyright (©) by the author, 1990.
Published by:
Chess Digest, Inc.
11836 Judd Court, # 338-E;
Dallas, TX (U.S.A.) 75234-4402
ISBN: # 0-87568-183-2
*******
Copyright (c) A.J. Goldsby I. Copyright (c) A.J.G; 2003.
Monday; June 30th, 2003: This is a game that I worked on for a few hours each night ... for over two weeks. Then I spent about 10 hours each on it for two more nights, completing the annotation process. After I finished annotating the games, it took TWO full nights to get the HTML code whipped into shape. I hope you enjoy all this hard work!!!
This page was last updated on 04/25/07 .
***
Click HERE
to go to, (or return to); my page on Mikhail Tal.
(Click here
to go to - or return to - my Geo-Cities
page on GM
Mikhail Tal.)
Click HERE to go to, (or return to); my page on Emanuel Lasker.
Click HERE to go to, (or return to); my page on Paul Morphy.
Click HERE to go to, (or return to); my Home Page for this site.
Click HERE to go to, (or return to); my End-Game School on this site.
Click
HERE
to go to, (or return to);
my Geo-Cities page
on the Best Chess Players who ever
lived.
Click HERE
to go to, (or return to); my (Geo-Cities)
page
on the Best Chess games of all
time.
(Or click the 'Back" button on your web browser.)
***********
I
hope you have enjoyed this game half as much as I have. If you would like to
obtain a copy of this game
for your own study and enjoyment, (for a modest fee, mainly to defray
postage); please contact
me.
Copyright (©) A.J. Goldsby I, © A.J. Goldsby, 2003 - 2006.
Copyright (©) A.J. Goldsby, 2007. All rights reserved.