|
|
Deep Fritz (7.0) vs. GM V. Kramnik
|
|
|
The Fifth (#5) game of the: "Man vs. Machine/Brains In Bahrain" Match.
<< I think Kramnik was fine in this
game, but did not play the most
accurate move
at one point. Then
he allowed the computer to put
constant pressure on him. He
was
on the verge of defending when he
blundered horribly. >>
Perhaps Kramnik was over-confident?
Was he complacent, after dominating
the program
in the first half of the
match? Did he get lost in thought, and
simply forget about the time?
Maybe.
Maybe not. {It is all just guess work.}
(And unless Kramnik
himself writes a book on the match,
we will never know!)
Another thing that should be taken
into account is the VERY deep
preparation and changes
made by
the team of programmers during the
halfway mark. The program's
approach to the
game prevented
the World Champion from steering
the game into the channels that
were
previously so successful for
him.
This is actually a good game by the
World Champion. If not for the blunder,
he may have
defended easily, and
won the match with no problems.
Before the match, I assigned this program, (Deep Fritz 7.0) a rating
of 2650. Several
GM's on ICC told
me this was too high! Yet at the end
of the match, it would seem I
was
over 100 points ... TOO LOW!!!
One cannot but help but be impressed
by the machine's play here. I doubt
Garry Kasparov -
who was unable to
defeat Kramnik even one time in
their last match - could have handled
the White pieces any more skillfully
than the program did here. While this
is NOT Kramnik's
best game, it is
truly a world-caliber performance
by Deep Fritz in this game.
***
The comments that are contained
within the brackets, ...
<< blah-blah-blah-blah >>
are from the
short version of
this game - that you can download
from my web site.
***
I have also used several quotes from
the ChessBase web site.
(http://www.chessbase.com/images2/2002/bahrain/games/bahrain5.htm)
I urge all interested parties to check
out his comments as well ...
for a
completely different take on this game.
Click HERE to see an explanation of the symbols I use.
1.d4
Nf6; {Diagram?}
Kramnik threatens a King's Indian?
(Maybe, maybe not. This is the most
modern move order.
Black retains
the greatest number of options.)
[ Kramnik also likes - very much -
the Slav Defense to 1.d4.
For
example: 1...d5;
2.c4
c6; 3.Nf3
Nf6; {Diagram?}
with a good game for Black.
See for example: GM Victor Korchnoi -
GM Vladimir Kramnik;
Tilburg (Fontys) / NED / 1998.
(Black scored a sharp victory.) ].
2.c4
e6; {Diagram?}
I keep hoping for a hot Benoni ...
or a very complex Nimzo-Indian;
but both sides seem bent on avoiding
these openings.
***
[ Black could also play: 2...c5!?;
3.d5
b5!?; 4.cxb5
a6;
5.bxa6
d6; "~" {Diagram?} which is the Benko Gambit.
(There is almost ZERO chance of either side playing this line.) ].
***
3.Nf3, {Diagram?}
A simple straight-forward developing
move.
(Which accomplishes all four
of the basic principles of opening
play.)
White also avoids the possibility
of the doubled-pawn complex of
Nimzovich's opening idea.
[ Both sides could also enter the vast
complications of the line:
3.Nc3
Bb4!?;
(counter-play) {Diagram?}
which is the Nimzo-Indian Defense. ].
3...d5; {Diagram?}
<< Now we have transposed back
to a Q.G.D.
(Queen's Gambit Declined.) >>
<< There seems to be lots of
double-Queen Pawn openings
in this match.
(Two games out of eight.) >>
{Six of the eight games started
with the move, 1.d4.}
Both sides continue to develop
normally for this line.
4.Nc3
Be7; 5.Bg5
h6!?;
{Diagram?}
This is a departure from the
main lines - I can only guess
that both sides were
engaged
in a little game of 'cat and mouse.'
(Both teams probably tried to
prepare something new -
especially Kramnik.)
This move is designed to give
Black more options, similar to The "Morphy Defense"
of the
Ruy Lopez. (1. e4, e5; 2.Nf3, Nc6; 3.Bb5, a6!)
This move is a prelude to certain
variations of the Queen's Gambit
Declined.
(Lasker's line and the
T.M.B. System.)
[ The most often used, and the
most respected, {main} line
of the
Q.G.D. occurs after the moves:
5...0-0; 6.e3
Nbd7; 7.Rc1
c6; 8.Bd3
dxc4; 9.Bxc4,
"+/=" {Diag?}
etc.
Both sides have a good
game. White maintains a slight
edge.
(See game eight for
something very similar to this.) ].
6.Bh4
0-0; 7.e3
Ne4!?; {See the
diagram just below.}
<< This Knight leap - practically
invented and refined by former
World Champion,
Emmanuel
Lasker - leads to exchanges and
a paring down designed to
{eventually}
yield Black equality. Of
all modern GM's only Yusupov plays
this system with any
real regularity.
(It is slightly drawish.) >>
<< This might have been something
of a surprise to the Fritz team. But
Kramnik has
used this a few times
before.
[Vs. GM Sadler at Tilburg in '98, vs. GM Anand
in a TV game, and vs.
GM J. Lautier
in a Melody Amber (rapid) game.] >>
<< Kramnik is also a huge specialist
in the purely Classical Systems - in
fact, he is
the greatest Classical
(style) player since Capablanca -
so his use of these
systems should
not come as a big surprise. >>
|
|
[ Black can also play:
7...b6!?; {Diagram?}
which is the line originated
by
the great Tartakower.
(The T.M.B. System.) ].
8.Bxe7
Qxe7; 9.cxd5!?,
{Diagram?}
Probably the main line.
<< The computer program chooses
one of the sharpest lines. It is no
surprise that in
such a position,
White has probably nearly a dozen
completely different and
playable
moves at this point in the game. >>
I should also point out that Kramnik
has been on the White side of this
defense
literally dozens of times!
***
[ White can also play: 9.Rc1, {Diagram?} with a good game.
Or 9.Qc2, {Diagram?} also with a very comfortable position for White.
(These are the two main lines White - besides cxd5.) {See MCO.} ].
***
9...Nxc3; {Diagram?}
<< This exchange was nearly forced.
(White was threatening to win
Black's pawn on the d5-square.) >>
This, (the exchange of minor pieces);
is also a good idea for Black in purely
general terms.
Initially Black suffers
from a very cramped position in the
Q.G.D. Every exchange brings
Black
closer to equalizing the game.
10.bxc3, {Diagram?}
White must re-capture, he cannot
think about winning pawns, as his
Queen is hanging.
[ Interesting is: 10.d6!?; "~" with unclear results. ].
10...exd5; 11.Qb3
, ('!') {Diagram?}
<< This is one of many playable moves
in this position, in fact it is probably
the main line.
It is also very sharp
and immediately pressures Black's
exposed pawn on d5. >>
[ White can also play: 11.Bd3, "~" {Diagram?} with a very small advantage. ].
***
<< White's 12th move is sharp and
is designed to give him a
preponderance of pawns
in the
middle of the board.
(Center domination.) >>
11...Rd8; 12.c4!
dxc4; 13.Bxc4
Nc6; 14.Be2, {Diagram?}
<< A strategic retreat, White does
not want to allow 0-0, Na5.
(Picking off White's Bishop.) >>
[ 14.0-0!? ].
14...b6; 15.0-0
Bb7; {Diagram?}
A very complex position that is also
very unbalanced. Yet according to
nearly all of
the chess programs,
the position offers both sides
approximately equal chances.
<< This position marks the end of the column in MCO. >>
16.Rfc1, (TN?) {Diagram?}
<< A perfectly logical move, but a
slight deviation from main line
theory here. >>
Actually, this is not a new position,
but has been seen a few times before.
The first example of this occurred in
the encounter:
GM Svetozar Gligoric - GM Paul Keres; (annual Dec.) Hastings Tournament.
Hastings/ENG/1957-58.
(White won a very long game.)
[ More commonly seen is the other
Rook to c1 here, i.e.;
16.Rac1
Na5; 17.Qb2
Rac8; "=" {Diagram?}
and the position is fairly equal.
(GM Nick de Firmian in MCO.)
GM Vladimir Kramnik - GM
Chris Lutz;
Germany, (Bundesliga?) 1994.
[ See MCO-14; page # 403,
column # 31, and note # (f.). ]. ].
<< In the next series of moves, Fritz
plays very strongly ... increasing the
pressure
and doubling on the c-file. >>
16...Rac8; 17.Qa4
Na5; 18.Rc3
c5; 19.Rac1,
('!') {Diagram?}
For 19.Qa3, see Ivkov - Krogius; Belgrade, 1998.
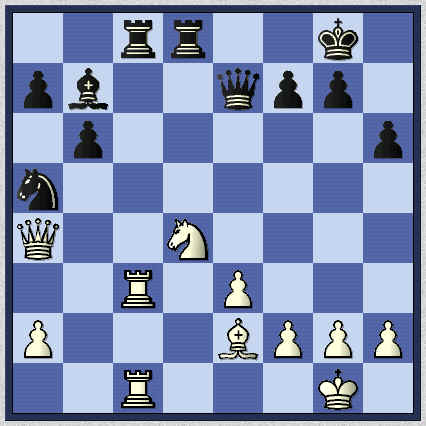
19...cxd4;
20.Nxd4, "="
{See the diagram just below.}
<< The correct re-capture.
(Exchanging both sets of
Rooks only helps Black.) >>
The position is very close to equal.
(At worst, White only has a very,
very small advantage.)
|
|
[ Slightly worse (for White) is: 20.Rxc8!?
Rxc8; 21.Rxc8+
Bxc8;
22.Nxd4
Qe4, "=" {Diagram?}
with a completely equal game. ].
20...Rxc3; {Diagram?}
Black - perhaps feeling the slight,
but annoying pressure of the
program here - decides
to swap
off some material.
21.Rxc3, {Diagram?}
<< The opening is over, and Black
appears to have almost completely
equalized. >>
21...Rc8; (Maybe - '!?')
{Diagram?}
<< This looks extremely logical, but
maybe Black is in too big of a hurry
to swap off the Rooks.
(Kramnik - behind on the clock -
probably wants to dump as much
material as he can.) >>
[ << It seems that Black could do
a little better with: >=
21...Qe4!; 22.Bf1,
22...Rd6;
"=" {Diagram?} and all the key squares are
covered. >>
The same idea is seen with
the move of: >/= 21...Qg5!?;
"~" {Diagram?}
putting a little pressure on
the White King. ].
22.Rxc8+, {Diagram?}
<< This is probably the most
precise. >>
[ The alternative line of: 22.Nf5!?
Qf8; 23.Rxc8
Bxc8; 24.Bd3
Bxf5!?;
25.Bxf5
g6; 26.Be4
Qd6; "=" {Diagram?}
seems to lead nowhere ...
but a very dead equality. ].
22...Bxc8; 23.h3, {Diagram?}
<< White immediately gives his King
some 'luft.' (The computer does
not want to
worry about the
possibility of a later check-mate
on the first row.) >>
[ White could also play: 23.Bd3!?, {Diagram?} with a comfortable game.
It's a 'back-rank mate' after: 23.Bf3!?
Qe5; 24.Nc6??
Nxc6; 25.Qxc6?,
25...Qa1+;
26.Qc1
Qxc1+; 27.Bd1
Qxd1#; {Diagram?}
Variations like this serve to
illustrate the usefulness of
creating
an escape square
for the King! ].
23...g6; {Diagram?}
<< Black needs some more room
for his own monarch as well. >>
The idea of 'luft' - or preventing any
possible counter-play of a back-rank
combination;
is a very common
theme in modern, GM chess.
Note how BOTH players - before
proceeding any further - both
insure their Kings
will not be in
jeopardy on their home row.
24.Bf3
Bd7!?; {Diagram?}
<< This is interesting, and may well
hold the balance, but might have
....Be6;
been just a little better. >>
[ << After the continuation: 24...Be6;
25.Nxe6!?
Qxe6; 26.Kf1,
"+/=" {Diagram?}
White has a slight advantage,
but is Kramnik really in danger
of losing this
position? >>
(I don't think so!) ].
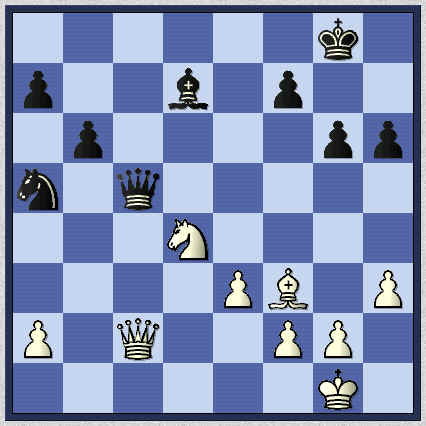
25.Qc2
Qc5!;
{See the diagram just below.}
The most active, Black offers to
exchange Queens.
(Something Fritz avoids.)
Several strong computer programs
confirm that this is probably the
best line for
Black in this position.
|
|
[ A less savory alternative is: 25...Qg5;
26.Qc7, "+/=" {Diagram?}
and White has a clear
advantage here. ].
26.Qe4!, {Diagram?}
The exchange of Queens yields
White little, ... in fact it only serves
to give Black a
dangerous passed
pawn.
(NOTE! See my pre-game
comments about the many
adjustments the Fritz team
made to the program during
the half-way point.)
[ After the much inferior: 26.Qxc5
bxc5; 27.Ne2
Kg7; "~" {Diagram?}
Black is fine, maybe even
a little better here. ].
26...Qc1+!?; {Diagram?}
<< Maybe a little too impetuous?
{The Black Queen seemed very
well situated on the c5-square.} >>
<< (According to several sources,
Kramnik was falling further and
further behind
on the clock at this
point in the game.) >>
After over a month's worth of
analysis, I am sure that this is a
very doubtful idea.
(Dubious or inferior. < '?!' > )
[ << Maybe the more prudent:
>/= 26...Kg7!,
"=" {Diagram?}
was called for. >>
(This seems much, much better
than what actually happened in
the game.) ].
27.Kh2
Qc7+; {Diagram?}
This is the Queen's new post ...
it hardly seems like an improvement
over the c5-square.
28.g3
Nc4!?; (Maybe - '?!')
{Diagram?}
<< Black wanted (desperately) to
activate his long, sidelined
Knight. While this is certainly
understandable, it is probably
not the best defense. >>
<< And this looks like the wrong
approach to me. The computer
evaluations immediately jump
up
and begin giving White nearly
35-one-thousandths of a pawn
(or more) advantage. >>
[ It seems Black could have
completely kept the balance
with the continuation of:
>/=
28...Bc8; 29.Qe8+
Kg7; 30.Bd5
a6; 31.e4
Nc4; "=" {Diagram?}
(possibly heading for e5?)
with a defensible position
for Kramnik here, I believe. ].
29.Be2
Ne5; 30.Bb5
Bxb5; ('!?')
{Diagram?}
<< This looks like it allows White
a lot of pressure or perhaps
to win a pawn. >>
[ Was 30...Qd6!?; {Diagram?} a very small improvement? ].
31.Nxb5
Qc5; 32.Nxa7
Qa5; 33.Kg2
Qxa2; {Diagram?}
Black has done the best he can in the given circumstances.
[ 33...Qxa7!? - GM Danny King. (See his article in the Feb. 2003 'Chess Life.') ]
34.Nc8,
{See the diagram just below.}
White has Black under a lot of pressure.
|
|
34...Qc4??; {Diagram?}
<< Black drops a whole piece. >>
<< A horrible blunder, perhaps the
worst of Kramnik's whole career.
(He was very short of time on
the clock.) >>
If Kramnik had played 34...Nc4[]; I find it hard to believe Black would
have lost this game. (34...Nd3!?, or 34...Qe6!?; - GM D. King.)
***
[ Black had to play:
34...Nc4[]; {Diagram?}
This is possibly the only
good move for Black.
For example:
35.Ne7+
Kf8!?; 36.Nd5
Kg8; 37.Qh4!,
"+/=" {Diagram?}
and White has continuing pressure
and may even win another pawn.
(But this is still better than dropping
a whole piece.)
(White could also play: 37.Qf4!?,
"+/=" {Diagram?}
with some advantage here.) ].
***
35.Ne7+, ("+/-") {Diagram?} Black Resigns.
<< (After the King moves, White plays QxN/e5, winning a whole piece.) >>
A completely un-necessary loss for the human side in this match.
As ChessBase - and other sites as
well - did not analyze this game in
depth the way
they did the first four
games; I have analyzed this game
very meticulously. I also felt
it was
extremely important to carefully and
objectively determine exactly what
happened in this game. (Kramnik's first loss.)
Please visit my web page(s) at:
https://www.angelfire.com/fl5/
human_fan02/index.html
for a
better look at this whole match.
(The Kramnik - Deep Fritz event
has its own section.)
Every game
is annotated in depth.
Copyright (©) A.J. Goldsby I. Copyright (c) A.J.G; 2002.
(Code initially) Generated with ChessBase 8.0
1 - 0
I
went to great pains to annotate this game ... NOT to benefit
a master, but to make it possible
for the average player to follow this game. I also tried to make this a
game a brief survey of the
opening, for any aspiring player who is trying to learn - and might not have
access to many books.
Click HERE to return to the page for Kramnik vs. Deep Fritz, Game # 5.
Click HERE to go to (or return to) the main (parent) page for the Kramnik vs. Deep Fritz Match.
Click HERE to go to (or return to) my Main (home) page for this site.
This
is a game I annotated especially for these web pages. I plan to annotate - in a
similar
manner ... all of these games. (For your study and enjoyment.)
If you would like a copy of this game to help you study, contact me.
Page
first posted, late October, 2002. Final revision:
Friday; November 29th, 2002.
(Page last updated: January 15th, 2003.)
Copyright (c) LM A.J. Goldsby I
Copyright (©) A.J. Goldsby, 2001-2005.
Copyright (c) A.J. Goldsby, 2006. All rights reserved.