|
|
GM V. Kramnik vs. Deep Fritz (7.0)
|
|
|
The fourth game (# 4) of the: "Man vs. Machine/Brains In Bahrain" Match.
<< Kramnik as White overpowers the
machine. But he allows the computer
strong play
and the box sinks a Rook
into the 7th rank. After that the game
is drawn. >>
The opening is a Tarrasch Defense,
this would have seemed to be a
surprise to Kramnik. But
actually he
appeared to be well-prepared for
this entire line. He came out of the
opening with
a very large advantage.
(Even winning a pawn.)
But perhaps the extremely simplified
nature
of the position made him
think it was drawn, no matter what.
A good game, with lots of play. There is much here that the student can learn from.
***
The comments that are contained
within the brackets, ...
<< blah-blah-blah-blah >>
are from the short version of
this game - that you can download
from my web site.
***
I have also used several quotes from
GM Karsten Müller's
comments from the ChessBase web site.
(http://www.chessbase.com/images2/2002/bahrain/games/bahrain4.htm)
I urge all interested parties to check
out his comments as well ...
for a
completely different take on this game.
Click here to see an explanation of the symbols that are used.
Kramnik once again uses his
favorite d-pawn.
1.d4
d5; 2.c4
e6; 3.Nf3, {Diagram?}
<< A good developing move. >>
[ The more usual move order
for the Tarrasch is: 3.Nc3
c5; 4.cxd5
exd5; 5.Nf3
Nc6;
6.g3
Nf6; 7.Bg2
Be7; 8.0-0
0-0; 9.Bg5, {Diagram?}
transposing back to the game. ].
3...c5!?; {Diagram?}
<< The full-blown Tarrasch Defense. I would have thought this a risky
choice, as the
second player is
forced to receive an isolated
pawn. >>
4.cxd5
exd5; 5.g3, {Diagram?}
<< This is the best method of handling
the isolated pawn. This approach (g3) was pioneered
by GM Rubinstein.
He and Capablanca all but drove the
Tarrasch Defense into oblivion.
(It was not played at the highest
levels for close to 50 years.) >>
<< A young GM Garry Kasparov -
in his match with GM Vassily Smyslov -
brought this line
back into (top-flight/GM)
play. >>
***
[ The older move here was: 5.Bf4, {Diagram?} followed by e3 and 0-0.
Another method for handling
this line is: 5.e3
Nf6; 6.Nc3
Nc6;
7.Be2
cxd4; 8.Nxd4,
8...Bd6;
9.0-0
0-0; 10.Nf3, {Diagram?}
with a small advantage for
White here. ].
***
<< Both sides now develop pretty
much in a normal fashion. >>
5...Nc6; 6.Bg2
Nf6; 7.0-0
Be7; 8.Nc3
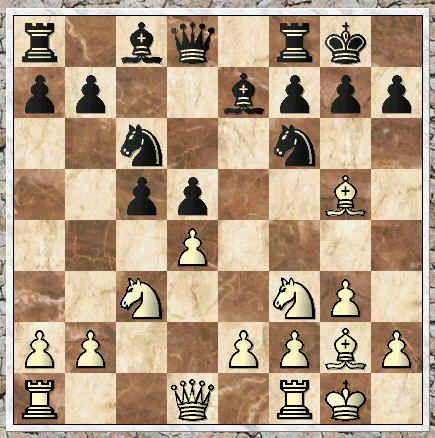
0-0; 9.Bg5,
{See the diagram below}
<< The book move, White is trying
to place the maximum pressure
on Black's position ...
undermining
his support of Black's d-pawn. >>
|
|
The main line of this variation after nine moves.
***
[ The main alternative here is
for White to play: 9.dxc5, {Diagram?}
and White plays against Black's
isolated d-pawn. ].
Now Black's
response is thought
to be nearly forced, according to
modern opening theory.
9...cxd4; 10.Nxd4
h6; 11.Bf4!?, (Interesting)
{Diagram?}
<< This is not the move that is most commonly played here.
(Usually,
the first player plays Be3 here.)
But this is sure to be more popular
after Kramnik's near successful
outing. >>
***
[ The main line is:
11.Be3
Re8; 12.Rc1
Bf8;
13.Na4
Bd7; 14.Nc5
Ne5;
15.Nxd7,
15...Qxd7; {Diagram?}
The end of the column.
MCO stops here and evaluates
this position as slightly better
for White. ("+/=")
[ See MCO-14, page # 436,
and column # 1. ] ].
***
<< The next few moves are all
book. >>
11...Bg4; 12.h3
Be6; 13.Rc1
Re8; 14.Nxe6!?
fxe6; 15.e4!?,
(Maybe - '!') {Diag?}
<< A very energetic way of handling
this particular position. >>
(White opens the game up.)
<< "A typical transformation which
is quite advantageous against a
computer, because once
again a
the queen exchange is looming."
- GM Karsten Müeller. >>
This is the correct approach, as White's fianchettoed Bishop is released.
[ Also yielding White a small advantage was: 15.Qb3, "+/=" {Diagram?}].
15...d4; {Diagram?}
<< This appears to be both forced,
and the best reply for Black. >>
[ Worse for Black is the line: 15...dxe4?!; 16.Qb3!,
"+/=" {Diagram?}
and White has a small but clear
advantage. ].
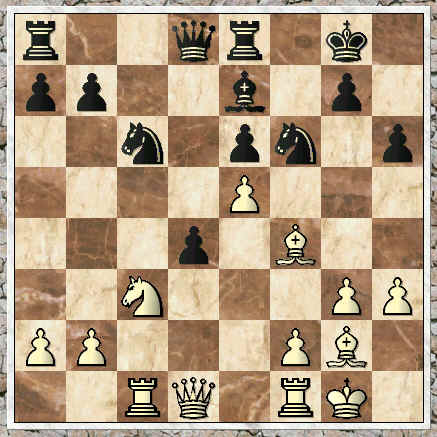
16.e5,
{See
the diagram just below.}
Probably the sharpest/most forcing move for White in this position.
|
|
An extremely sharp and complex position has arisen on the board.
***
[ 16.Na4!? ]
16...dxc3; (TN?)
{Diagram?}
<< This is probably the best move
for Black here.
(Was this a TN found by the
Fritz team?
Or did the computer
simply find this via brute-strength
analysis during the game?) >>
***
[ After the substantially inferior
continuation: 16...Nh7?!;
17.Ne4, "+/=" {Diagram?}
White is clearly better, and went
on to win easily in 26 moves.
J. Nogueiras - J. Klinger; Graz, 1984. ].
***
17.exf6
Bxf6; {Diagram?}
<< The computer spent quite a bit
of time over this recapture, so I
would assume it is best. >>
***
[ After the moves:
17...Qxd1!?; 18.Rcxd1
Bxf6; 19.bxc3,
"~" {Diagram?}
White might keep a small
advantage, in this position.
One poor player on a chess
server tried to tell me that cxb2
was winning for Black
in this
position. But that is ludicrous.
One sample line is: 17...cxb2??;
18.fxe7
bxc1Q?;
Compounding the damage.
(The continuation: 18...Qxe7;
19.Rb1, "+/-" {Diagram?}
simply leaves White a piece
up - with a won game.) 19.exd8Q
Qxd1; {Diagram?}
This looks nearly forced.
(Or 19...Raxd8; 20.Qxc1,
"+/-") 20.Qxd1,
"+/-" {Diag?}
and White has an easily won
game. ].
***
<< The coming exchanges only
serve to highlight Black's weaknesses
and further increase
the scope of
White's Two Bishops. >>
18.bxc3
Qxd1; 19.Rfxd1
Rad8; 20.Be3!,
"+/=" {Diagram?}
<< This appears to be an
improvement over existing play. >>
[ The continuation of: 20.Rb1!?
Rxd1+; 21.Rxd1
Kf7; "~"
{Diagram?}
led to an eventual draw in
less than 40 moves.
J. Adler - C. Flueckiger;
/Bern, 1988. ].
20...Rxd1+; (Hmmmm.)
{Diagram?}
<< Black decides to exchange a set
of Rooks in this position. This appears
to be quite
reasonable. The move, ...Kf7; has
also been played here before. >>
[ Black could also play: 20...Kf7!?;
21.c4, "+/=" {Diagram?}
but White has a slight advantage
here. (21.Rb1!?,
"+/=") ].
21.Rxd1
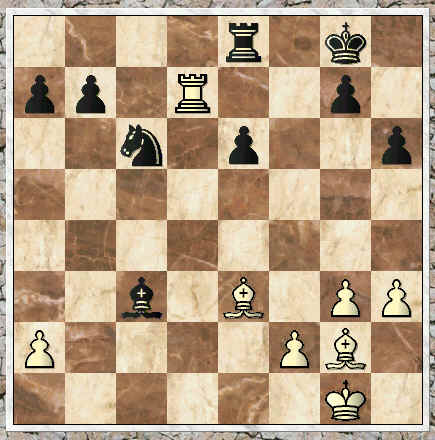
Bxc3; 22.Rd7!,
{See the diagram just below.}
<< This is the best move. The White
Rook is very active here. >>
<< GM Karsten Müeller wonders if GM Vladimir Kramnik had prepared this whole line? >>
|
|
An
extremely sharp position. Although White is a Pawn down here,
he has little to fear ... just having landed a Rook on the 7th Rank.
(In addition, White has the Two Bishops!)
***
[ White is just a tiny bit better
after the continuation: 22.Bxc6
bxc6; 23.Rc1
Bb4;
24.Rxc6,
"+/=" {Diagram?}
but I doubt if anyone could win
against a computer
from this
particular position. ].
***
22...Rb8; {Diagram?}
<< Black defends the best he can,
and White now cashes in some
of his chips to win a pawn. >>
[ 22...Nb4!? - GM D. King. See CL, page # 28. ]
23.Bxc6
bxc6; 24.Rxa7
Rb2; 25.Ra6; {Diagram?}
<< White is better, but according to
many experts, this is still a drawn
position. >>
***
[ << White could also play: 25.a4!?, {Diagram?}
with a slight advantage.
(But the game is still drawn,
according to GM K. Müeller.) >>
Another idea here is to play: 25.Kg2!?, {Diagram?}
and simply march the White
King to the very active e4-square.
This could be White's best bet.
{A.J.G.} ].
***
25...Bd2!; (counter-play)
{Diagram?}
<< Black actively initiates some
counter-play. >>
<< '!' - GM Karsten Müeller. >>
26.Rxc6!?; {Diagram?}
<< Kramnik decides to be a pawn ahead in this position. >>
<< But I do not like this, as now
White's King is trapped on the
very first row. Was Kramnik
hoping the computer would
misplay the defense, as it had
done previously? >>
I personally think that Rxc6 here is
the wrong approach if White wants
to keep the position
a one in which
he has real, concrete, and viable
chances to win. {A.J.G.}
***
[ I prefer to play: 26.Bxd2!
Rxd2; 27.a4,
"+/" {Diagram?}
with a complex ending,
and White
keeps some chances to win. (
The continuation after: 27.Rxc6!?
Rxa2;
28.Rxe6, "+/" {Diagram?}
is a theoretical draw - all the
pawns are on the same side
of
the board. (Black plays to swap
all the pawns. Eventually White
tries to force a
passed pawn, and
Black will draw with the technique
shown by Philidor more than
200
years ago. All that is required of
Black is that he never allow an
exchange
of Rooks.) )
According to ChessBase's
analysis of this game, the position
after: 26.Bd4
Rc2;
27.Ra7!?
g5; "~" {Diagram?}
should eventually be drawn as well.
(GM K. Müeller.) ].
***
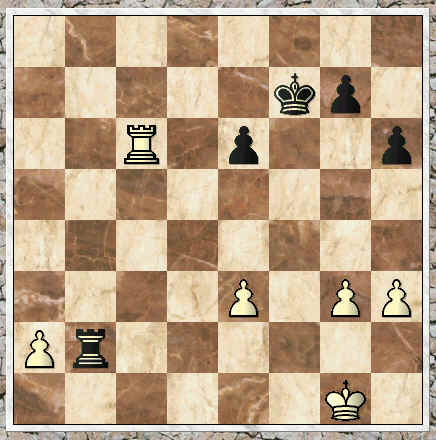
26...Bxe3; 27.fxe3
Kf7;
{See the diagram just below.}
<< The most precise continuation. >>
The seeds of the draw are already sown.
|
|
A greatly simplified position, a draw is likely ... if there are no mistakes.
***
[ With the continuation: 27...Rxa2!?;
28.Rxe6, "+/=" {Diagram?}
White gains a chance for real
play with his extra pawn. ].
<< The ending is now drawn. Black
simply maintains his Rook on a2,
which both traps the
White King and
maintains a vigil over White's passed
a-pawn. Meanwhile, White can
make
little or no progress because of the
sorry state of his King.
(He is a pawn ahead,
but playing this
ending nearly a piece down -
compare the active Black K!) >>
28.a4
Ra2; 29.Rc4
Kf6; {Diagram?}
Black continues to activate his
King.
(The King is a strong piece,
and should be used - especially
in endings of greatly
reduced
material!)
30.Kf1
g5; {Diagram?}
<< The computer tries to force
open some lines ... the best
approach. >>
31.h4
h5; 32.hxg5+, {Diagram?}
<< This appears to be the correct
move here. >>
(g4!? only initiates complications.
This is both needless and risky
against the machine.)
[ 32.Rc5!? ].
<< Kramnik continues to flail about,
but the machine - for once! -
plays
this ending most accurately. >>
32...Kxg5; 33.Ke1
e5; {Diagram?}
The computer does not take
the bait.
[ Perhaps Kramnik was hoping to "sucker-punch" the computer with
a continuation
like:
33...Rg2!?; 34.a5!?
Rxg3?;
This is clearly bad. (The move 34...Ra2; {Diagram}
was probably forced.) 35.Kf2
h4; 36.a6,
"+/" {Diagram?}
White now has real winning
chances. ].
The back-and-forth maneuvering
continues.
34.Kf1
Kf5; 35.Rh4
Kg6; 36.Re4
Kf5; 37.Rh4
Kg5; 38.Kg1
Kg6; 39.g4,
{Diag?}
<< Kramnik, perhaps tiring of this
rather basic ending, decides
to exchange down
to a dead drawn position. >>
[ 39.Rb4!? ].
39...hxg4; {Diagram?}
This draws, as does ...Kg4.
[ 39...Kg5; 40.Rxh5+ Kxg4; 41.Rxe5 Rxa4; "=" ].
40.Rxg4+
Kf5; 41.Rc4,
"+/=" {Diagram?}
<< Kramnik now offered a draw
that was immediately accepted
by the Fritz team.
(Note that neither King can
advance or make progress -
both are cut off by the
opposing
Rook.) >>
A nearly flawlessly played game ... by both parties!!
Even though I was a little disappointed
because Kramnik did not win this
position -
with his extra button - I
was very happy with the progress
of the match up to this point.
He has
totally dominated the nasty box.
***
Please visit my web page(s) at:
https://www.angelfire.com/fl5/human_fan02/index.html
for a
better look at this whole match.
(The Kramnik - Deep Fritz event
has its own section.)
Every game
is annotated in depth.
Copyright (©) A.J. Goldsby I. Copyright (c) A.J.G; 2002.
(Code Initially) Generated with ChessBase 8.0
1/2 - 1/2
I
went to great pains to annotate this game ... NOT to benefit a master, but to
make it possible
for the average player to follow this game. I also tried to make this a
game a brief survey of the
opening, for any aspiring player who is trying to learn - and might not have
access to many books.
Click HERE to return to the page for Kramnik vs. Deep Fritz, Game # 4.
Click HERE to go to (or return to) the main (parent) page for the Kramnik vs. Deep Fritz Match.
Click HERE to go to (or return to) my Main (home) page for this site.
This
is a game I annotated especially for these web pages. I plan to annotate - in a
similar
manner ... all of these games. (For your study and enjoyment.)
If you would like a copy of this game to help you study, contact me.
***
Page
first posted, late October, 2002. Final revision:
Monday; November 25th, 2002.
Page last updated: January 15th,
2003.
Copyright (c) LM A.J. Goldsby I
Copyright (©) A.J. Goldsby, 2001-2005.
Copyright (c) A.J. Goldsby, 2006. All rights reserved.