|
|
Fritz_X3D - GM Garry Kasparov;Game Two (# 2.)"Man vs. Machine" World
Championship Match The Athletic Club/New York City, NY/USA; 2003.
Click HERE to see an explanation of the symbols I use to annotate a game. Click HERE to see this game on a java-script replay page. (UN-annotated.)
*************************
Garry's use of this opening is a radical departure from his previous use of opening systems.
[ The 'main line' here is:
3...a6!?;
(Maybe - '!')
{Diagram?}
4.Ba4 Nf6;
5.0-0 Be7; {Diagram?}
( Instead, after the move 5...Nxe4!?;
"~" Maybe - "+/=" {Diag?}
(Returning to the main line of the Ruy Lopez.)
White will play d2-d4,
next ... and have a very good game. Literally
[ See the opening manual, MCO-14, beginning on page # 40.
To show how popular the Ruy Lopez is, I have over 50 books that deal
The most recent GM game I could find in my database was the contest:
The computer plays a slow line designed to avoid the loss of its
vital center pawn.
But in a way, this is already a big success for Garry. We are out of the main variations
<< According to Alex Kure, the opening book expert for Team Fritz, they wanted to keep ************************************************************************************
[ After the moves:
4.0-0 Nxe4; 5.d4 Nd6; 6.Bxc6
dxc6; 7.dxe5 Nf5;
Garry himself was unable to break through Black's position in his 2000 (WC) {"Brain Games"}
Also, Deep Fritz was unable to win as White against Kramnik in the ... "Brains in Bahrain"
A good {recent} example of this line was the following contest: *******
One opening book gives the following continuation: ******************************************************************************
( Black could also try:
9...Bd7!?; 10.b3!? h6;
11.Bb2 Kc8; 12.Rad1 b6; 13.Ne2 c5; 14.c4 Bc6;
GM G. Kasparov - GM V. Kramnik;
"Brain Games" World Championship Match ******************************************************************************
(We now return to the study of the known ... 'book' ... line.)
12.Nd4 Bd7; 13.Bf4! c5!?;
14.Nde2 Kc8; 15.Rad1!?,
"+/=" {Diagram?} GM E. Geller - GM O. Romanishin; 45th URS Championship /Leningrad/U.S.S.R./1977. [ See MCO-14; page # 45; column # 8, and also notes numbers(s) # (a. - k.). ] ] ************************************************************************************
The next few moves feature some
rather simple, but logical and very straight-forward developing ideas.
[ Paul Morphy would have probably played the move:
4...Bc5!?;
"<=>" {Diagram?}
5.c3,
White is playing a very slow line, a highly positional method for handling this opening.
White's last move keeps Black's pieces off the d4-square, (And to a lesser extent, the b4-square as well.); and
[ An off-beat move, but one that was suggested by several amateurs, was:
5.c4!?,
{Diagram?}
(Garry paused about one minute ... before playing his next move.)
After a little research, I found this idea was suggested by several different authors, i.e., GM Nick de Firmian.
After weeks {months} of research, during which I perused almost all of the opening books in my library, it seems
********************************************
In the next few plays ... both sides obviously want to continue their development ... and get castled.
*************************
*************************
Thus far play has developed slowly, but also in a highly positional manner.
[ Possible was:
7.h3!?,
{Diagram?}
but to be honest, this is probably
7...0-0;
By castling, the Black King is put almost into the corner, where it is much safer than the middle of the
*************************************************************************************
While castling may not seem like a big deal to most players here, I have noticed a definite trend in GM chess lately.
And on a similar note, I am currently (September, 2003; through February of 2004.); working my way through the
The above mentioned book, the winner castled (early) in 84 of the 101 total games, while the loser castled in
Of course, most of the time when the loser was not able to castle, the victor often had to sacrifice material to try and
[ Another idea is to simply play a move like ...Bd7; followed the next move by ...a6;
GM V. Kupreichek
(2515) - GM Alexander Aleksandrov
(2535);
With his next move, White plays a Rook to the center of the board. This is both good, normal, and very commonplace
I think that Garry was really busy trying to decide on what type of general strategy that he should play, and wasn't really
One commentator on ICC said that this move was a novelty. (He must be right, I searched this position in the on-line
This move also was new or completely unexpected to the computer ...
[ Also good was:
8...Bd7;
{Diagram?}
9.a4 a6; 10.Bc4 Be6;
11.a5 Bxc4; 12.dxc4!? Nh5;
"~" {Diagram?}
R. Ponomariov - A. Grischuk;
7th European Cup (team tourn.) ***************************************************************************
I definitely would have tried ... or at least been tempted to try, the move:
8...Ne7!?;
{Diag?}
White now advances in the middle
of the board ... gaining vital ground. [ Interesting is: 9.h3!?, "~" {Diag?} with play analogous to other Lopez variations. ]
9...Bd7;
{See the diagram ... just below.}
*************************
*************************
Seirawan also pointed out that Black is just slightly ahead in development at this point in the game.
Garry took about three-and-a-half minutes on this move ... he was probably just checking the tactics ...
[ The exchange in the center:
9...exd4!?; 10.cxd4,
"+/=" {Diagram?}
The box took about 10 minutes before deciding on its next move.
I am sure Fritz made this move because after spending a good deal of time on this move,
[ I expected something like:
10.Bd3!?,
"+/=" {Diagram?} *************************************************
Or even the move:
10.Qb3,
"+/=" {Diagram?}
Garry took very little time before playing his response to d5.
GM Yasser Seirawan also pointed out that he played Garry many times
...
[ The continuation of:
</= 10...Na5??;
{Diagram?} 11.Bxd7 Qxd7; 12.b4, ("+/-") {Diagram?} simply drops a piece for Black. ****************************************************************
Also inadvisable for Black was the continuation of: 11.Qb3!, "+/=" {Diagram?} and White has a very solid edge. ]
11.Bxd7,
('!?')
[ Maybe (>/=) 11.Bf1!?, "+/=" {Diagram?} was just slightly better? ]
11...Nxd7;
{Diagram?}
I prefer the move ...Qxd7! in this position. But I would also be the first to admit that Garry has a ton more
The position - while arising from a KP opening - has much in common with: "The King's Indian Defense." [ I much prefer to play (the move of) ...Qxd7!
Just one sample line, (similar to the way the game was played); is the following continuation: ( </= 12...c5?!; 13.Nc4, "+/=" )
13.a5 a6; 14.b4 Nf4!?;
{Diagram?}
15.h3!?,
{Diagram?} ( Maybe better was: 15.Nc4!? "=" )
15...h6!?; 16.Qc2!? Rf8!;
17.c4!? f5;
"=" {Diagram?} Original line of analysis, by - LM A.J. Goldsby I ]
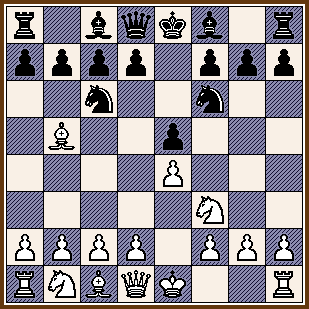
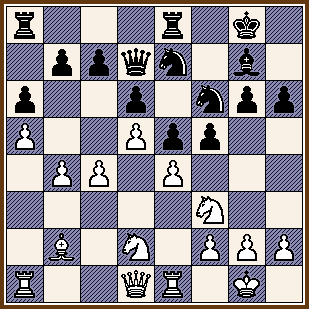
12.a4!?, (TN?) (Probably - '!')
{See the diagram... just below.}
This move is good and natural, it also gains some significant space on the Queen-side. Another very common motif in **************
---> I searched about a dozen different databases for this particular position.
*************************
*************************
This unique position certainly deserves a diagram of the position.
[ More normal would be moves like:
12.Nf1!?,
"+/=" {Diagram?}
Play could now proceed:
12...h6; 13.Ng3 Rf8;
14.a4!?, "+/=" (Maybe - '!')
{Diag?} K. Langeweg - GM K. Spraggett; ICT / Ibercaja Open / Zaragoza, ESP; 1992.
(That contest did
not start with the KP, but instead opened with the move, 1.d4. *******************************************************************************
Or White could even try the move:
12.Qc2!?,
"+/=" {Diagram?}
12...h6;
[ The continuation of:
</= 12...f5!?;
('?!') 13.a5! a6;
{Diagram?}
14.Ng5! Nxd5!?; 15.Nf1! N5f6;
16.exf5 gxf5; 17.Ne3!,
"+/=" {D?}
13.a5!,
[ Also good for White was:
13.b4!?,
"+/=" {Diagram?}
13...a6;
White's center Pawns, esp. the one
on the d5-square, makes finding the correct plan for Black a little
14.b4 f5!?;
{Diagram?}
(An idea borrowed from the "King's Indian Defence.")
[ Possible was:
14...g5!?; "~" {Diagram?} *************
Also good for Black was the move:
14...Rf8;
"<=>" {Diagram?}
White - after the ...f5 lever put pressure on the center - desperately needs to shore up the center.
This move supports the d-pawn, gains space ... and gives the computer the possibility of a later *************
Maybe just:
15.Bb2!?,
"~" ('+/=')
{Diagram?} *************
Also playable for White was:
15.Rb1!?,
"+/=" {Diagram?}
15...Nf6;
16.Bb2,
(dubious?)
On the other side of the coin, if the
center ever opens up, White's Bishop will be positioned to control many
[ Better was:
>/= 16.Qb3!?,
"+/=" ('!') {Diagram?}
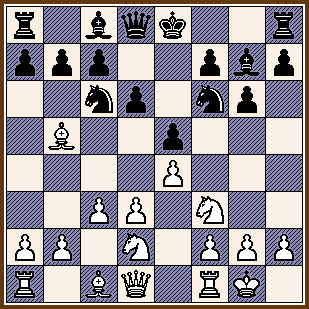
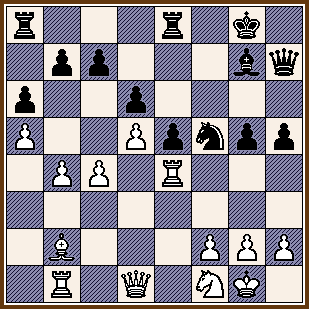
16...Qd7!?;
{See the diagram ... just below.}
*************************
*************************
This move - (...Qd7;) - appears to be a natural one. (If Black wants to attack
on the King-side, he will very naturally
The amazing thing about this play is that almost none of the 'expert'
commentators ... either on the Internet, or on the ***********************************
[
Many commentators on the Internet said that the move:
16...f4;
"~" {Diagram?} *************
Another good move for Black was the try:
16...Rf8!?;
{Diagram?} ********************************************************************
A position suggested by one TV commentator was:
( I think better is: (>/=) 17.Qb3!?, "+/="
{Diagram?} ***********************************
White's next move is mysterious ... only Fritz knows what it really does
to improve the computer's position.
*************************
*************************
All the commentators were puzzled ... and completely nonplussed by this particular move as well.
The ONLY good thing (!) about this move ... as far as I could see ...
[
Variation # 17W1.) *********************************************
Variation # 17W2.) *******************************************************
Variation # 17W3.)
17...g5!?;
{Diagram?}
Garry took nearly 15 minutes on this seemingly obvious play.
[ Maybe the move:
>/= 17...Rf8!?; ('!')
{Diagram?} *** *** *** *** *** *** *** *** ***
Also to be seriously considered was the move:
17...f4!?;
"/\" {Diagram?} {GM Y. Seirawan mentioned this idea in his TV commentary many times as well.} ]
Now White decides on the exchange of Pawns, viz. e4xf5. While this play was severely criticized by some
When White captured on the f5-square with the Pawn, Black could have re-captured this foot soldier
*************************
*************************
The other positive thing about the re-deployment of the 'horsie,' is that this cavalry unit will gain time when it comes
[ Or
19.h3!?,
"+/=" 19...g4!?;
"~" {Diagram?} *** *** *** *** *** *** *** *** *** ***
One 'expert' commentator also suggested the possibility of:
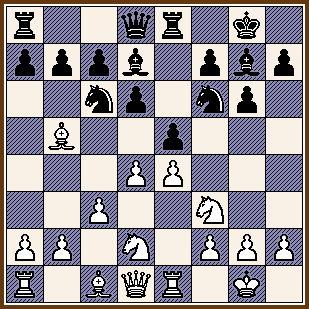
19...Qh7!?;
(hmmm)
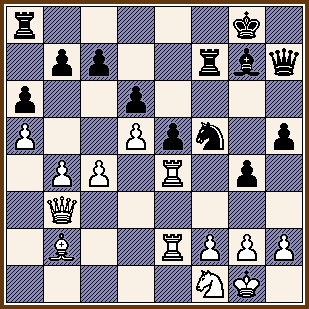
{See the diagram ... just below.}
*************************
*************************
It seems that to me ... the most natural square ... in this position
...
for the Queen is on either d7 or g6.
[
GM Yasser Seirawan liked the move:
>/= 19...Ng6; ('!')
{Diagram?}
An extremely interesting line ... that took several hours to try and generate ... was: *************************************************************************
Another play in this position for Black would be:
19...Qg6!?;
{Diagram?}
White now begins a policy of transferring and re-arranging his Knights.
At about this move, we lost our continuous (TV) coverage of the game, as the sports network,
ESPN;
20.N3d2 Nf5;
[ After the continuation of:
(</=) 20...Ng6!?;
('?!') 21.Ng3 Nf4;
21.Ne4 Nxe4; It also seems that this exchange must played sooner or later. [ Also possible was: 21...Rf8!? ]
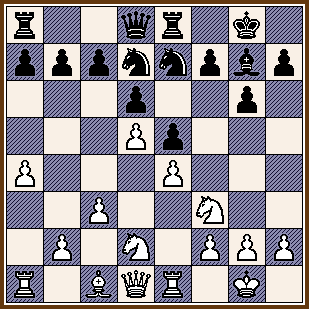
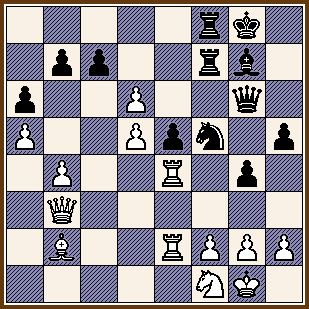
22.Rxe4 h5!?;
(Maybe - '?!')
{See the diagram - just below.}
*************************
************************* {See the diagram just above.}
Since Steinitz we have understood that all attacks must be based on some type of fundamental advantage in the position. (A weakness in the opponent's Pawn Structure, more space, or a much greater degree of mobility, at least in that sector of the board. In my opinion, a great advantage can sometimes be a "three-to-one" ... {or greater} edge in the number of
Here Black enjoys NO edge of any kind that I can detect, and therefore his assault - while interesting - must {at least} ******************************************************************************************** [ Maybe 22...Re7!?; {Diagram?} was better than the game? *******************************************************
Also possible was:
22...Qg6!?; 23.Qd3!,
"+/=" {Diagram?} **********************************************************
While it might be possible for Black to grab the "out-post" square here ... ***********************************************************
Maybe also playable for Black was the rather simple idea of: ********************************************************************************************
White now transfers his major pieces
over to the King-side. This is a good idea - it improves White's defence, Black - apparently - is still massing on the King-side ... and is still looking for an attack in that sector.
[ One commentator ... on a European chess server
... suggested the continuation of: ( Maybe just: 24.Rbe1, "+/=" )
24...Re7!?; 25.c5!? Rf8;
26.Nd2?!, (Maybe - '?') {Diagram?} ( The move >/= 26.c6!, {Diagram?} has to be better for White. )
26...Ref7;
"/\" "~" (Maybe - "=/+")
{Diagram?}
24.Rbe1 Rf7;
25.R1e2!, I was surprised to learn {later} that others criticized this move.
[ Also very good for White was:
25.Nd2!?,
"+/=" ('!') {Diagram?}
25...g4!?;
26.Qb3!?, ('?!')
{See
the diagram - just below.}
*************************
*************************
White - perhaps several times in this particular game - builds up a {slight} advantage, and then just allows it to
[ Better is:
>/= 26.h3!,
"+/=" {Diagram?} with a possible King-side break-through for White.
26...Raf8;
27.c5,
[ Maybe {also} good for White was:
>/= 27.b5!?,
"~" ("+/=") {Diagram?}
27...Qg6;
28.cxd6!?, (Maybe - '?!')
{See the diagram ... just below.}
*************************
*************************
White was on the verge of a break-through here, but throws it away with this one errant play.
********************* **************************************************************************************************
[ Maybe simply:
28.Nd2!?, "+/="
{Diagram?} ********************************************************* *********************************************************
Also worth some consideration here
was the move Qc4!? ********** *********************************************************** ( Jennifer
Shahade - in the pages of the
Feb. 2004 {issue} of 'Chess Life' -
gives
For example:
</= 28...Rf6!?;
('?!' or '?') 29.c6!?;
{Diagram?}
( Very interesting were the massive
complications that arise from the
29...Qf7?!; (Maybe - '?')
{Diagram?} ***
( Better was: >/= 29...bxc6[];
30.dxc6+ Qf7!;
"<=>" {Diag?}
For if: 31.Qxa6?!, {Diagram?} then simply: 31...Ne7; "/+" {Diagram?} and Black is better. ) ***
30.cxb7 Ne7; 31.Qc2!,
{Diagram?}
( Jennifer Shahade only offers
the totally idiotic line of:
(Now we follow a line that was
analyzed in some detail - on one fairly popular
{chess} website.)
( Or Black can try: </= 31...Nxd5!?; ('?!') {Diagram?}
The next few moves look to
be pretty much forced. *****
(
Probably slightly worse was:
</= 33...Qxb7?!;
('?') {Diagram?}
34.Bxe5! dxe5?!;
{Diagram?}
( But after the moves: >/= 34...R6f7; 35.Bxg7 Rxg7;
35.d6+ R6f7!?; 36.dxe7 Re8;
37.Nf5, ("+/-") {Diagram?} *****
34.Nxc4!?,
{Diagram?}
While this is very good, maybe
the natural-looking
( Maybe simply: >/= 34.Rxc4!?, '±' {Diagram?} 34...c6!?; {Diagram?} Black probably has to try this move ... or something like it. *******
( Definitely not: </= 34...Nxd5?!; 35.b5!
Nb4!?; 36.Nxe5!, "+/-" {Diagram?} ** ** ** ** ** ** ** ** ** ** ** ** ** ** **
Also worth a look was: >/= 34...Rb8!?; 35.Nxe5!
dxe5; 36.Bxe5 Nxd5[]; *******
Intensive
work with a strong
computer program will clearly
demonstrate that the next few 35.Nxe5!!, {Diagram?} A brilliant retort.
( But the very simple line
of: 35.dxc6 Nxc6; 36.Nb6, '±' {Diagram?}
35...dxe5; 36.Bxe5 cxd5!?;
37.Bxf6!? dxe4; 38.Bxe7 Rb8; { This line took a tremendous amount of time to verify. A.J.G. }; *********************************************************** ***********
29.Bc3! Bh6!;
"~" {Diagram?}
These lines - in this note took DAYS of work ... and were verified on several different computers, Shahade needs to buy a computer, and at least check her analysis! ] ************************************************************************************************** *********************
28...cxd6;
"=" (Maybe - "+/=") {Diagram?}
White continues to probe, but without a blunder from Garry ... it would have all come to nothing.
29.b5!? axb5;
30.Qxb5 Bh6; ('!') [ Possible was: 30...Rc8!? ]
31.Qb6,
(Maybe - '!?')
[ Maybe 31.Rc4!?, "+/=" ]
31...Kh7!;
{See the diagram - just below.}
*************************
*************************
Black looks to have a fairly solid position ... it does NOT appear that White could force a win from here. 32.Qb4 Rg7?;
(Really - '??') In Garry's defense, he looked very fatigued. He was also running short of time as well. Garry soon realized his mistake and was obviously upset about the rather sudden turn of
{ "Garry must have realized that this was a mistake, just a few seconds after he made the
move;
[
Why not simply:
>/= 32...Bg5; "="
{Diagram?} *****
Or maybe simply:
32...Nh4!?;
"~" {Diagram?} ***** Maybe 32...Rc8!?; - Jennifer Shahade. ]
Now Bxe5 (!) will probably win
... the computer chooses another move - that also works. "Tricky beast!" - GM Vishy Anand. [ Maybe 33.Bxe5!?, also works? ]
33...dxe5;
34.Qxf8 Nd4;
Now White wins with a nice combination ... but one that should not be too difficult for the computer to find from this position.
[
Black can not look for counterplay
in this position, Now White continues an interesting pattern ... checks with the Queen ... to work this piece closer to the Black b-Pawn. After every check White plays the Queen (back) to the last rank, renewing the threat of mate on the h8-square. The whole point of this procedure is to win Black's b-Pawn ... WITH CHECK! (Of course!) Then White's a-Pawn marches in ... with little or no resistance. 37.Qe7+!,
[
Completely inaccurate would be:
38.Rxg8 Kxg8; "~"
{Diagram?}
37...Rg7[];
[
After the very simple moves:
38.Qd8!
Rg8[]; 39.Qd7+!,
Black Resigns. ("+/-")
A terrible loss for Garry ... who should
have probably drawn this game without any **********
Copyright (c) A.J. Goldsby I. Copyright
(©) A.J. Goldsby,
1 - 0It took around three months before I finally got this game annotated, formatted, and posted. Click HERE to go (or return) to the main/parent page for game number two. (# 2.) Click
HERE
to go or return to the MAIN PAGE for ... Click
HERE
to go (or return) to my main/home page
... for the ... This page was first posted - in very ROUGH form! - just a few days after the completion of the match. This page was
first posted - with a completely annotated game
- on February 06th, 2004. Page (final) posting: Saturday / July 03rd, 2004. This page was last updated on 02/17/06 . ******************************* Copyright (c) A.J. Goldsby I Copyright (©) A.J. Goldsby, 2002 - 2004 & 2005. All rights reserved.
|