|
|
GM Garry Kasparov -
Fritz_X3D (C);
|
|
I have taken my time annotating (& formatting) this game. My goal here was NOT speed, but accuracy. Many of the jobs of annotation contained gross inaccuracies or oversights. I also recorded all of the games coverage on TV, and I wanted to watch those tapes repeatedly in order to do the best possible job. (Although the television coverage of games 1-3 were interrupted ... something I have no control over. Only the television coverage of Game Four was complete.) But I am thankful I was able to record all the available TV coverage that was available. Speed was not required, as I posted a short, briefly annotated version of this game within just a few hours of the completion of the first game. There were also other annotated versions of this game on the web, and I also provided links to those as well. Monday; December 22nd, 2003. |
Click HERE to see an explanation of the symbols I use to annotate a game.
Click HERE to see this game on a java-script replay page. (UN-annotated.)
GM Garry Kasparov
(2830) -
FRITZ_X3D (2675)
|
|
|
This is the first game of the match
between Garry Kasparov and Fritz
X3D ...
the computer. (program)
"Man vs. Machine" World Championship Match.
( Garry Kasparov's opponent here is
the latest version of Fritz, running on
a
multi-processor machine. Further,
there is NO real chess set ...
the
entire duel is being fought in space!
{Or, more correctly, in virtual reality.} )
********************************************************************************************************
1.Nf3,
{Diagram?}
White plays a true Reti ... but you
can bet that:
A.) Garry intends to transpose into
some other line.
B.) He had a reason for choosing this
particular move order!
The Reti is one of the most flexible of
all opening systems ... it is also the most
transpositional. {It is possible to play
literally dozens of different openings
from
this one move.} Therefore,
because of the extreme difficulty of
this line - and the
opening knowledge
required to play it correctly - it could
be one of the most difficult
of all the
different systems the first player could
use to start a chess game.
[ More normal for Garry is the
Opening:
1.d4,
{Diagram?}
as he used in the European Team
(club) Championships.
(This event
was played in Greece in August.) ]
1...d5;
A good move - which controls the
center - but certainly not the only
move.
[ Black could also play:
1...Nf6; {Diagram?}
leading to a completely different type
of game for the second player.
With the moves: 1...c5!?;
2.e4!?, {Diagram?}
we are playing a
Sicilian Defense.
(And after 2.c4, we have instead the Symmetrical English.) ]
2.c4,
This move hits the center and is the
normal move for White here, especially
if he wants to play a 'true' Reti.
(2.d4, 2.g3, and 2.b3, are also
possible in this position.)
[ With the move:
2.g3, {Diagram?}
the first player offers to play
a kind
of "King's Indian Defence," ... but
with colors reversed!! ]
2...c6;
Generally, if your opponent attacks
your foot soldiers in the center with
a Pawn,
you should ALSO defend
with a Pawn. (To keep from losing
time in the opening.)
This move has
the additional benefit of also {possibly}
threatening ...d5xc4 for
Black.)
With this play, (1...P-QB3 or ...c6;);
Black also can transpose into the
main lines
of a Slav Defense.
*************************
[ Another line that the second player
can also use is the continuation:
2...e6; 3.b3!?,
{Diagram?}
This is one of the more interesting
lines that White can use here ...
but it is certainly not the only one!
( With the moves: 3.d4 dxc4; 4.e3 Nf6;
{Diagram?}
Play will most likely transpose
into yet another main line ...
The Queen's Gambit ACCEPTED. )
3...Nf6; {Diagram?}
Simple development is probably the best ... pushing the Black Pawn
to the c5-square is the most
ambitious approach for the second
player in this position.
4.g3 Be7;
5.Bg2 0-0; 6.0-0 c6!?; 7.Bb2 Nbd7;
8.d3, "+/=" {Diagram?}
which Reti himself used in a
tournament in the 1920's.
(White has a very small advantage.)
There are literally hundreds - if
not thousands - of Master games
in this line.
Probably the most recent
example, with GM's involved -
is the contest:
GM J. Horvath - T. Farkas;
The Hungarian Championship(s),
(tourn.) chT3, of02 (f), 2001.
***************
With the moves: 2...e6;
3.d4, {Diagram?}
Heading back to the main lines
of the Queen's Pawn Openings.
( Instead, with the moves:
3.g3 Nf6; 4.Bg2 c6; 5.b3 Be7; 6.0-0 0-0; 7.Bb2 Nbd7;
8.d3, "+/=" {D?}
we play this opening line the way
that Reti actually believed it should
be
played. )
3...Nf6; 4.Bg5 Nbd7;
5.Nc3 c6; {Diagram?}
we reach the main lines of the
normal variation of the line known
as, "The Queen's Gambit Declined."
(This line is over 150 years old!)
]
*************************
3.d4,
One of the most consistent moves,
White occupies and controls the
center.
With this move, we could also
transpose directly to a "Queen's
Gambit Declined,"
if both players
are so inclined.
[ It was not too late to play
the move:
3.g3;
{Diagram?}
trying to steer the game back into
a 'true' Reti Opening, or
even the
Catalan System. (And 3.b3 is also
fully playable.)
*******
After the moves - and the rather
unusual move order - we
reach the following position:
3.b3!? h6!?;
4.Bb2 Bf5!; 5.d3 Nd7; 6.g3 Ngf6;
7.Bg2 e6;
8.0-0
Bc5; "~" {Diagram?}
This is the "Lasker's Defense" to
the Reti Opening ...
a line I used
in tournaments for over 30 years. ]
3...Nf6;
One of the most consistent and
reliable moves for Black. The 2nd
player
controls the center, develops
a piece, and prepares castling.
(These are 3 out the 4 basic
principles of the opening.)
*************************
[ Black can also try:
3...e6!?; {Diagram?}
in this particular position.
After the {somewhat} wild moves:
4.Nc3!? dxc4!?;
{Diagram?}
The most provocative ... ... ...
and also the most ambitious.
( After the moves: 4...Nf6; 5.Bg5 Nbd7; 6.e3 Qa5; {Diagram?}
we reach the system of defence
to the Queen's Gambit - that was
first worked out in detail ... by the
great H.N. Pillsbury.
{THE CAMBRIDGE SPRINGS Defense.} )
5.a4 Bb4!?; {Diagram?}
Exploiting the 'hole' on b4.
6.e3 b5!?; 7.Bd2 a5; 8.axb5 Bxc3;
9.Bxc3 cxb5; 10.b3 Bb7;
11.bxc4 b4; 12.Bb2 Nf6;
13.Bd3!? Nbd7; 14.0-0 0-0; 15.Qc2,
15...Qc7; 16.e4,
"+/=" {Diagram?}
(White has a small advantage.)
we reach ...
"The Noteboom Variation."
This line is one of the sharpest and
most difficult lines that the
second player can employ in the Q.G.D.
Sanchon Guirado - Bellon Lopez; Barcelona, (ESP); 1989.
See the book: "Play
The NoteBoom," by Mark Van der Terf
and
also Teun Van der Vorm.
(c) 1996. (Published by Cadogan Chess.)
Chapter # 8, page # 79. ISBN:
# 1-85744-108-7
******* ******* *******
Black could also try: 3...dxc4!?;
4.e3!? b5!?; ('?!') 5.a4! e6;
6.b3! Bb4+; 7.Bd2 Bxd2+;
8.Nfxd2! cxb3; 9.axb5, "+/="
{Diag?}
I think that White
is at least a little better in this
particular position.
(The books
consider this position to be much
better for White, but virtually all
of
the "GM-versus-GM" games in
the database have been draws.)
I would have to say the most hard-fought contest would have been the
following key struggle:
GM Boris Gulko - GM Ivan
Sokolov; International Chess Tournament
/Groningen/NED/1994/ Drawn in 54 moves. ]
*************************
4.Nc3,
White simply develops a piece.
(It also controls the center.)
This is the simplest ... it is also the best.
Not to be recommended was Bg5
here, as ...Ne4; might force White
to move his Bishop a second time.
[ By playing the move:
4.e3,
{Diagram?}
White immediately guards
the
c-pawn ... but also allows the
2nd player the possibility of
playing
the Knight leap. (...Ne4) ]
4...e6;
The simplest ... and also quite
possibly the best move for Black.
(The only real drawback for the 2nd
player is now the light-squared
Bishop is closed in behind the
Pawn Structure.)
[ With the moves:
4...dxc4!?; 5.a4!?,
{Diagram?}
This is not the only move ...
e3 AND e4 are played here.
(Even Bg5 might work as well.)
The move a4 was played by both
Rubinstein and Capablanca. But
it was probably the Russians who
analyzed this system in great detail.
In particular, there are several nice
wins - which I saw in a book of his
best games - by Botvinnik; which
made an indelible impression on me.
( The sharpest line for White
is the move: 5.e4!?, {Diagram?}
but some modern GM's consider
this a somewhat risky approach.
(See the excellent book:
"The Slav For The Tournament
Player,"
by GM Glenn Flear.) )
5...Bf5; 6.e3 e6; 7.Bxc4 Bb4;
8.0-0 Nbd7; 9.Qe2 0-0;
10.e4 Bg6; 11.Bd3 Bh5;
{Diagram?}
The end of the column.
12.e5!?,
{Diagram?}
This is sharp - whether or not
it is best in not at all certain.
( Also possible was: 12.Bf4!?, at least according to MCO. )
12...Nd5;
13.Ne4, ('!')
{Diagram?}
Probably the most accurate
approach for White here.
( Possibly 13.Nxd5!?, "~"
{Diagram?} is OK
for White, although
the first player ... maintains a {very} "minimal edge,"
according
to the respected author
of MCO. ( - GM Nick de Firmian.) )
13...Be7; 14.Ng3 Bg6;
15.Bxg6 fxg6; 16.a5 a6!?; 17.Ne4 h6;
18.Ne1 Rf5; 19.Nd3,
"+/=" {Diagram?}
... and the position: "slightly
favors White, though the game is
strategically complicated."
- GM Nick de Firmian.
GM J. Ehlvest - GM D. Barua;
The (FIDE)
World Team Champ.
(Commonly known as an Olympiad.)
/
Yerevan, RUS; 1996.
[ See MCO-14; page # 477, column # 58, & also note # (m.). ] ]
*************************
5.e3, {See
the diagram ... just below.}
Probably the simplest ... and also
the sanest move.
(White guards the
attacked unit at c4 and prepares to
develop his King-side.)
{The main lines of this opening feature
White playing Bd3 and then a quick
castling on the King-side.}
***************
|
|
***************
[ The sharpest lines for White here
probably arise after the following
continuation:
5.Bg5!? dxc4!?; 6.e4!? b5!?;
7.e5 h6; 8.Bh4!? g5!?;
9.Nxg5! hxg5; 10.Bxg5 Nbd7;
11.exf6, "+/=" {Diagram?}
when White probably maintains a
small but clear advantage.
[ See MCO-14; page # 473,
columns # 44 through # 47. ]
This is the very sharp lines of the
system known as:
"The Botvinnik {and Geller!}
(ANTI-MERAN) Gambit."
I remember a very famous game
that was played between Garry
Kasparov
and Mikhail Tal in this
(very wild and crazy) line.
{This game was analyzed in depth
by many different chess magazines.}
I own several books on this line
and I have also played it numerous
times in 5-minute chess with other
Masters and Experts. But this line is
probably best left to postal chess ...
and the world's experts of this sharp
line. (GM Lev Polugaeyevky - before
he passed away - was considered
perhaps the world's leading expert
in this particular variation ...
especially from the White side.)
Currently the best opening book on
this particular (ultra-sharp) line is:
"The
Botvinnik {Gambit}
Semi-Slav," by
IM Steffen Pedersen.
Copyright (c) 2000. Published by GAMBIT Books. (UK)
ISBN: # 1-901983-26-9
The most recent (GM) example I
could find in this particular variant
was the contest:
GM Pedrag Nikolic - GM Rainier Knaak;
European Club
Championship; Rethymnon, Greece; 2003.
(An almost unbelievable contest ...
that was drawn ...
in just under
50 moves.) ]
5...Nbd7;
Once again ... this is probably
the best method. Just simply
develop ...
and most problems
will take care of themselves.
Lasker said, "Knights BEFORE the
Bishops," ... and here is a very
good practical example of the
correctness of this axiom.
[ Currently - - - the ultra-sharp
continuation of: 5...a6!?;
"~" {Diagram?}
is VERY much in vogue.
***
The very safe and sane move of:
5...Be7;
{Diagram?} is OK - developing the Bishop,
and also getting
ready to castle -
but isn't a very testing variation
for the first player to meet.
(White
gets a solid edge with simple and
straight-forward developing moves.) ]
6.Qc2,
{See the diagram just below.}
A VERY old move ... that is currently
all the rage again.
(See Bareev's win over GM Ivanchuk
from the FIDE Grand Prix, 2002.)
***************
|
|
***************
This play, (Qc2 on move six);
was
first tried in the contest:
O. Chajes - I. Kashdan; New York
Championships, (Rice CC)
New York, NY; (USA) 1924.
(As far as I can tell from various
CD-ROM and on-line databases.)
I am sure the idea of Qc2 is to simply
play positional chess ... and slowly
increase White's small edge in
space - in this position. (I think
the other
reason GM's use this
move is to avoid the over-analyzed
main lines of
this opening.)
According to the Informant DB ... this position has now occurred
literally
thousands of times at the
Master level! (and above)
*************************
[ The main line occurs after the
following continuation:
6.Bd3 dxc4; 7.Bxc4 b5;
8.Bd3 a6; 9.e4 c5!?;
10.e5!? cxd4!?; 11.Nxb5!,
"+/=" {Diagram?}
and White seems to maintain
at least a slight edge.
(The 'Semi-Slav,' Meran
Variation.)
I stop here because the lines
become very complicated, and it
is not really clear which of Black's
responses is the very best.
[ See MCO-14; beginning on
page # 457;
columns # 1 all the
way
through column # 30. ]
See also the excellent book: "The
Complete Semi-Slav,"
by IM Peter
Wells. Copyright (c) 1994.
(Published by Henry Holt Books.)
On a historical note, the move Bd3
on move six is very old.
The first strong master to use this move was
probably ...
H.N. Pillsbury in the late
1800's. ]
*************************
6...Bd6;
A common position in the Slav.
This is <also> the same position as
occurred in game one of Garry's
match
versus DEEP_Junior. (C)
(There Garry scored a very nice
and a very convincing victory.)
---> BUT! Although here we probably
used a different move order, the end
result is exactly the same. In other
words this is the exact same position
after six moves of Game One of Garry's Match versus DEEP-Junior.
(There the move order was 1.d4, d5.)
Black's last move is VERY good.
Black controls the center, (e5 & c5);
develops
a piece and prepares
King-side castling. The second player
is also prepared for
{an eventual}
freeing idea/break of ...d5xc4; and
then ...e5! If the second player is
able
to successfully execute this freeing
break - most of Black's problems will
be completely solved.
[ Also good is: 6...Be7; although the text (...Bd6) is sharper and more ambitious. ]
Garry now continues with the same
Pawn sacrifice that he (also) offered
in game one of his match vs. the
"Deep_Junior" chess program.
7.g4!?,
This offers a (possible) Pawn sacrifice
that Black should simply decline.
(See my (See my analysis
of the Kasparov -
Deep-Junior game for more details.)
Of course this is EXACTLY the same
move that was played in ... Game One
... of the Kasparov - DEEP_JUNIOR (C) Match.
[ Also ... VERY playable was the
simple, but effective, move of:
>/= 7.Bd3, {Diagram?}
followed by very rapid
development.
After the further moves:
7...0-0; 8.0-0 dxc4;
9.Bxc4, "+/=" {Diagram?}
a very common position in the
opening has been reached.
The
literally hundreds of master-level
games confirm the
judgment that
White is probably slightly better.
[ See MCO-14, page # 468,
column # 33, and all applicable
notes for this line. ] ]
7...Bb4; ('!')
{Diagram?}
This is probably the best move.
It is also the main line, and I am
tempted to award the machine an
exclam for
avoiding the silly and
inferior garbage that occurred in
the afore-mentioned game
against
the other program. (Deep Junior.)
***************
[ One on-line commentator
suggested that Black should
play:
7...b6; {Diagram?}
but this strikes me as a little
artificial.
(To say the least!)
The other contest saw the moves:
7...dxc4!?; 8.Bxc4 b6!?; ('?!')
9.e4!, "+/=" {Diagram?}
... Garry already had a clear and
very solid advantage ...
and went
to score a brilliant and smashing
victory.
GM G. Kasparov - DEEP_Junior (C);
"Man vs. Machine" Challenge
Match;
(Game #
1);
New York, NY; 2003. ]
***************
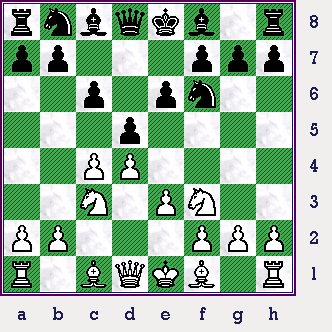
8.Bd2 Qe7;
9.Rg1!?, {See the diagram
just below.}
White appears to have a change
of heart, but since Garry played
this move SO quickly, I must believe that this was part-and-parcel of
Kasparov's pre-game
preparation.
***************
|
|
***************
This move was first played back in
1995, but it did not meet with success
in its initial outing. The computer(s)
mostly consider White to be solidly
better. Garry must have noticed this,
and decided Rg1 was a big
improvement
over the main lines.
{The main drawback to this move is that White can no longer castle on
the King's side.}
*************************
[ White could also try:
9.g5 Bxc3;
10.Bxc3 Ne4; 11.Rg1 b6; 12.0-0-0 Bb7; {Diagram?}
but GM Nick de Firmian
considers
this position to be UNCLEAR.
[ See MCO-14, page # 468, col.'s 33-36, and note # (j.). ];
**************
Several books give the following
line ... as the main line:
9.a3!? Bxc3;
10.Bxc3 b6!?; 11.Bd3 Ba6; 12.Qa4!?, {Diagram?}
GM de Firmian condemns this as
inferior ('?!'), but does not inform
us what move is superior.
( Maybe >/= 12.Bb4!?, ('!') instead? )
12...dxc4!; 13.Qxa6 cxd3; 14.Qxd3 0-0; 15.g5 Nd5;
16.Bd2!?,
{Diagram?}
This looks too routine.
( Maybe better is: >/= 16.e4! Nf4; 17.Qf1 f5;
18.e5 Nd5;
19.Qc4! c5; 20.0-0, "~" {Diagram?}
and White seems to have survived
the worst of his problems.
{A.J.G.} )
16...f5!;
"=/+" {Diagram?}
GM Nick de Firmian considers Black
to be CLEARLY better
here,
('/+'); ... and he may be right.
[ See MCO-14, page # 468; columns 33 - 36 ...
and {also}
(mainly) note # (j.), Part (B.). ]
GM B. Gelfand - GM V. Kramnik; EU Cup / Berlin, Germany; 1996. ]
*************************
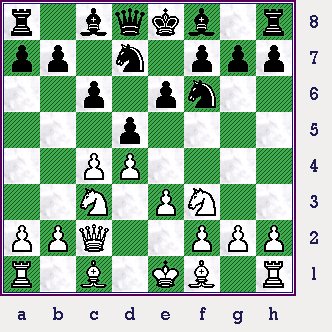
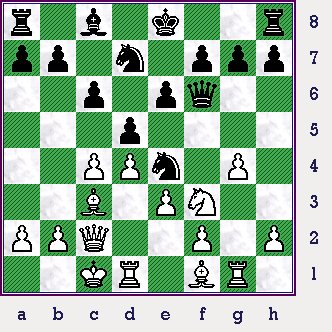
9...Bxc3;
10.Bxc3 Ne4;
{See the diagram, just below
here.}
At this point - - - I am pretty sure
we are still ... "in book."
(Or at least
I am sure we have NOT left the
confines of established
Master
practice.)
***************
|
|
***************
11.0-0-0,
(TN?) {Diagram?}
This was all played very quickly ... it must have been THOROUGHLY
prepared ...
- IN ADVANCE!! - by
BOTH sides for this contest.
[ Playable was: 11.g5; {Diagram?}
and also 11.Bd3, {Diagram?}
with approximately a level game. ]
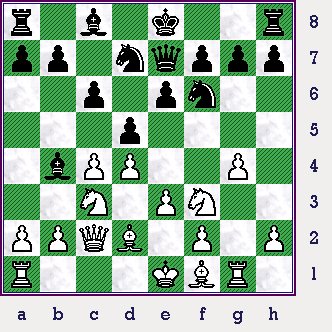
11...Qf6;
(TN?) {See
the diagram ... just below.}
A big surprise by the computer.
***************
|
|
***************
The positives of this try is that Black
is attacking White's Knight on f3.
{Which is currently unprotected.}
The main drawback is that this is
the second time the Black Queen
has moved
in the opening ... there
is a definite loss of time with this
method of playing.
*******
Garry
now sacrifices a Pawn for play. The next series of moves, (until
White's
17th move); appear close to being forced.
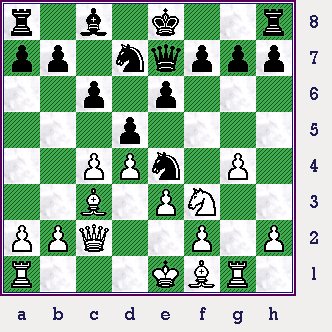
12.Be2! Nxf2; 13.Rdf1
Ne4; 14.Bb4! c5!;
Unless Black plays this move, (and blocks the a3-f8 diagonal); he will
never be
able to castle and get his King to safety.
***************
[ Black could have also played a line like the
following:
14...Qd8; 15.Bd3 Ng5;
{Diagram?}
This could be best ... but
nothing
is set in cement here.
*****
a). Black maybe could play:
15...a5!?; 16.Be1!?, "~" {Diagram?}
with an unclear position.
(Possibly 16.Ba3, here?)
b). But
definitely not: 15...f5?; 16.gxf5 exf5;
17.Rxg7,
'±' {Diag?}
and White is very clearly better.
*****
16.Nxg5!? Qxg5; 17.Qf2!? Qf6; 18.Qg3 Qd8; 19.g5, "comp"
{Diag?}
(but) White has "comp" here ...
as Black's King is stuck in the
center.
(The second player is
also {obviously} very behind the
first player in
development here.)
{Analysis.} ]
***************
15.cxd5!,
This appears to be the best
capture for White.
[ White can also play the other
capture in this position,
but after
the following moves:
15.dxc5!? Qe7; 16.Rd1!? b6;
17.cxd5 exd5;
18.Rxd5!?
bxc5!; "~" {Diagram?}
I think that Black is OK here.
(At least equal, "=" maybe better.) ]
15...exd5[];
I think that this is pretty much
forced for Black in this position.
[ The other capture is MUCH worse
for the second player, viz:
</= 15...cxb4?; 16.Qxe4 0-0; 17.Bd3 g6; 18.dxe6 Qxe6;
19.Qxe6 fxe6; 20.h4, '±'
('+/') {Diagram?}
and White is very clearly much
better in this position. ]
16.dxc5 Qe7;
This is also {probably} the best move for Black here.
[ Black could also try 0-0 here,
but that is not really clear.
16...0-0!?; 17.Nd2!?,
{Diagram?}
This is good, but maybe White
should play c6! here as
in the
actual game.
( Probably >/= 17.c6!, "+/=" is better. )
17...Qh6; 18.Bd3 Nxd2; 19.g5! Qh3; 20.Qxd2 Ne5;
"~" {Diag?}
Black could be OK
(maybe "=/+")
in this position. ]
17.Nd4!,
This is probably best.
[
After the moves:
17.Nd2 Nexc5; 18.Bb5 b6;
19.Bc6 Rb8; 20.Bxd5,
20...0-0; "~" {Diagram?}
the position is probably unclear. ]
*******
17...0-0; ('!')
This could be the best - some of
the alternatives here for Black were
distinctly UN-appealing.
*************************
[ Variation # 17B1.)
After the following continuation:
</= 17...Nexc5?; 18.Nf5
Qf8; 19.Rd1! g6; 20.Rxd5 gxf5; 21.Bxc5 Nxc5;
22.Rxc5! Bd7;
23.Bb5! Bxb5; 24.Re5+! Kd8; 25.Rxb5 Rc8; 26.Rd1+ Ke7;
27.Rc5 b6;
28.Rc7+ Rxc7; 29.Qxc7+ Kf6; 30.Qc6+, ("+/-")
{Diagram?}
White should be winning.
***************
Variation # 17B2.)
After the moves:
</= 17...a6?!; 18.Nf5 Qf8; 19.Bf3 Nexc5;
{Diagram?}
This could be forced.
( Not 19...Ndxc5??; 20.Bxe4, "+/-" )
20.Bxd5, '±' (Maybe "+/-") {Diagram?} White is clearly better.
***************
Variation # 17B3.)
The following line is inferior:
</= 17...Ne5?!; 18.Bb5+ Kf8; {Diagram?}
(and)
Black has lost his castling
privileges. ("+/=")
( Even worse is: </= 18...Bd7?; 19.Nf5, '±'
{Diagram?}
and White is close to winning. )
***************
Variation # 17B4.)
After the following line:
</= 17...Ndxc5!?; ('?!') 18.Bb5+ Kf8;
19.Kb1!,
"/\" {Diagram?}
White is clearly a little better ...
and Black has difficulty in properly
organizing his position. ]
*************************
The next few moves appear to be
nearly forced and/or are best.
18.Nf5 Qe5;
19.c6,
Winning material.
[ Possible was: 19.Bd3!?, with very dynamic play. ]
The next couple of plays are also
forced ... or best.
19...bxc6;
20.Bxf8 Kxf8!; ('!!') {See the
diagram - just below.}
A little bit of a shock, all the
commentators were expecting
Black to capture
instead with the
Knight here.
***************
|
|
***************
Most GM's would have avoided
this move on general principle. Fritz,
with its
ability to look at OVER four
million positions-per-second, the
program simply
looked at all the lines
and decided that its King was not in
any real danger.
[ Maybe 20...Nxf8!?; {Diag?} instead? ]
21.Ng3,
Kasparov decides to rid himself
of the Knight on e4.
***************
[ The computer ... and several
on-line commentators ... suggested
the move: 21.h4!?,
{Diagram?}
maybe with the idea of advancing
on Black's King position ... and
maybe creating some weaknesses.
********
A move like Qxc6!? could
much too risky for White ...
but this is not really clear:
21.Qxc6!? Rb8; 22.Qc2 Ndc5; 23.Nd4 Bd7; "<=>"
{Diagram?}
and I would say Black is OK
here, he has good play for the
material
he has sacrificed. ]
***************
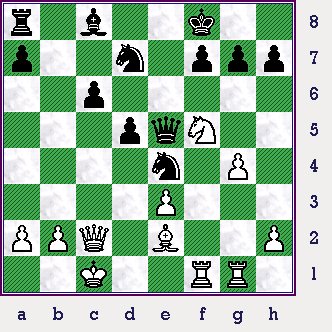
21...Ndc5;
22.Nxe4 Nxe4; 23.Bd3 Be6; 24.Bxe4!?,
{See
the diagram below.}
Garry played this rather quickly ... but I am not at all convinced that this
is the absolute best move here.
***************
|
|
***************
{Opening the a2-g8 diagonal for
the Black Bishop on e7 greatly strengthens
Black's position.}
[ I liked the move: >/= 24.Rf4!, "+/=" {Diagram?} for White at this point. ]
24...dxe4;
25.Rf4 Bd5;
Black's Bishop is a tower of strength
on the d5-square ...
and is almost
impossible for White to remove by
force.
Many of the commentators were
saying here that a kind of dynamic
equilibrium has been reached.
26.Qc5+ Kg8;
27.Rgf1,
With the obvious threat of capture
on Black's f7-square.
(The Black
Bishop would be unable to capture
in the current position ...
because
of the lateral pin ---> the BQ
would be hanging!)
[ Possible was: 27.Rg2!?, "+/=" {Diagram?}
(and) - White is slightly better.
]
27...Rb8;
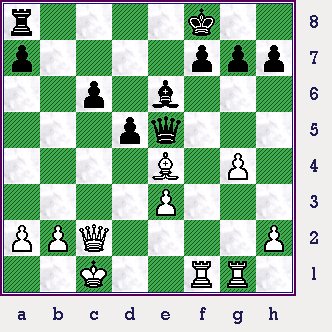
28.R1f2 Qc7; {See the diagram just below.}
This is a very important position.
***************
|
|
***************
Now Yaz says Black should think
about safe-guarding his a-pawn ...
and he might be right. Instead
Kasparov plays aggressively.
29.Rc2,
An aggressive move ... but one
that also protects the White King
by keeping the pieces nearby.
Of course White has the threat of QxB/d5!, PxQ; RxQ/c7 ... winning.
[ Maybe better is: (>/=) 29.Kb1, "~"
{Diagram?}
and White maintains the superior long-term chances in this position. ]
29...Qd7;
30.h4!?,
Garry continues to play ... "in his style," ...
which is to say, very actively.
[ The computer says it is better for
White to play the move:
30.b3, {Diag?}
but this creates a number of
weaknesses as well. ]
Thus far Garry has found nearly
all of the really tricky moves, but
now its is
Fritz/X3D's turn to find the
a fine tactical sequence.
30...Qd8!;
A good move - the main idea is to
attack White's Pawns and also
increase the scope of the Black
Queen in this position.
[ I had expected: 30...Rb5; "~" {Diagram?}
with good play for Black.
]
31.g5,
Thematic - with Black having a light-squared Bishop, White should try and
create weaknesses on the other
color-square complex.
[ Also interesting is: 31.h5, {Diagram?}
but Black retains fair
chances. ]
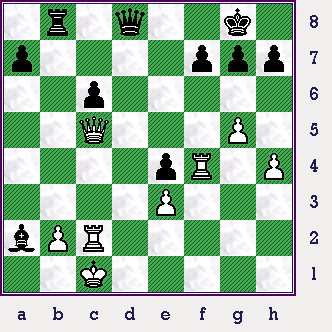
31...Bxa2!;
{See the diagram just below.}
The computer cries: ENOUGH!
***************
|
|
***************
This move not only re-establishes
material equality, the loss of this pawn
creates some distinct threats.
[ Perhaps Garry expected a
continuation something like:
31...Qf8; {Diagram?}
but after a move like:
32.h5!?, '±' White is very clearly better. ]
32.Rxe4,
After a long think ... Garry finds
the very best move.
***************************
[ The continuation of:
</= 32.Qxa7? Ra8; 33.Qd4
Bd5; "=/+" {D?}
only creates open lines to the
White King here.
********
And after the moves:
= 32.Rd2!? Qe8; "~" {Diagram?}
The computer retains the better
practical chances.
(The tactics
are going to be intense, the Queens
are still on
the board, and Garry is
running very short of time.) ]
*************************
32...Qd3;
33.Rd4,
This looks to be practically forced.
[
After the moves:
33.Qxc6 Qf1+; 34.Kd2 Rd8+;
35.Rd4 Rf8!; "~" {Diagram?}
I would be very uncomfortable as
White - with my naked King
stuck
out right in the middle of the board. ]
33...Qxe3+;
Now the game will resolve itself
into a draw by repetition.
(But there are still a few tricks left
in the position.)
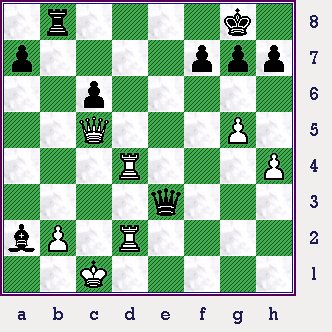
34.Rcd2,
{See the diagram ... just below.}
This is completely forced ... although
many on-line {titled} commentators on
ICC, and GM Yasser Seirawan did NOT
immediately grasp this fact!!
***************
|
|
***************
[ A brilliant and shocking sequence
would be the following moves:
</= 34.Rdd2?!, ('?') 34...Rxb2!!!; {Diagram?}
A truly unexpected move.
And While this is best ... it may NOT be the only move for Black.
( After the simple moves: </= 34...Qe1+!?; 35.Rd1 Qxh4;
36.Qe5 Rf8; "=/+" {Diagram?}
I would much prefer to be Black ("/+") in this position, as he has
a piece
and two pawns for the exchange. )
35.Rxb2, {Diagram?} While this is very ugly ... it is probably forced.
( NOT 35.Qxe3?? Rb1# .)
35...Qxc5+; 36.Rdc2 Qe3+!; 37.Rd2 Qc3+!; 38.Kd1,
{Diagram?}
This is pretty much forced.
( </= 38.Rdc2?? Qe1#. Or </= 38.Rbc2?? Qa1#. )
38...Bb3+; 39.Ke2 h6; ("-/+") {Diagram?}
with an easy win for Black. ]
*************************
The next few moves are all pretty
much forced for both sides.
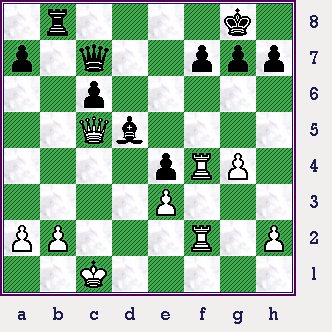
34...Qe1+; 35.Rd1 Qe3+;
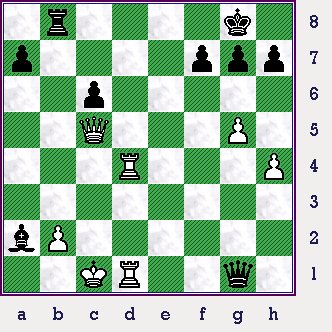
36.R1d2 Qg1+; 37.Rd1, {Final
Diagram, below.}
Here Garry talked to the arbiter ... the parties agreed to split the point.
A truly great draw ... one I did not
think would be exceeded for a
number of
years. Both sides played
very well, attack and defense really
canceled each
other out.
But with hindsight, after winning the
exchange out of the opening; Garry
must
have been kicking himself for
not winning this game. (One wonders
if he spent
a sleepless night trying
to find all the improvements ... and
if this somehow did
not affect his
play in Game Two - which he lost.)
***************************************************************
***************
|
|
(The final position in the game, just after 37.Rd1.)
***************
Copyright (©) A.J. Goldsby I
Copyright (c) A.J. Goldsby. Copyright (c) A.J.G; 2003 & 2004.
*************************
*****************************************************************************************************
(HTML code initially) Generated by the program: ChessBase 8.0
Chess diagrams generated by the program: ChessCaptor 2.25
Click HERE to go (or return) to the main/parent page for game number one. (# 1.)
Click
HERE
to go or return to the MAIN PAGE for ...
the Garry Kasparov-versus-Fritz_X3D match.
Click
HERE
to go (or return) to my main/home page
... for the ...
eternal, fierce battle between HUMANS and THE MACHINES. (the
boxes/computers)
This page was first posted - in very ROUGH form! - just a few days after the completion of the match.
Page (final) posting: DAY(unkown); January, 2004. This page was last updated on 06/07/12 .
*******************************
Copyright (c) A.J. Goldsby I
Copyright (©) A.J. Goldsby, 2002 - 2004 & 2005.
Copyright (©) A.J. Goldsby, 2006. All rights reserved.