
General Update
It's been some time since the last update. This has been because for the last 2 months of 2002 I had to study hard to obtain my CCNA (Cisco Certified Network Associate) certification. This was of great importance as it assisted me in obtaining a promotion at work which means I no longer have to work shift work. I now have my weekends to work on the car. :o)
Over Christmas number 2 piston was put back in the block and the sump and baffles were refitted. We also started looking into the design of the new extractors we will be making in the first half of this year.
The next job is to have the head re-surfaced in preparation for fitting with a new head gasket. This fitment along probably won't occur until around March or April, as I'm currently saving money in preparation for the purchase of a new road car, which is capable of towing - an EF/EL XR6 is looking the goods. This means I won't have much money to spend on the car until this new car has been purchased.
Over the next month or 2 I will be making a new rear crossmember for both myself and Matt Nade. The focus of the design of this crossmember will be to overcome some of the inherant issues the semi-trailing arm rear end has when it comes to putting the power down. I will document this on the site, so keep an eye out for that.
16 November 2002:
General Update
There's not alot happening with the car at the moment, as it's almost the end of the season and we don't feel it's worth rushing the car back together for a single race.
Below is a list of the jobs we have for the next 4 or so months:
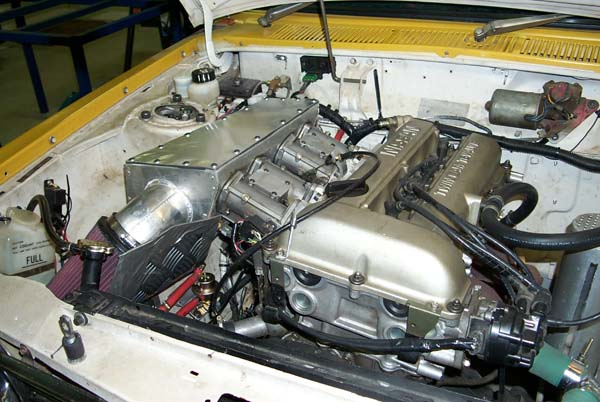
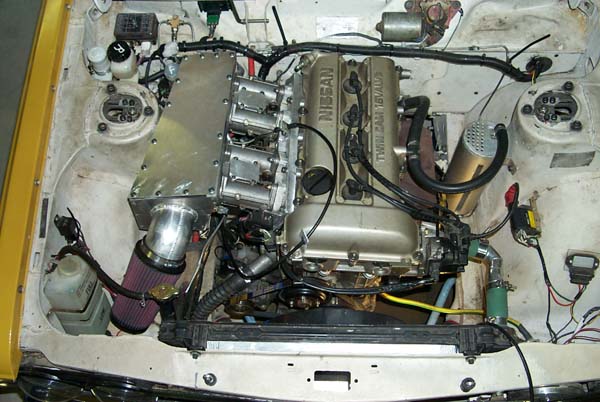
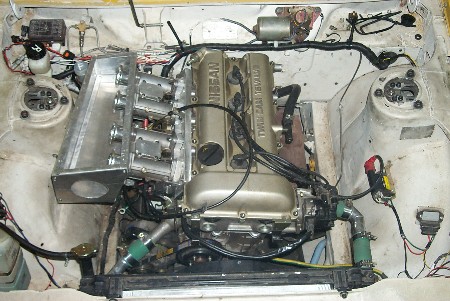
For the interest of the reader, below are some pictures of the engine and induction in completed form, taken before we pulled the engine to pieces chasing the misfire and low compression.
Completed Installation:

General Update
We've just decided to include the following pictures of the current state of the car peoples interest.
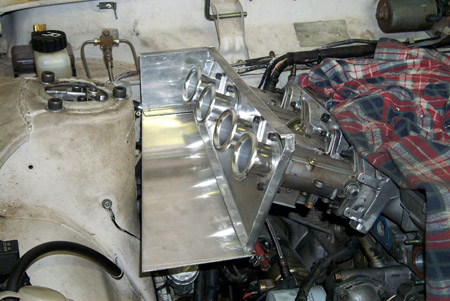
This first picture is of the engine bay, with the head and inlet removed.....pretty bare really:

The next step was to remove the valves and see if there was any signs of leaks:


16 September 2002:
The Search Continues
First apologies for not updating the site sooner, but in all honesty work has stopped on the car for the moment due to a temporary change in priorities.
The last 3 or so weeks have been spent trying to track down the source of the low compression. Having done everything we could think of to try and cure the misfire, we decided to pull the head of the engine to see if we could find the source of the low compression - and hopefully a link to the misfire. This was really a last resort, as we simply ran out of things to test.
We began by removing the cylinder head off the block with the manifold and throttle bodies in tact. 2 of the 3 sets of gaskets for the throttle bodies/manifold needs to be hand made, hence we wanted avoid having to remake these if possible.
Having removed the head, we inspected the gasket, block surface and head surface very carefully, to see if there was any evidence of a blow. We could find nothing wrong with these things, but had a friend check out the head and the gasket to be sure. He could not find any signs of a blow either.
The next step was to remove the valves. This involved removing the manifold/throttle bodies (in order to be able to get the valve spring tool into place) - but this was unavoidable. Having removed the valves, we inspected both the seats in the head and the mating surface of the valves for any signs of leakage. We paid close attention to the exhaust valves as the inlet valves weren't suspect (having run the car with the airbox lid off, there was no evidence of the fuel/air mixture being blown back up the inlet). Again, there appeared to be no problems.
The next check we did was to inspect the combustion chamber for cracks, especially around the valve seats. This was done with a commercially available flaw finding kit. This didn't reveal any cracks or obvious flaws, although we suspect it wasn't totally accurate. We therefore followed up with a close visual inspection, which again revealed nothing.
At this stage we felt that we had eliminated (for the time being) any sort of top end failure (despite the wet compression test indicating this to be the problem area). We therefore had a close look at the bore to see if there was any evidence of scoring, indicating a broken ring. The bore looked like new. At this stage we decided to remove the piston and check the rings - just to be sure. Again this revealed no obvious problem.
At this stage we are out of ideas. We don't want to put the engine back together blind (ie not knowing what the source of the problem is/was), yet this is rapidly becoming the only option. We have spoken to a number of people who have provided a number of possible causes - each of which we'll investigate. The suggested causes are:
The only other source we have not tried has been Phil Ryal of BRS Motorsport. We'll hopefully give Phil a call in the next week or so to see what his opinion is.
We'll begin reassembly of the engine around Christmas, but in the mean time we will continue to research the problem further. Any further findings from our research will be posted.
Should we not find the source of the problem and exhaust all sources of information, we'll begin the reassembly blind and pay careful attention to all steps of the process. If anyone reading this has any suggestions, they would be most welcome - even if you think we may have already tried it. We'd much rather cover all bases and try and put the engine back together knowing the problem, than put it back together still in the dark.
25 August 2002:
Major Disappointment
Well, a great deal has occured since the last update. We went testing last Wednesday (21st) to bed in the new Pagid pads, give the engine some exercise and let the driver learn the new additions to the circuit. We achieved half of what we set out to do, being successfully bedding in the brakes and allowing the driver to half learn the circuit. Unfortunately, we experienced a serious misfire which has pretty much destroyed our chances of making Wakefield Park.
We turned up to Wakefield at around 10:00am on Wednesday. We rolled the car off the trailer, set up the garage, assisted Matt (a mate who made the trek from Melbourne to test his Over 2L Improved Production 1600) to unload his gear and took care of the administration of using the track. From there we checked the wheel alignment and tyre pressures and prepared for the first session. From the first lap, the misfire appeared and hung around for the rest of the day. The symptoms were:
We first experienced this misfire in the last couple of runs on the dyno. We had managed to do about an hours tuning with no indication of the misfire, before it appeared. At the time we put the misfire down to low battery voltage not providing enough charge to the ignition. This is now obviously incorrect, as voltage was tested on the test day and turned out to be fine.
We then had the car on the road (legally - under permit), where it appeared fine. Then it began to misfire in the last part of the drive home (onto a major highway - 100kph - accelerating hard in 2nd gear).
At the test day, we tried a myriad of things including:
None of these things made any difference to the misfire.
At the end of the test day, Matt suggested we do a wet and dry compression test. This revealed that there was low compression in cylinder 2 (70psi as opposed to 120 psi in the other 3 cylinders). At this stage, we suspected this to be the culpret. When we got home, we decided to try a few more tests on the electrical system, just to eliminate it as the source of the problem. These included:
We again tested the car under load.....and the misfire remained. At this point we decided (with a bit of prodding from Matt - thanks Matt!) to pull the head and perform a leak down test. Having removed the head, we filled the combustion chambers with water and left it overnight (expecting to find a leak from number 2's combustion chamber the following morning). Sunday morning (this morning) greeted us with no leaks anywhere.
So at this point we're running out of options. As it stands, we will be crack testing the combustion chamber and valve seats, but beyond that we're not sure where to look. Unless a miracle occurs, we won't be competing at Wakefield - a MAJOR disappointment.
We have also tried to find a spare engine to put in, or a car to borrow which we could compete in. The closest thing we have is a mates rally car (pretty sure you wouldn't have minded Mark....LOL), but it doesn't meet the rules closely enough to be a viable option.
We'll keep the site up to date as things eventuate over the next few days.
As a final word, I'd REALLY like to thank Matt Nade for all his advice and assistance. Matt has pushed us to continue on and given a great number of extremely good suggestions to try and narrow the problem down. Thanks Matt.
8 August 2002:
General Update
There's not a great deal happening with the car at the moment as we're waiting for our upcoming test day at Wakefield Park on the 21st of this month. Matt Nade from Victoria is coming up to join us with his IPR Over 2 litre Datsun 1600, which will be great. There will also be a number of people coming along with road cars in various states of modification, which should make for some good spectating in the afternoon.
Our plans for the day are to bed in the Pagid RS14 pads, which we haven't had the chance to use yet. We also intend on giving the engine a good run, to ensure there are no problems. We will hopefully also do some further setup of the susupension, although this hinges on the purchase of a tyre pyrometer (which measures the temperature of the tyre). The pyrometer is important as it will tell us what the suspension is doing and how close we are with our tyre pressures (hotter outside edge not enough camber, hot middle of the tyre too much pressure and so on). We will also hopefully have the assistance of Errol in this endeavor, although this will depend on his availability. The only downside to the day will be that we will be running limited laps as the tyres on the car are approximately 1/3 worn and we don't want to wear them out before the race.
Timeline: in order for the car to be ready for the test day we only need to perform a bolt check to the front of the car and make a slight correction to the fuel map. Beyond that we only need to wash the car. This will happen slowly over the next week or so. That way the car will be ready a week ahead of time - which is the way we like to do things. :)
27 July 2002:
Dyno Tuning
On Saturday we took the car to Nash Offroad to do some tuning on their Dyno Dynamics dyno. We had predicted 4 hours worth of dyno work, which at $85 an hour was going to cost $340. Due to the expense of dyno tuning we had put together a tight schedule of jobs to achieve.
We arrived at Nash at 8:00 am. Michael had the car on the dyno shortly after our arrival and we were doing our first run by about 8:30am. The plan was to tune from 2500rpm to 7500rpm in 1000 rpm increments for each fuel load point (10%-100% throttle position in 10% increments). Due to the car using Avgas (ie leaded fuel) Nash do not allow you to use their lambda (O2) sensor - instead you must purchase your own. This is quite fair enough, but being we didn't have the budget for the sensor ($350), we planned to tune off max power. The process was to load the car at a certain rpm (say 4000) at a certain load (say 60% throttle) and tune the fuel mixture.
We began our tuning session, when we ran into an unusual problem. As the revs rose to around the 5500 rpm mark, the link between the ECU and the PC dropped out. It was fine below this threshold, but dropped and stayed down beyond it. After about 20 minutes of messing around we finally discovered it was a problem with the cord in the PC. For some inexplicable reason at 5500 rpm, the power cord would cease to provide power to the PC (due to a dodgy plug) and the link would fail. We worked around this by pulling the power whenever we did a run in excess of 5500 rpm and ran the PC off the battery.
As we got to the end of our first hour of tuning, it became apparant that the method of tuning wasn't very successful. Once the car was under load, the adjustments made to the map weren't providing any significant change to to power rating on the dyno. To make things worse, as heat soak set in on the inlet, power was dropping off regardless of adjustments made to the map which made it hard to decipher a positive adjustment from a negetive one. After about 45 minutes of trying to get this process to work, it was abandoned in favor of a suggestion presented by Michael.
Michael suggested that instead of tuning each individual load points, that we instead tune the overall map utilising the Overall Fuel Trim feature. At least that way we would know if we were headed in the right direction or not. We thought this was a good suggestion and hence we began our first power run to get a baseline. The first run yielded 92 kW's at the wheels. This was a reasonably pleasing figure as we'd been expecting more around 80-85 kW's at the wheels at this early stage. We then decided to richen the map by 5%. This gave an immediate increase of 4 kW, taking the peak to 96 kW. The map was richened a further 3% to 8%, giving an increase to 100.5 kW's. At this stage we pulled all of the spark plugs to check their condition and look for signs of detonation. The plugs looked perfect, with no sign of detonation.
We were reasonably surprised that the engine was responding so well to extra fuel, given that it was already running much larger injectors than standard. We then upped the trim to 12%, which resulted in a loss of 1.5 kW, reducing peak power to 99 kW. It was around this time that the car began to suffer a misfire. This was tracked down to the altenator not charging the battery properly, resulting in low battery voltage and ignition breakdown. We subsequently discovered a crimp had begun to fail. We decreased the trim to 10% and tried another run, but the misfire threw the results. At this stage we decided to leave the mixture as was, given that the plugs had looked good at 8%, giving us a 2% safety margin. You can go here to see the dyno sheet.
Overall the day was reasonably successful, given the results. We didn't learn as much as we wanted to about how best to tune the car, but we will research this further before the next dyno day. The only real dampner to the day was finding out that the price of dyno hire is going up from $85 to $110 next month. Being that the majority of other dyno shops are charging around $85 an hour, it will be hard to justify going back to Nash. This is a great pity as their service was excellent and Michael was and enormous help.
We are now at the stage of preparing the car for it's test day before the race on the 31st August/1st September. There isn't alot to do, just a few small jobs such as a full bolt check of the car and ensuring there are no fluid leaks. We will be testing on the 21st of August. The purpose of the test will be to bed in the new Pagid RS14 pads, give the engine more of an exercise and give the driver a chance to get used to the car again. :)
12 July 2002:
The Engine Lives!!!
On Wednesday afternoon we successfully fired up the car for the first time in 18 months, with the new modifications.
Having spent Tuesday night checking the wiring of the injectors (which was incorrect), re-caliberating the TPS and checking hoses and checking wiring, there was little to do on Wednesday. We rewired the injectors to fire in the correct order, did a last visual check and tried to start it. The first problem we ran into was that the battery was flat, despite around 14 hours of charging - not overly suprising given it's sat unused for 18 months. We hooked up another battery via jumper leads and tried again. After around 4 or 5 rotations it coughed into life - coughed being the operative word. Due to the new injectors, it was obviously running excessively rich (filling the garage with smoke), hence we stopped it (or more accurately let it die) and leaned out the map by 10%. That gave an immediate improvement and it would at least hold a given rpm with a given throttle input. We leaned it out by another 5%, wound up the idle and let it sit for about 10 minutes to warm. All of this time we were intensely looking for any fluid leaks or other problems - of which there were none. We then decided to lean the mixture out a further 15% (making a total of 30%), which made the car idle almost like a standard engine - which was a total shock. We allowed it to idle for another 10 minutes or so before we decided to take the next problem - the rear brakes.
During it's long sit, it would appear that the rear calipers had sized in place. This meant that the car couldn't be rolled as the rear wheels wouldn't turn. With the car running it was decided to do a couple of gentle runs up and down the driveway in order to see if we could unsize the the rear brakes. These runs only seemed to make things worse. We then decided to take the car for a quick run down the street (~150M) to see if they would give with a bit more speed. This actually made this worse still, to the point where in order to get the car back in the driveway, it required some reasonable revs from a recently reassembled engine(5000 rpm).
Having finally got it into the garage using exceesive revs, we jacked it up to have a look around. Seeing nothing we dropped it back on the ground......at which time it rolled forward like it was on ice. In summary we now believe that the cycle of heating and cooling, caused the corrosion to give, allowing the rear wheels to turn freely.
8 July 2002:
One job from starting...
As per the title, we are just one job off starting the car - hooking up the regulator to the fuel rail. This will involve 4 pieces of hose and 3 x 90 degree bends - all up probably 20 minutes work. We'll then perform some basic checks before starting the car. These will include recaliberating the TPS (Throttle Position Sensor), checking the timing, testing the injectors (the ECU allows each injector to be manually tested), priming the fuel system, checking oil and water levels, re-Molybonding the cams and a general look around. Then we'll turn it over and hold our breath.....
Here's a summary of the past week - a week in which I've averaged about 4 hours sleep a day (night shift and working on the car will do that to you).
That's about it. Tomorrow the last of the fuel lines will be hooked up and some preliminary checks done. We are planning on turning it over on either Tuesday or Wednesday afternoon, depending on when Dad can get time off work. Having a second brain and set of eye's will be very important when doing the preliminary checks to ensure nothing get's missed.
We're hoping to have some pictures up within the next week or so. As I don't own a camera myself, I haven't been able to take pictures of the recent advances, but I'll do my best to get as much detail as I can.
Timeline: Tomorrow the regulator will be hooked up to the fuel rail. Tuesday or possibly Wednesday the car will be fired up for the first time.
2 July 2002:
Update.
We received the fuel rail back from Errol yesterday. It was tested with the air compressor to check that it would hold 60psi (approximately twice the working pressure). It actually leaked around one of the welds I had performed. This leak was remedied using fuel tank repair putty. It is now tested safe to 60psi.
Today we received the mandrel bend from Errol. This will be marked against the airbox and taken back to Errol for TIGing. This will hopefully occur tomorrow and we'll pick up the completed airbox on Thursday. This is the final piece of fabrication. From here on it will be only assembly and checking.
Timeline: The mandrel bend should be welded to the airbox by Thursday. Thursday will see the beginning of the final assembly of the airbox involving sealing, making up of gaskets and wiring up the injectors. Over the weekend we will be add the last of the fuel hoses between the airbox and the fuel pressure regulator. From there we will do a thorough check of all modifications before attempting to start the engine. All going well, the engine should be first turned over around Tuesday.
28 June 2002:
Update.
The carby/throttle body sleeves were finished on Tuesday and are now installed. This has allowed us to permanently bolt the manifold and throttle bodies to the head. A few other miscellaneous jobs have also been completed such as bolting on the exhaust manifold/system, bolting on the oil overflow can, the purchase and installation of the new clutch master cylinder and remote resevoir and the addition of the mandatory front window sticker.
There was a bit of concern earlier in the week with the news that CAMS are now proactively checking harnesses for their used by dates. Being I was given my new harness as a gift around 12 months ago, there was a small chance that it would exceed the 5 year used by date - it had been on a shelf in the UK for an unknown period. Having checked the harness, it has an end date of 2005...which has provided a great deal of relief.
CAMS are also checking on fire extinguisher end dates. Having checked the ones in the car, we will need to have these serviced before the upcoming event. They are 12 months overdue, which isn't overly surprising since the car hasn't moved for about 18. :)
We are now left to wait on the parts from Errol. Errol has been quite busy lately and hadn't had a chance to do it by Wednesday. He has assured us that it will be ready by Monday, hence we should be back on track with the reassembly next week.
Timeline: Once we have the parts from Errol, we should have the assembly completed by Thursday. This should allow us to give the car a trial start early the following week.
24 June 2002:
Update.
Things have been progressing at a rapid rate with the car (so much so, there hasn't been time to update the site) and we are now only about a days work away from starting. We are currently waiting on Errol to complete the second set of modifications to the fuel rail and make up the 3.5 inch mandrel bend to mount the air filter. Once these things have been done and the mandrel bend has been TIGed onto the airbox, we will only need to bolt in the fuel rail and seal the airbox before doing the final checks before starting. All VERY exciting.
We also recently purchased a close ratio gearbox for the car. It was purchased off a good friend and is a 240K box with a Holinger 2 gear conversion. For the uninitiated, a 2 gear conversion replaces 1st and 2nd gear in the box with different ratio's, pushing the first 2 changes (1st-2nd and 2nd-3rd) closer. This should help us a great deal off the start line. We're presently unsure as to whether we'll be running this in the Aug/Sept event, as we are running tight on time. If the chance arises though, we will put it in.
Timeframe: In the next 2 days, we will be putting the finishing touches on a few things, such as fitting some sleeves to the carbies/throttle bodies (to ensure there is no air leakage) and re-caliberating the throttle position sensor. Other than that, we'll wait with baited breath to get the parts back from Errol.
5 June 2002:
Some new pictures.
Being I haven't had time to create a new section, here are some pictures of where things stand. I will endeavour to create a timeline section, a fuel rail secton and an under the cam cover section in the next week to provide further detail on these aspects of the motor.
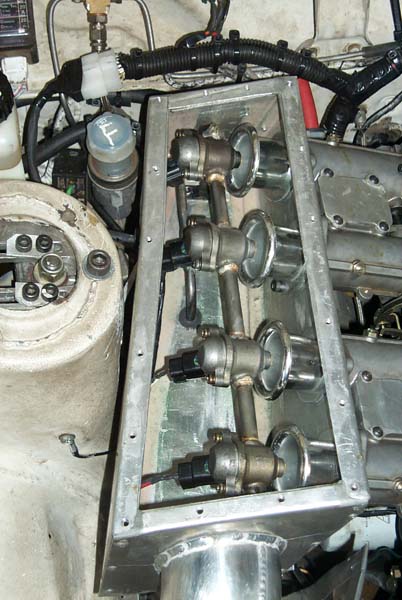
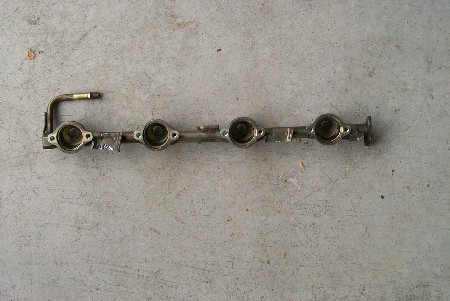
Fuel Rail:(old on the left, 2/3 modified on the right)
Unfortunately this view doesn't show very clearly how the distance between the injector housings has changed. The distance between injectors 1 & 2 and 3 & 4 has been reduced, while the distance between 2 & 3 has increased.


Fuel Rail Mounted.
The fuel rail is now phyically mounted in the airbox. It utilises 2 legs on the injector housings for cylinders 1 and 4. Pictures should be up within the next 5 days or so.
Next step is to drill the ends of the fuel rail to accept the new steel hose to carry the fuel into and out of the airbox. Steel line is being used in case of a backfire. The steel hose for the end closest to the front of the car is straight forward with a hose dropping vertically through the bottom of the airbox. The end towards the back of the car is a bit more tricky as the steel hose needs to be bent into an "S" shape so as to allow it to exit around the middle of the airbox (where there is a bit more clearance underneath). This is causing some minor headaches as all the pipe benders we have looked at purchaseing appear to give bends with too large a radius. This issue will hopefully be sorted out by this Monday. From there it's a simple matter of taking the rail back to Errol for everything (end plugs and new steel hose) to be brazed on.
Over the course of the coming weekend, new brackets will be made to relocate the throttle cable, which is not sitting at the desired angle. In addition to this a new exhaust manifold gasket will be sourced to re-mount the exhaust system. This will also allow the re-fitment of the blow-by canister.
There isn't a great deal more to be done from here until around the 15th of next month when more funds become available. The 2nd half of the month of June will be very full on, with the car needing to be completed by around the 5th of July. We will also need to have started the engine and run in the cams by then. The second half of July will see the car being taken to the dyno for tuning. A timeline page will be added in the near future.
22 May 2002:
Major Advances....
In the last few weeks there have been some major advances in getting the car closer to starting again. The fuel rail has been successfully shortened (although it still needs other modifications), the fuel injection wiring loom has been split and 1/2 of it re-routed, the piston to valve clearance has been checked for all camshaft settings and the throttle cable has been modified and fitted - we now have a working throttle. On top of all of this the engine bay is pretty much back together after fitting the radiator and other accessories.
The piston to valve clearance was checked after making up a shim to lock solid one of the Hydraulic Lash Adjusters. The engine was hand rotated with a 1.5mm shim on top of the valve (to give extra lift to compensate for rod stretch) at each setting of the vernier cam sprockets. This was done to ensure that when the cam timing is tuned, there will be no clash between the pistons and the valves.
In terms of the fuel rail, each of the injectors is now in the correct position, lining up with the centre of each throttle body. The next phase is to plug the ends of the rail and make new steel hose to carry the fuel out of the airbox. This will occur over the next 2 weeks.
This Thursday we will begin the final phase of modifications to the airbox, with the exception of mounting the air filter (which has been purchased).
Here's a couple of pictures of the airbox as it is now:


Fuel Rail Solution Found!!!!
A solution to effectively shortening and sealing the fuel rail has been found!!! Having spoken to a local fabricator/machinist by the name of Errol, we have decided to utilise a machined sleeve on the inside of the fuel rail which will be silver soldered in place. Errol confirmed that trying to get a MIG weld to seal at 60psi would be bordering on the impossible and recommended silver soldering. The fuel rail is now with Errol and should be ready to be picked up early this week. The rail will be shortened, although more modifications are needed. While the injectors will now line up with the throttle bodies, the ends for the rubber hose will still be standard - which isn't of any use. Next task is to make up a plug for the end which used to hold the fuel pressure regulator (an external one will be used), the plug then being drilled to accept a new host fitting. Then the other end will need to have the metal hose cut off, the hole sealed and a new steel hose fitted in the correct location. The point to all of this is to allow the flexible rubber fuel hose to connect to the fuel rail from the bottom of the airbox. All up, it would appear that the fuel rail will be finished and mounted in the airbox in approximately 2 weeks.
The airbox itself has had the hole for the air filter inlet pipe cut and the next step is to have the pipe welded on. This pipe is simply a piece of large diameter alloy tube to mount the pod type K & N filter.
Photo's have been taken of the almost complete airbox as well as the standard fuel rail for later comparison. These pictures should be up within the next week.
Timeframe:We should be picking up the fuel rail from Errol on Tuesday of this week. From there it is only a matter of making cutting off the old steel fuel hose and taking it all back to Errol. We will also be endeavoring to start making the shim to fit inside the hydraulic lash adjuster so as to check cam timing. With an upcoming holiday, some of these jobs may not get completed.
13 April 2002:
Fuel Rail Saga Update
Finally an update on the fuel rail saga. Today we tested to see if it was possible to heat up the joins in the fuel rail and pull them apart. The theory was that there was a small chance that Nissan may have used brazing to put the fuel rails together. This however has proved not to be the case - the joins are definately welded. This leaves us in the position where we need to come up with another solution.
We will now endeavor to find some copper pipe to sleeve the fuel rail where it is cut and welded. Silver soldering will be used to seal the joins. There is still the issue of the ends of the fuel rail where a sleeve isn't a workable solution. In the next few days we will endeavor to find a way around this problem.
So, in summary, we will now search out some copper for use as a sleeve and try and figure a way to cap off the ends of the fuel rail without resorting to welding.
Timeframe: More work will be done on the car on either Tuesday the 16th or Wednesday the 17th. If there has been no further progress with the fuel rail, work will begin on making the shims to check the cams.
31 March 2002:
General Update
Still nothing's happened on the car!! The road car broke a clutch this week hence no further work has been done on the race car. Predicting timeframes seems to be unlucky, hence I won't give one.....except to say soon. :)
25 March 2002:
General Update
Due to work commitments, the car has not progressed any further. Work should begin this Thursday as more fee time becomes available.
18 March 2002:
Further Injector/Airbox Update
The airbox is now 90% done. All that is left to do is TIG a mandrel bend onto the front wall of the airbox, to mount the air filter. The mandrel bend will be around 30 degrees and put the filter roughly behind the headlight for cool air.
With regard to the injector rail.....there have been a number of problems. The rail was modified as stated below, but problems arose when it was pressure tested. The welds were porous, for reasons we are unsure of. The modified rail was tested by putting a small amount of water in it and then hooking it up to an air compressor. It was then filled with air using a tyre pressure fitting. Water bubbled from any holes present - and there were alot of holes!!!! The joints were ground back and rewelded a number of times (each time trying to perfect the weld), but with no success. Another option was then tried, which involved welding new pipe to the actual injector housings. This proved unsuccessful due to there not being enough clearance between the new fuel pipe and the flange which mounts the injector caps to get the welding tourch in and seal the joint.
The new plan of attack is to see if it is possible to melt the factory welds (which look like they may be braze). If this is the case then the housings will be removed from the standard fuel pipe, the pipe shortened and the housings brazed back on. Only time will tell if this is possible.
Timeframe: Testing of another fuel rail will begin on Tuesday or Wednesday.
2 March 2002:
Injector/Airbox Update
The SR20 Turbo injectors and fuel rail have been obtained off an imported 180SX. The mounting arrangement for the injectors and fuel rail are exactly the same as the RWD N/A SR20 fuel injection arrangement we have. Work will start on modifying the fuel injection rail later this week and it's expected to only take a day of work.
The method to be used for shortening the distance between the injectors will be to cut a sufficient amount of material out of the existing fuel rail and then weld a sleeve over the join. This will make the job of keeping the fuel rail symetrical while welding it much easier. To extend the fuel rail in the centre, the same approach will be used.
The ends of the fuel rail must also be modified, so as to ensure the metal flares for the rubber fuel hose are located in a convenient position (to prevent the hose crimping due to a tight angle). To do this, solid steel bar will be drilled to a set depth (ie not drilled through), still leaving the end blocked. This will then be cross drilled to allow the fuel hose to connect the the fuel rail at 90 degrees. These end caps will then be welded onto the end of the fuel rail. Photo's of the modified fuel rail will be added to the page within the next 2 weeks.
15 Feb 2002:
Injector Trauma
Having had a closer look at the airbox, it's been decided that trying to fit FJ20 Turbo injectors is going to be too difficult. Having re-assessed the standard SR20DE injectors, it appears that the best option is to use SR20 Turbo injectors (to ensure enough fuel is supplied) and fit them to a modified fuel rail. The modificiations will consist of reducing the distance between the injectors for cylinders 1 & 2 and 3 & 4 and increasing the distance between injectors 2 & 3. It will also be necessary to remove the old mounting brackets and replace them with new ones. Finally, the hose fittings with need to be modified.
There's alot of work ahead, as while these jobs don't constitute much in the way of difficult fabrication, it will be very fiddly. This job has now taken precedence over all else, as once the injectors are mounted, there's not much fabrication left to do before it's ready to start.
13 Feb 2002:
Vernier cam sprockets have arrived
The vernier cam sprockets arrived from BRS Motorsport today. This means that the timing of the cams and the checking of valve clearance can now be completed. This will probably occur over the next couple of weeks.
11 Feb 2002:
Update on the airbox
The initial construction of the airbox is almost completed with only the lid to be made and a filter arrangement to be installed. The next step from here is to mount the fuel injectors - which looks like being a harder job than first thought.
The initial intention was to mount FJ20 Turbo injectors at the trumpets. Problems then arose with clearance between the back of the airbox and the brake master cylinder for the front brakes. Due to this lack of clearance, the rear section of the airbox has been reduced in size. This in turn means that there is less room to mount the injectors. From the looks of things at them moment, the FJ20 Turbo injectors will be replaced with SR20 Turbo injectors on a modified fuel rail.
Current status: Once the lid for the airbox has been made, the task of mounting the injectors will begin. This will probably occur over the next 2 weeks.
NOTE: the pictures below were taken before the left side and front panel were completed.

Currently there are 2 things we are working on.
Timing of the new camshafts
Being the cams in the SR20 operate with a follower style valve train with Hydraulic Lash Adjusters (HLA's), there are some intricacies involved in timing the camshafts. In order to check the piston to valve clearance and mark the sprockets for timing, it is necessary to modifiy one of the HLA's so that it becomes mechanically solid. This is being done by fabricating a metal shim from 12mm mild steel bar (if we decide to make all the HLA's solid, silver steel will be used), to replace the spring and high pressure valve in the HLA. This will ensure that when the cams are hand turned (and the cam actuates the valves via the rocker), that the HLA cannot bleed down. If the HLA bleeds down, the valves are opened less and hence any measurements are not accurate.
Current status: the 12mm round bar has been obtained and measured to fit. The next step is to cut it to size and begin the slow process of modifying to to the correct height. This will take place over the next 2 weeks.
Making of the airbox
An airbox needs to be made to house the injectors and capture cold air for the induction system. This is being made from 1.6mm aluminum sheet (cost of $24) and will be approximately 3-4 litres in capacity. It will be mounted by the trumpet bolts, sitting it between the inlet trumpets and the throttle bodies. It will be sealed with a marine sealant which is fuel proof and air tight.
The fabrication of the airbox is going to be a tricky affair, it is and extremely tight fit. The main problem area is the rear wall, which if made vertical, will foul on the clutch master cylinder. Therefore, the rear wall will first drop vertically from the lid of the airbox, then slop towards the front of the car. Being we don't have any sheet metal bending tools, all of this will be done with a hammer and some angle iron.
Current status: The alloy sheet has been obtained and the design for the airbox sketched out. Work will begin on the airbox in the next couple of days.
