Figure 3.1 Control Panel showing Drafting Options tab.
Table of Contents.
Lesson 1: Fundamental Drawing Skills and a Simple Simulation.
Lesson 2: Introduction to Frequency and transient Analysis.
Lesson 3: Configuring LT Spice and more Drawing controls. This page.
Lesson 4: Locating, modifying, and installing vacuum tube models.
Lesson 5: Operating point of vacuum tube circuits. Introduction to stepping and plate curves.
Lesson 6: Finding, installing, and using, potentiometer symbols and models.
Lesson 7: Transient analysis of unregulated power supplies.
Lesson 8: Transient analysis of power supply regulators.
Lesson 9: Transient and frequency analysis of amplifiers with feedback.
Lesson 10: Lossless transformers.
Lesson 11: Making symbols and models.
Lesson 3,
Configuring LT Spice and more Drawing controls.What you will learn in Lesson three. How to:
- Change the line width on the schematic.
- Change the font size on the schematic.
- Setup a hotkey to run the simulation.
- Pan the schematic window.
- Zoom out when you are running out of room.
- Zoom to fit the drawing.
- Center the schematic in the window.
- Move a single component.
- Move groups of components.
- Copy and Paste within a drawing.
- Copy from one drawing and paste to another.
- Draw a neat Schematic. (Optional).
- Export a schematic or graph to another program.
- Change the quantity that is plotted on a graph.
- Change the scales on a graph.
Changing the Line Width on the Schematic.
Press alt-F and load Lesson 02.asc.
Press ctrl-B a couple of times which will pull BACK the camera, that is zoom Back.
In the following steps you are going to customize the schematic drawing board to suit your visual acuity.
Does the line width look right? Are the lines too thin? Are they too thick. If they are just right skip the indented steps.
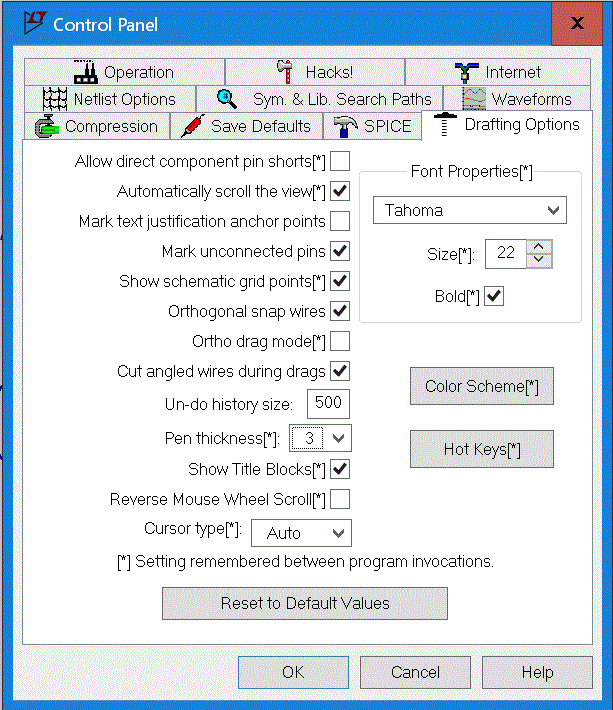
Click on the button with the icon that looks like a hammer. This opens the control panel. Now zoom out more by pressing ctrl-B until the diameter of the generator circle is approximately 7/16 inch (11.11 mm).
Select the Drafting Options tab.
Click on the drop down list next to Pen Thickness. Set it to your preference.
Click OK.
How does the font size look to you. Is it too big? Too small? If it is just right skip the indented steps.
Click on the button with the icon that looks like a hammer. This opens the control panel. Here you can see my choices. I don't remember what the default settings were but these are the settings that I am most comfortable with.
Select the Drafting Options tab.
Select the font type of your choice and try different sizes till you find one you like.
Try it with and without the bold box checked.
Click OK.
Figure 3.1 Control Panel showing Drafting Options tab.
Setting up a hotkey for running the simulation.
Once again open the control panel (the hammer) and select the Drafting Options tab.
Click on the Hot Keys[*] button.
Look in the second column about 3/4 of the way down. You are looking for Run Simulation.
The box to the right of the text will contain (none).
You want to replace it with F10. Click on the word (none). You now have about 5 seconds to press the F10 key.
Now select the Wave Forms tab.
In the first column find Run Simulation.
Click on the word (none) and press F10.
Click OK>
You have now setup F10 to run the simulation regardless of whether the schematic or waveform window has focus.Panning the schematic diagram.
Write a negative review of it. No! Not that kind of pan.
Left click and hold on a blank part of the drawing board. Move the mouse and the schematic will follow. There may be a little time lag depending on the speed of your computer. When you have it where you want it, release the mouse button.
Zooming out.
The default zoom setting for the schematic window provides a rather small area in which to draw. As you fill it up you will need to zoom out.To zoom out press ctrl-B. Yes, it's really that simple.
Zoom to fit.
That one is even simpler.Just press the space bar.
Centering the Drawing.
The zoom to fit crowds the edges of the schematic very close to the edges of the window. There may be times when you want to use a spice drawn schematic in a presentation of some kind. The schematic should have some margins to give it a more pleasant appearance.To do that, press the space bar and then ctrl-B one or more times until it has the desired appearance.
Moving a single component.
To move a single component click on the open hand icon or press F7.
The cursor will turn into an open hand. The dot in the center is the active part. It must be on the component to select it.
Move the cursor over one of the components and left click.
Move the mouse and the component moves disconnecting its wires.
To drop it somewhere left click again.
You can pick it up again by placing the hand over the component and left clicking.
Move it back to where it came from and the wires will reconnect.
To get out of move mode right click the mouse.
Moving a Group of Objects.
Select the closed hand or press F8.
Click and hold the mouse button to draw a box around the generator and resistor.
If you got it right, after you release the mouse button the generator and resistor will move with the mouse but their leads will remain attached.
Move the generator and resistor to the left some distance and left click.
They will remain where you put them.
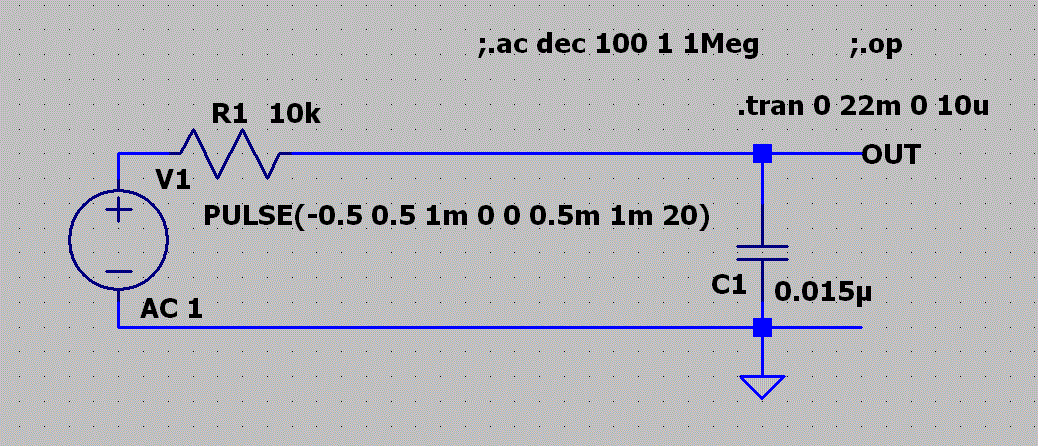
Figure 3.2 Showing generator and resistor with leads stretched out.
Sometimes a component is just too close to others to draw a box around it alone. In that case press F8 and click on the single component. If the part is in a long line such as the resistor in figure 3.2, you can slide it along the line without distorting anything. You can move the resistor to the middle of the line and then perform the steps in the paragraph below.Now press F8 and draw a box around the resistor only.
Move the mouse up to duplicate the picture below.
Left click to fix the resistor in place.

Figure 3.3 Showing resistor lifted high above with leads stretched out.
This is one that you can spend a lot of time playing with. See just how badly you can mess it up. Then use undo many times to straighten it out.
F9 is undo.Copy and Paste Within a Drawing.
LT Spice does not strictly adhere to the windows protocol for copy and paste. However ctrl-C does work although it is not documented. This exercise includes some practice with the group move, called Drag, and single move called move.
The goal here is to pull the generator a little to the left so it can be separated from the resistor.
Note: LT Spice works on a verb noun order which is the reverse of most windows commands. In other words you first tell it what you wand done and then tell it what to do it too.
Press F8 which is the group drag.
Then draw a box around the generator being sure that no part of the resistor is inside it. Part of the generator will be outside.
Move the mouse to the left and you will see the wires disconnect from the generator and stretch out as you move them.
Move them 2 or 3 dots to the left and left click.
Now press F7, single object move, and left click on the generator.
Move it to the left until the terminals matchup with the connecting leads.
Left click again.
Now you can work with the diagram. If in your drawing any of the spice directives are close enough to the schematic parts that they might be included in a drawn box, use the move command to move them farther away so they won't be duplicated.Press F7 then click the word OUT and move it upwards to get it out of the way.
Click a second time to drop it.
Now press ctrl-C and draw a box around the resistor and capacitor including the wires that extend to the right from the capacitor but not including the ground symbol. Do not use F8.
Move the mouse to the right and you will see a second resistor and capacitor with its connecting leads but not any leads to the left.
Match the lead of the resistor with the lead from the top of the capacitor.
Left click again.
There may be a gap in the ground line. If so, press F3 and fill it in.
Now press F7 and move the word OUT back to the right end of the circuit.
You should now have this diagram. Press F10 and the graph you see in the figure will probably be empty.

Figure 3.4 Showing two Stage Filter with frequency response.
Click on the bar at the top of the schematic window to place the focus on it.
Right click R1 and change its value to 1k.
Right click C1 and change its value to 0.15u.
Now click on the line leading to the word OUT.
Press F10 again to rerun the simulation. You should now have the graph in figure 3.4.
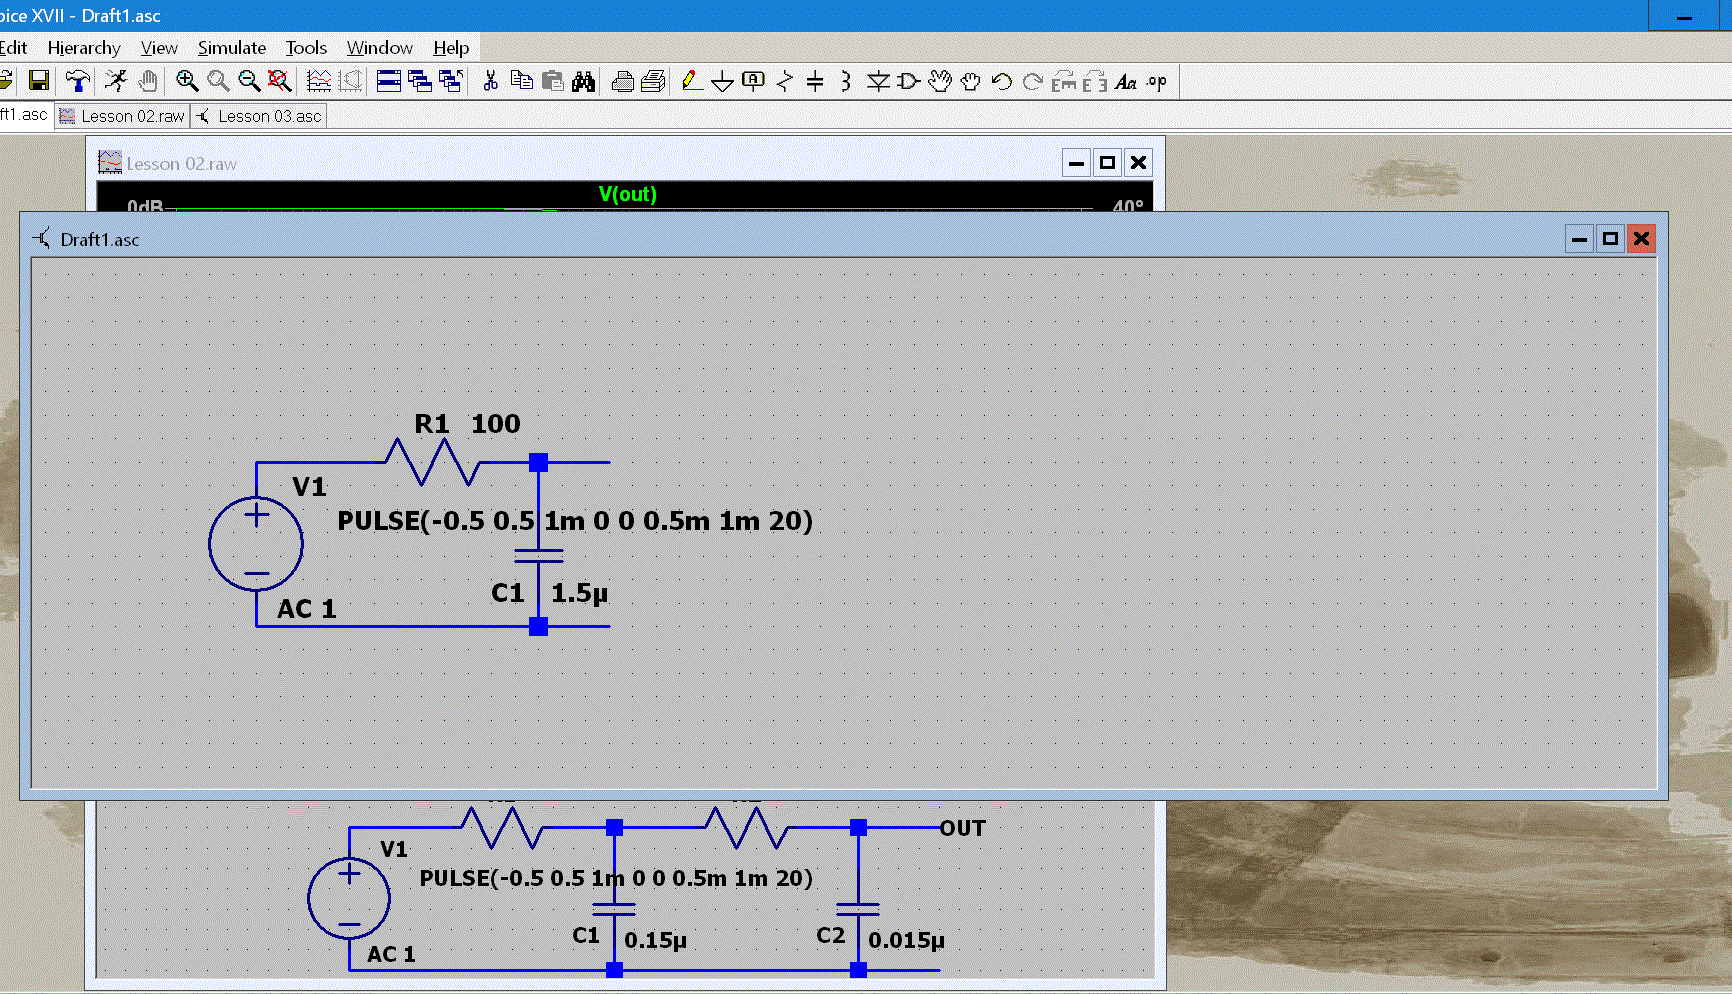
Figure 3.5 Showing two Schematic Windows.
copy from one drawing and paste to another.
Press ctrl-N to open a new schematic window.
Note that you can always see part of either window regardless of which one has focus, is in front.
Click on the smaller one that is sticking out from behind the larger one. Note that the smaller one has Lesson 03.asc in the upper left corner while the larger one has Draft1.asc in its upper left corner.
Press ctrl-C and draw a box around the generator and its leads. Start the box on one of its left hand corners so you can position the right edge exactly on the spot where the line ends and the lead of R1 begins. Where the color changes from blue to black. Release the button.
As you move the mouse you will see the generator and some of its leads come away from the rest of the drawing.
Move the mouse to the Draft1 screen and click there. The generator will appear.
Position it to the left and click to drop it.
Press R for resistor then control R for rotate. The resistor will now be horizontal. Drop the resistor somewhere away from the generator.
Press F7 and move the loan letter R from below the resistor to above it.
Now press C for capacitor.
Drop it somewhere on the board away from where it will eventually be.
Press F7 and pick up the loan letter C.
Move it to the other side of the capacitor and below the plates opposite to C1.
The single move function is still active so there is no need to press F7 again.
Click on the capacitor. Move it so the lead is between 0.5 and 1m in the generator label and the plates are just below the text characters.
Drop it there.
Click the resistor and move so it will connect to the lead from the generator.
Left click to drop it there.
Right click to end move mode.
Press F3 and draw the lines connecting the resistor to the top of the capacitor and the bottom end of the capacitor back to the generator.
Draw two lines out to the right from the top and bottom of the capacitor.
Right click to end line draw mode.
Right click the resistor and type 100 for the value. Pressing enter is the same as clicking OK.
Right click the capacitor and type 1.5u for its value.
Now go back to Lesson 03 and press ctrl-C.
Draw a box around the two resistors, two capacitors, including the ground symbol and the word OUT.
After you have released the button move the mouse to see what you have. You should have two resistors, two capacitors, ground and the word OUT. It took me three tries to include the left most resistor.
Move the cursor over the Draft1 window and click. Everything will appear. As you move the mouse there will be a double image of what you captured from the other drawing. Don't worry, the one that is not moving will disappear when you click again. Line up the resistor with the leads coming out from the junction of R1 and C1 and click.
Notice that the numbers corrected themselves to prevent duplication.
One more step.
Switch back to Lesson 03 and press the delete key. Draw a box around the entire drawing. When you release at the second corner the entire drawing will disappear
Now switch back to Draft1. Press ctrl-C and draw a box around the entire drawing.
Move the cursor over Lesson 03 and click. The drawing will appear. Position it in the center and click again. The other copy will disappear and you will have a 3 stage RC Low Pass Filter.
Close the Draft1 window and answer don't save.
Now press F10 to run the simulation again. 180 dB down at 1 MHz. That's quite a lot. Be sure to save this circuit under the name of your choice. It's Lesson 03 on my computer.
Granted, it would have been much easier just to draw the new circuit from scratch. But that isn't the point. The point is to illustrate how to use the LT Spice version of copy and paste.
Neat Looking Schematics. (Optional.)
If you are planning to use a spice drawn schematic in a presentation you should try to make it neat looking right from the start rather than trying to neaten it up later. Neatness like beauty is in the eye of the beholder. The sad fact is that there are people who are neat and those who are not and never the twain shall meet. It may be possible to move from the not neat group to the neat group by developing good habits right from the start. As you learn LT Spice make a conches effort to be neat.Resistors and capacitors come out of the box, so to speak, with only an R or C where the value will eventually be located. The value of capacitors can get 7 characters long counting a leading zero, the decimal point, and the units. The value of one component overlapping another does not give a neat appearance to a schematic diagram. You can manually move the value and the number designator can be moved around independently of the component symbol.
Whenever possible arrange schematics so signal flow is from left to right. Grounds should always go down. I've seen schematics where some grounds go up and some go sideways. That just looks weird.
Exporting a Schematic or Graph to Another Program.
If you need to transfer a schematic or a graph to another program the programmers of LT Spice have provided the means. The initial picture size is the same as it was on the screen. Thus if it fills the screen when you export it the exported picture will fill the screen. This is usually not good. So, you need to reduce the window in size before beginning the process. I tried reducing some pictures in size after transfer to paint but some of the lines in a graph disappeared.To change the size of a window move the mouse cursor to the left or right edge of the screen. When you get it in the right place the cursor will change to a two headed arrow. Drag it away from the edge. Do this on both sides. Reduce it anywhere from 3/4 to 2/3 the width of the screen. The program you are going to import it to may have a size restriction.
Change the vertical dimension of a schematic if the aspect ratio doesn't look right.When working with a graph it may benefit from expanding the vertical dimension. You can change the vertical scale and greatly increase the vertical resolution. See changing the scales on a graph (below).
There are two ways to export a schematic or graph. Right click in either window and the context menu will come up. Select the view option and a submenu will open. The two choices are at the very bottom of the view submenu. Copy bitmap to clipboard and Write image to .emf file. Copying the image to the clipboard gives the most flexibility. You can import the image to any program that knows how to deal with bitmap images. Even a relatively primitive graphics program such as Paint can convert it to a number of different file formats. All the pictures you have seen and will see on these pages were processed in this way. The dialog boxes could only be captured by the print screen key. These were pulled off the clipboard the same as the bitmaps.
Changing the quantity that is plotted on a graph.
If you have a graph with one or more quantities plotted on it, if you click another node in the schematic that quantity will be added to the graph. But if you double click all existing quantity plots will be removed and the one you double clicked will be the only one left.Changing the scales on a graph.
As we have already seen, sometimes the scale on a graph can come out a little funky. They are easy enough to fix.
Move the cursor over the scale to be repaired. It will turn into a ruler. Right click and this dialog box will open.
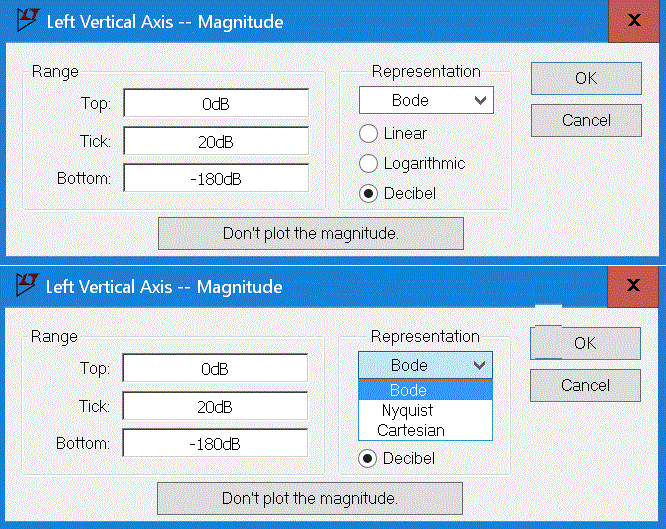
Figure 3.6 Showing Graph Scale Dialog.
This is a paste up of two different views of the dialog. The top version is how it looks right after you right click. In the bottom view the drop down list has been activated so you can see its contents. The top and bottom entry boxes are obvious. The one labeled Tic is the scale units between labeled graph lines. Sometimes the software gives values for this that are not factors or multiples of 10 which make the scale hard to read. The smaller the tic number gets the closer together the numbers and lines are. If they are too close the program will not use your input and set the Tic value itself. You can stretch the graph window vertically and make it possible to use a smaller tic value.Practice changing the dB scale on the left and make the phase angle scale on the right match up with it. LT Spice usually does this on its own although sometimes it fails to do so.
DON'T FORGET TO SAVE THE DRAWING. Save it as Lesson 03.
If you can honestly checkoff each item on the list under the heading "What you will learn in lesson 3", you can go on to lesson 4, assuming I have written it by then.
Back To Table of Contents.
This page last updated May 6, 2022. Home.