|
Do you want to learn how to do Vectors in PSP? Well here is an easy one to get you started. There are just a few things to change in vectoring as we have given you in the zip below most of the pieces required to make this cute Pup. Just follow the directions and before you know it, you'll have this cute pup to give away. It makes a great card for emailing to friends and family! Just click on our card to receive the parts needed. Once you have them open, open them in your PSP program and we can get started!

Lets begin!
Open a new image, transparent background, 16.7 mill col. 400x400 pixies.
Go to SP-ttvectorpuphead.gif and edit, copy it! Now we've done this tutorial in PSP 6. But we know its almost the same in PSP 7. The reason we do it in PSP 6 is to help those who have it. Now edit paste it as a new layer onto your working image. The edit sits right beside the file at the top.
Now at the top of your program find selections. Hit the select all, then select float. One more select, selections modify. Hit the expand button and enter the value 1. This makes sure your getting the entire image.
Go to your flood fill tool. Click on it. You should now have a new palette open on your programs desktop. Go to it. Make sure your settings are: Solid Fill, no pattern, opacity 100, the rest should say none.
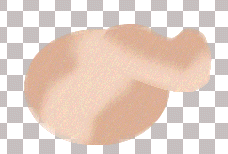
On the right, go to your colour palette and change your foreground color to #DCB197, or you can make your pup any colour you would like him to be. Flood fill the head. Keep selected. Go to your air brush tool. Change your settings to: Pen, round, size 53, hardness 0, opacity and density 100 and step 10. Go to your color palette, move the color #DCB197 to the background, now change the foreground color to:#F6D7C2. These are the two colors used throught for the pup. We are now going to add highlights. Follow the diagram below to place your highlights.
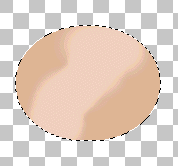
Now find your noise, in PSP7 its under image, effects, and in PSP6 its under image. Change the settings to: amount:9, and uniform. Apply this. Now go to your blur. Motion blur. Change the settings to: Angle 215, intensity 10. Apply this. This softens your highlight and adds a little texture for the fur. Go to noise and apply amount at 5%. Deselect. Now move the head up closer to the top, about a third of the way down. This just gives you room for the body later. You can close SP-tthead now.
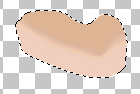
Next piece, add the SP-ttrightear.gif, by edit copying it, and then pasting as a new layer. Now we are going to do all the same effects, just a different placement for the highlight.
1) Select All, select float, select modify, expand by 1.
2) Change foreground color to #DCB197. Flood fill.
3) Change foreground color to #F6D7C2. Select your airbrush tool and apply the same highlight as following.
 =Right Ear =Right Ear 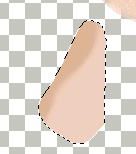 =Left Ear =Left Ear
4) Add noise at 9%. Same settings otherwise.
5) Motion blur, same settings.
6) Add noise at 5%, same settings otherwise.
7)Select none, and move your piece to:
 =Right Ear Placement. Move this layer below the head layer. Go to your layer palette, click on this layer and move below the layer below it. You can also name your layers. Double click on the layer and change them accordingly. Delete the original. =Right Ear Placement. Move this layer below the head layer. Go to your layer palette, click on this layer and move below the layer below it. You can also name your layers. Double click on the layer and change them accordingly. Delete the original.
Above are the steps to follow for each piece. The next piece to open is the left ear. Edit copy it, then edit paste it as a new layer. Then follow the 7 steps.
Next piece is the nose. Follow the steps above.
Ok, we are done the selections we have given you. Now we will make a nice face for him.
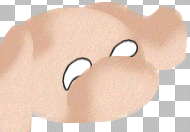
Go to your layer palette, get your preset shapes tool. Change the settings as: shape ellipse, stroked and filled, line width 1, antialias and vector checked. Change your foreground to black, and your background to white. We are now going to make an eye and create the first vector of this tutorial. draw an oval on the face as following:

Looks a little odd, doesn't it? Well we will fix this now. Go to your vector selection tool, the last tool on the bar. Go to the palette, and click on node edit. Go to the bottom node.
 This one! Move it up, then right click on it. Go to node type, symmetric. Now you will see an arrow. move this end out. Like this: This one! Move it up, then right click on it. Go to node type, symmetric. Now you will see an arrow. move this end out. Like this: and this is the shape it should be. and this is the shape it should be.  Now look in the center, you will see a square. Mouse over this without clicking. You will see an arrow that is almost circular. when you see this, hold the arrow and turn eye as following. Now look in the center, you will see a square. Mouse over this without clicking. You will see an arrow that is almost circular. when you see this, hold the arrow and turn eye as following.
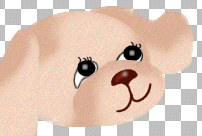
 you can adjust the eye to make it a little bigger using and node, or smaller. Once your happy with it, click on your layer palette and convert to rastor. Then move the eye beside the nose. Then click on the layer palette and move this layer below the nose layer. Duplicate. Move this eye over in place as following you can adjust the eye to make it a little bigger using and node, or smaller. Once your happy with it, click on your layer palette and convert to rastor. Then move the eye beside the nose. Then click on the layer palette and move this layer below the nose layer. Duplicate. Move this eye over in place as following
 Now go back to your preset tools, only change the setting of style to filled. Black should still be your foreground colour. Now make a new layer.Draw a shape almost round. Make it no bigger than the center half of the eye. Duplicate this layer and move the eye over to the right eye and place following the next diagram below. Change you tool to the paint brush. Reverse your colors on your color palette to white as your foreground. Change your settings as following: Brush type pen, to get this just click on the brush to the right of your palette, shape round, size 6, hardness 0, opacity 100, step 26, density 100. Paint a small white dot on the eyes as following: Now go back to your preset tools, only change the setting of style to filled. Black should still be your foreground colour. Now make a new layer.Draw a shape almost round. Make it no bigger than the center half of the eye. Duplicate this layer and move the eye over to the right eye and place following the next diagram below. Change you tool to the paint brush. Reverse your colors on your color palette to white as your foreground. Change your settings as following: Brush type pen, to get this just click on the brush to the right of your palette, shape round, size 6, hardness 0, opacity 100, step 26, density 100. Paint a small white dot on the eyes as following:
 Revese the colors again on your color palette making black the top color. Now get your draw tool and set it to freehand. Stroked and width 1, antialised. Draw some eyelashes. Its the eyelashes that make him so cute! Revese the colors again on your color palette making black the top color. Now get your draw tool and set it to freehand. Stroked and width 1, antialised. Draw some eyelashes. Its the eyelashes that make him so cute!
Ok, on with the nose. Change your color to #4b0800. Go to your preset tools, same settings except check vectors. Yes, just a little vector noding here too. Make sure your working on the top layer. Draw an oval then go to vector object selection. Again, go to the bottom node. Right click on it to get your node edits, then click on symmetric, then cusp. Draw both arrows into the center, pulling them up slightly. The next image will show you how they should look. Then rotate your image same as the eye, using the circular arrow. Then go to your layer palette, and convert to rastor.
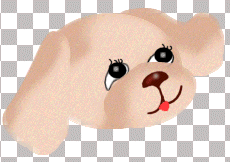
Create a new layer. Now get your draw tool, click vectors off, freehand selected, antiased checked, line width 2. Change your foreground color to #CE4F36, its a light rust color, moving the dark brown to the background, you'll need it again shortly. Draw a small line on the left side of the nose. Yes, your left side. Then go to your blur tool, gaussian blur, this time. Using a radius of 1.30 apply. Change your foreground color to white, using your paint brush, same settings as previous, add a dab of white at the top of the rusty blurred line. Then gaussian blur once more, same settings. Now were done the nose, on to the mouth. Change your foreground color to the dark brown. Change your tool to freehand again. Add a new layer, and draw a line from the nose down, make it short. Then draw two curved lines going in two directions for the mouth. Follow this diagram.
Ok, for the tongue, change colors to #FF3E3F, a nice red. Change the settings on your draw tool to filled, keeping the rest the same, draw a half loop from one mouth part to the other, sort of centered. You can erase the corners if you want.
We are done the face, now onto the body. Click on any layer, right click and merge visible. Take a stretch..and get a coffee..
Next
All materials and graphics are watermarked and copyrighted.
Copyrighted © 2001 by The Tilly Garden

Back
|


