
Ok, ready to continue?
Change your foreground color to black, background color to green. #246224. Chnge your tool to preset shapes. Use these settings: Shape rectangle, Style Stroked and filled, Antialias and create with vector checked, line width 1. Draw a rectangle using the following dimensions. The beginning numbers are the exact places to start. Move your mouse over your working image to see how these numbers located in the bottom left corner change. Once you have the starting point draw out your shape until the next set of numbers read the same as below.

Go to vector object selection. Go to the palette and click on node edit. Moving your mouse over the rectangle place 4 new nodes as the red arrows in the next image show by holding down the control key and left clicking with your mouse. 1, 2, 3, and 5 are the nodes to add.
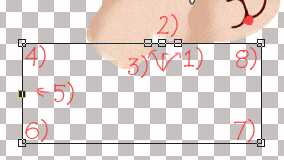
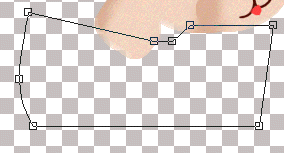
Now follow the numbers as I explain how to move them. First move 7) in towards the middle angling this side slightly. You can do this by holding the shift key down and sliding the node in. Before going to the node object selection. Time to go to the node object selection. Next move node 4) up and move 5) out towards the left, right click on this node. Then click on edit node, and select symmetric. This side should have a nice curve to it. Move vector 2) in, towards the center. About a 1/4". Move node 3) down even with 2) so that it angles towards 4) but there is a straight line to 2). When your done moving the nodes. Your node placements should look like this:
Ok, now all thats left to do with the jacket is to move node 5 in until the end of the jacket is the same as following. Were just reducing the size a bit. Move the jacket in until the line is equal to 140 on the ruler. To see the rulers, click on view at the top, then rulers. We always have our rulers showing whenever we paint. Go to your layer palette and change this layer to a rastor layer by eight clicking on it. Move this layer below the merged face layer.
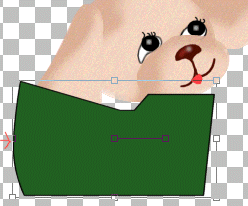
Go to your freehand tool again, click vectors off, antialias checked, style stroked and size 16, second tab, joins should be straight, this is important. Draw a line from where node 2 and 3 were, that straight part, curve your line slightly and draw the line down to the bottom of the jacket. The ending doesn't have to be perfect. It will be covered. Move the jacket until the front, or right side of the jacket side lines up under his chin or tongue. We are done this section.
Now to make the arms. Using the same settings in preset, rectangle, vector etc. and the same colours..black forgeground, green background. Draw a small oblong rectangle for his legs. About 50 pixels wide and 80 pixels long. Follow your rulers for sizing. Get the rounded arrows up as we need to angle this layer. Rotate the legs similar to the following image. Then go to node object selection. This is an easy vector change. But teaches a new technique. Across the top, where the narrow portion is, holding down your control button add a new node by clicking with your left mouse button. Then hit your delete key. This gets rid of the box look. You can now click on the node to the left of this line thats gone and right click on the node, go to symmetric and move the bottom ball part of the arrow out giving a slight curve to the arm. Go to your layer palette and change this to a rastor layer. Right click again, and duplicate this layer. Then move the legs with your mover tool, positioning them as following.
Now for the rest of his body. Change your foreground color to #DCB197 and your background color to #F6D7C2.
Change your tool to Preset shapes, changing only the shape to ellipse, and the style to fill, make sure vector is checked. Make a new rastor layer. Move this layer to the very bottom of your layer palette. Click on it and drag it down. At the end of the jacket, where it curves draw a circle no leaving a bit of space at the top and the bottom. Change this layer to a rastor layer. Go to your draw tool freehand, vector unchecked, antialias checked, size 16, style stroked, second tab make youe ends round by selecting the center joins. Draw a tail with a little curve going up. Then repeat these same steps as you did the face:
1)Select, select all, select float, select modify, expand by 1 pixel.
2) Change the foreground color to #F6D7C2, and the background to #DCB197. Change the tool to airbrush using the same settings. To apply the highlight to the tail, change the size to 15.
3) Apply the highlight as following.
 =tail and bottom highlight =tail and bottom highlight 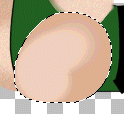 =hind leg highlight. =hind leg highlight.
 =each paw =each paw
4)Go to noise, add 9%. Uniform.
5)Go to blur, motion blur, same settings.
6)Go to noise, add 5%. Uniform.
7)Deselect.
Now go to your top layer, get your preset shapes tool, same settings. Make sure the foreground color is the darker color. Make a new vector for the hind leg. Draw a circle up touching the ear. Go to node object selection and move just the bottom node up. So that the bottom is flat. Move the left node down and the right node up. Convert your layer to rastor. Remember how? Click on your layer palette, right click on this layer, on the bottom it says change to rastor, apply.
Draw another circle, same way except make this circle about 1/3rd the size of the hind leg,using the darker brown. Go to node object selection, move the bottom node up. Now make a new node by holding down the control key and hitting your left mouse button. Make the node between the left node and top, and make another new node between the left and bottom, right where the hind leg meets this backfoot. Then click on the left node and hit the delete key. Follow the diagram below. The red x is the node to delete. The arrows point out where to add the new nodes.

Follow the steps above to this hind foot. 1-7.
Now make a front paw by using the darker brown and making a new circle using the preset shape, same settings. Make the front paw about the same size as the back, but slightly smaller. Go to node object selection and the only node editing is to move the bottom up to make the paw flat. Change to a rastor layer and repeat the steps above. 1-7. Now duplicate this layer. Move the paws under each front leg. You can resize the back paw some by clicking on the deformation tool and sliding the sides in some. Change your color to #C38C65, and using the draw tool, freehand, size 2, stroked vector not checked make a few curved lines on all 3 paws for toes. Now click on the layer palette, right click on any layer and merge visible. Now your pup is quite big. You can resize him by clicking on your resize button, entering 80% percent of original, making certain maintain aspect ratio is checked apply your resize. Now for a few Irish accents. Were going to make a leprachaun hat and a clover for him. Change your colors to foreground black, background, #246224. Go to your preset shapes, ellipse stroked and filled, vector and antialias checked. Draw a wide but narrow oval about the width of your pups head. Now using that rounded arrow, turn the arrow on a slant, the same slant as his head. Change the layer to a rastor layer. Now using preset shapes but using the rectangle instead, Draw a rectangle about a half inch high, maybe slightly smaller. Now holding the control key down slide the top corner nodes out a bit. Go to node object selection tool, that bottom tool again and holding the control key down add 3 nodes. One on each side of the hat, and one on the bottom. Then go to node edit. Move the two side nodes in slighly, right click on each and make symmeric, this keeps your lines on a curve. Move the bottom center node you made, down a bit and symmetric here also. Then using the round arrow, turn the hat on the angle. Now we also moved the sides in a bit and positioned the hat inside the oval sitting on the pup's head. Change to a rastor layer then draw one more vector shape, another oval. the same width as the top of the hat, turn and angle this layer. Now go to your draw tool, freehand vector unchecked, size about 9. Draw a curved line around the bottom of the hat ontop of the brim. Go to vector shapes, change the shape to rectangle, stroked, vector unchecked. size 6. Make a new layer by clicking on layer at the top and adding a new rastor layer. Change your foreground colour to white. Draw a square or an oblong square to fit on the brim of his hat. Go to select, select all, select modify and expand by 1. Now how you fill this buckle is up to you. If you have blade pro, use a nice gold fill, if not, use a gradient. Fill your buckle. Then go to the top, go to image, rotate. Rotate your image 30 to the right. Place the buckle on the top of his hat. If its a bit big, resize it.
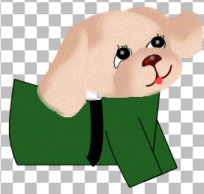
Now open your SP-ttvectorpupclover.psp. Resize by 50%. To resize, click on resize, percentage of original, type in 50. Make certain resize all layers is checked, and apply. Rotate the clover 30 to the right. Sharpen, sharpen. Move the clover to your right of the pups mouth. Now with your eye dropper, select the color of the clover leaf. Change tools to draw. Freehand, vector unchecked, antialias checked, size 2. Draw a line from the clover to the pups mouth. Draw another line coming out the other side of the pups mouth. Click on your layers, right click on any layer and merge all flatten. Now your pup is a bit big for a card so we are going to resize. This time click on resize to 75% of original, and image sharpen it. Then using your crop tool, click on your working image and making certain you have sized evenly around your pup, and leaving space at the top if you would like to add a saying, crop your image. Now how you decorate your card is up to you! But do add a nice border around it! Were finished. Yes, this was a long tutorial. But the card is worth it, as is that cute pup you now own! By the way, you can decorate him in different clothing for different occasions!
Back
All materials and graphics are copyrighted.
This image is the sole proerty of The Tilly Garden as is this tutorial. Any reproducing of this tutorial is prohibited by law. Hope you understand copyright rules, if not, go to my main page, and click on What is a Copyright.
Copyrighted © 2001 byThe Tilly Garden

|


