|
|
|
|
|
|
|||||||||||||
|
|
|
|
|||||||||||||||
|
|
Salmonfly.Net |
|
|
|
|||||||||||||
|
|
|||||||||||||||||
|
|
Articulated Fly Patterns: Where did they come from?
|
||||||||||||||||
|
|
|
|
The Tasmanian Minnow Connection By Steve Burke
It's amazing how similar these flies look to your leech." It fascinated me that someone had developed an articulated leech pattern 10 years ago so I asked John to explain a little of the origin of the Articulated Tiddly. "Perhaps, I said to John, Yours was the fly that started it all." John wrote back again describing some of the history of his fly and promised to send the pattern. "The idea for 'our version' of this fly was from Grayden Haynes, a local fly tying guru and well respected fly fisherman. The idea was to imitate the Golden Galaxia the native fish that is present in Lakes Sorell and Crescent in Tasmania's midlands. It was a huge success and was later adapted to represent other galaxia sub species from other lakes and rivers. As a commercial tyer, I attempted to sell an adapted version in New Zealand to cater for their smelt feeders but only succeeded in having the pattern pirated by a local New Zealand tyer. It has proven very successful as a harling fly over there. "Harling" is a New Zealand term for trolling a fly on a line with a length of lead line in the belly to take it down. Not something that appeals to me. Anyway, if I think of anything else to add, I will get back to you." Articulated Leeches I had asked John to send me the pattern because I was still interested in the method he used to articulate the hooks. Another Fly Fisherman and Tyer, Jeff Jarret, owner of Jarret's Guide Service, Orofino, Idaho had written to me about he tremendous success he was having fishing Articulated Leech patterns on the Clearwater. I asked him to describe how he articulated the hooks. He wrote: "I have found out that using long shanks on the rear hook will sometimes hinge back on the front. Then your fly is fouled and you don't realize it until it is too late. With the short hook it doesn't seem to do it as often. For steelhead I am using size 1 on the rear hook, size 2 typical black salmon on the front. After the fly is tied, then I will cut the front hook off at the point where the materials stop, some place just above the bend. For materials, I like rabbit, marabou, dubbing, cactus chenille. actually just about anything. Anything black or purple seem to be the fishiest. As far as tying hooks together, I start with the front hook, wrap the shank with Kevlar thread, Take a piece of spider wire or anything comparable, nail knot about 2/3 way back from eye. Run the line back thru the eye of the second hook, then bring forward and nail knot in front of the previous nail knot. Then wrap both knots with the Kevlar and head cement. It seems like a lot, but it is the only method that i have found that will hold up to 50 lb. kings. If I am making for kings the fly is about 7 inches, for steelhead about 4 inches ".
Articulated Leech Patterns Tied By Jeff Jarret Jeff brings up a couple good points: The fly needs to be tied to keep the back hook from doubling back over the first, and the articulated joint needs to be strong enough to hold a big fish in fast water. John Bailey partially solved the problem of strength by cutting the 2nd hook instead of the first. This way the tail is just an extension, and the fish that strikes is hopefully striking the whole fly. Describing this, he also addresses the issue of the second hook doubling back: "I began using articulated flies just this year on a trip to SE Alaska. I stumbled upon them in a store and purchased a few. I fished for two days and had minimal success. Upon trying the articulate pattern, I began to catch a number of large silvers. Upon returning home, I began experimenting with different methods of joining the two shanks. Although I've had good luck with using spider wire to rig them, recently I've begun removing the barb and point of the first hook. I then bend the shank to form a loop through the eye of the second hook. Although it would seem that the loop would not be fast in place, I've caught several steelhead up to twelve pounds on this pattern. I've experimented with JB welding the loop, but it seems to add to much bulk." Chinook Tandem Patterns Tied By Clark Lucas
Clark Lucas, a Contributing Fly Tyer for the Salmon and Steelhead Fly Tying Guide is noted for the original Spey Flies he ties in pains-taking detail. Just recently he sent two flies that he tied and calls his Chinook Tandems for use in fishing the King Salmon run in his native Clearwater and Salmon Rivers. The colorful examples above are the Tandems that he tied. I asked Clark, to explain how he tied the articulated joint as a contribution to this article. "I am using 20lb Mono and a knot used to attach tippet to fly line or fly line to backing around the shanks wrapped with tying thread and then Super glued for both knots. The trick is the knot on the front hook to keep the desired distance between hooks and the length of the Marabou barbules on the head hook." Origins in Trout Nymphs
I have since read of other trout nymph patterns that use similar methods for articulating a rear section made to give an action that closely imitates the action of the nymph. Underlying Principles So, it seems that there are many methods used to tie connect the hooks for these flies. The underlying principles behind all them are strength, action, and anti-fouling. Obviously, when you are fishing for heavy fish in fast water, the concern is that with two joined section of hook shank, you do don't want to lose a fish due to a weak joint. The purpose of the articulation, in the first place is to add life-like action to the fly, so that it entices fish to strike, believing it's the real deal. And finally, the joints need to be tied in such a manner that the rear shank will not double back and get fouled with the front shank, ruining the action that the articulation was designed to impart. If all of these characteristics are present, combined with the right pattern color and size to match the conditions, these flies can be unbelievably deadly. Also see: The Art of Articulation: Simplified Stingers, by Don Johnson
Steve Burke is the editor and webmaster for Salmonfly.Net
|
|
|||||||||||||
|
|
|||||||||||||||||
| Homespan | About Salmonfly.Net | Links | Stores | Contact the Webmaster | |||||||||||||||||


 Not too long ago I received some questions about tying Articulated Leeches. I knew a little about the popularity of these flies due to their success in enticing strikes, but I was in the dark about how to articulate the two hooks. It prompted a little research on my part to find some
history and methods for tying these flies. What I found was a bit confusing, however, and I really didn't like the methods that I discovered. None, that I could see, clearly pictured how this
Not too long ago I received some questions about tying Articulated Leeches. I knew a little about the popularity of these flies due to their success in enticing strikes, but I was in the dark about how to articulate the two hooks. It prompted a little research on my part to find some
history and methods for tying these flies. What I found was a bit confusing, however, and I really didn't like the methods that I discovered. None, that I could see, clearly pictured how this 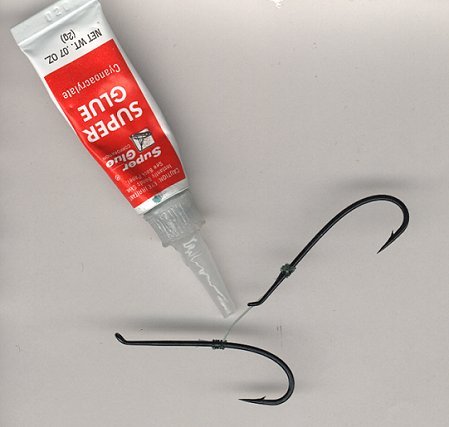 was actually done. All along, I pictured in my own mind how it could be done and so eventually developed the method using monofilament that is pictured in my instructions for tying the Articulated Egg-Sucking Bunny Leech. This method incorporates the use of a length of monofilament, tying the two hooks together with a snell-type knot and strengthening it with a drop of super glue (See the above link for details). The day that the fly was posted, I received an e-mail from a tyer in Tasmania named John Bailey who had developed an articulated fly with a couple other members of his fly tying club about 10 years ago. He remarked the following, "I was very surprised when I saw a picture of the articulated Leech. You see, I am a foundation member of the NW Fly Tyers Club here in Tasmania."
 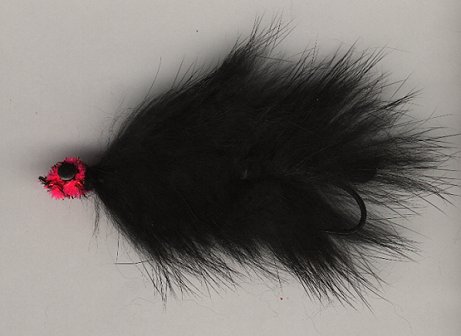 Some 10 years ago we developed a fly called the articulated tiddly. (I say "we" because it was a joint effort between myself and 3 other members.) It is tied by creating a tail on the shank of a straight eyed hook and cutting off the bend. This is then attached to another hook by using a small piece of steel guitar string doubled over through the eye and bound to the shank of the second hook. A drop of super glue was added for strength. The main body of the fly was made from the marabou part of a hen saddle hackle. (Usually grizzly dyed olive.) Small lead eyes were used. This created a lot of movement. I think you get the picture.


 Articulated patterns have actually been around for quite some time in the form of articulated nymph patterns for trout. Dave Whitlock writes about an articulated Damselfly Nymph in his book The Fly-Tyers Almanac, by Robert H. Boyle and Dave Whitlock, copyright 1975. He makes the articulated hinge for this pattern in the following way: