It is increasingly popular to setup your own computer. In most
cases, it saves money and time.
Best of all, having to setup the system yourself, you will be familiar with
the system and computers in general.
If you have a desire to learn, then you can. And once you know
the basics, you can easily setup your computer!
In my opinion, it is best to do this more than once, so you will how to do
it in the future.
In short, you need to know what you are going to learn. I hope this tutorial
is going to teach you the things you want.
In the following tutorial, you will find the steps to setup
the OS in your own PC. Enjoy!
At this point, the CD-ROM drivers are installed. So, you are
ready to install the operating system.
You can choose whatever operating system you wish. I generally use Windows,
as do most people.
I will assume you are installing Windows so I only offer the installation
processes to each version of Windows.
I think you have any chance of using.
Note! Just click on the above link to take
you to the section you want.
Now, your new PC should be up and running and you should be
staring at the BIOS setup screen.
Your next step is to make sure your BIOS is using the proper
settings.
While some users like to use the BIOS to tweak the system into running like
greased soap, during an initial build,
it is best to keep settings conservative, which usually means leaving them
at their defaults.
 When you first enter the BIOS,
and where you probably are at this point in the tutorial,
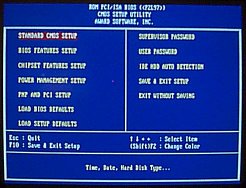
you will see the main menu.
It will list two columns (usually) of sections of
your BIOS which have different settings in them,
an example of which is to the right.
Standard CMOS Setup-This section just controls some
of the basic stuff.
Advanced BIOS Features-This section controls some of basic operating
settings of your PC.
Advanced Chipset Features-This Bios section allows you to control certain
aspects of your motherboard which are specific to the chipset on your board.
Power Management-This section controls the power setting.
Integrated Peripherals-This sections is used to configure the ports.
PnP/PCI Configuration-This section controls some of the various aspects
of plug and play and the PCI bus.
PC Health-This section controls the hardwares like fan speed, cpu temperature,
voltage level etc.
SoftMenu / Frequency-Voltage ControlThis section allows you to control
the CPU settings.
Defaults-This section lets you choose the defaults.
Passwords-This section lets you set a password for your bios settings.

Windows 95 is a true multitasking operating
system than is much better than the previous Windows.
It supports:
- Improved graphical user interface
- Long filenames
- 32-bit Preemptive Multitasking
- Plug and play technology
- Support Networking and email
- Included Game and Media Support
Just click on the link below to see its information.
- Begin Setup. At the DOS prompt, type "D:setup". If
your CD-ROM is a letter other than D:, type in that drive letter instead.
- SCANDISK. Once begun, the setup program will begin
to run a SCANDISK on your hard drive. This will proceed automatically
and, hopefully, without error. If you get an immediate error stating that
you have no extended memory manager, don't fret. This is probably because
this drive is brand new and you don't have DOS installed on it. Simply
hit ESC and move on.
- Welcome Screen. At this point, you will see the graphical
interface of Windows 95 and a Welcome screen. You should see a mouse cursor.
Makes sure your mouse works. If not, double-check its connections. You
can setup Win95 without a mouse, but I wouldn't recommend it. Now, hit
"Continue".
- Setup Start. Setup will tell you all about the three
phases of this install process. How nice of Microsoft to warn us.=) Click
Next.
- Choose Install Directory. You will be prompted to tell
the computer what directory to install Windows to. The default is C:WINDOWS,
and I strongly recommend leaving this value at default.
- Options. Upon continuation, setup will run some routine
tests on your system. After this, you will be offered four options for
a setup routine, "Typical", "Portable", "Compact", and "Custom". Pick
the options that best suits you. For most people, I recommend choosing
"Typical". If you wish to have more control over what Microsoft would
like to install on your machine, choose "Custom".
- Hardware Search. At this point, setup will analyze
your computer to see what components are installed. When asked if it has
a MIDI or sound card, or video capture card, check the appropriate boxes.
This search may take several minutes, and expect your hard drive to be
very loud and active.
- Select Components. Windows will ask you which components
you would like to install. Simply click on those you want. I recommend
choosing at least Accessories, Communications, Multimedia, and Disk Tools.
- Network Configuration. Even if you don't have a network,
Windows will want to add a network card. Just accept the defaults and
move on. This can be fixed later.
- ID. You will be asked for your network identification.
Just type something in for each line just to make Windows happy. You can
always change these names later.
- StartUp Disk. Windows will ask you if you want to make
a startup disk. Make one if you would like. You can always make one later
as well.
- Copy Files. Setup will now copy all of the files to
your computer's hard drive. This may take awhile depending on the speed
of your system. When it is finished, click "Finished".
- First Boot. Well, first Windows 95 boot. You will see
a nice blue screen. At the bottom, it will say "Getting Ready To Run Windows
95 For The First Time". It will do some thinking, and it might take a
while. Just let it go.
- SetUp Finished. You will see a dialog saying setup
is done. Click OK and the system will reboot.
- Install Additional Drivers. If you're like most, you
have additional hardware that is not yet set up. This probably includes
your video card, sound card, modem, etc. Install these drivers now. Follow
the procedures outlined in their documentation. You may have to reboot
a few times.

Just click on the link below to see its information.
- Setup Start. Type Setup?at the command prompt to start
the process. It will warn you that setup is going to do a routine check
on your system. This is fine. Press Enter.
- Product Key. It will then ask for the product key.
You can find this on the CD-slip that help the Windows CD when you bought
it. Type it into the blank boxes.
- Directory. Select the directory to which you want to
install Windows. For most people, the default of C:WINDOWS will do just
fine. Hit Next.
- Options. You will be presented with your setup options.
You are given four options: Typical, Portable, Compact, and Custom. The
explanations for them are given. Choose the one you want. For the regular
user, Typical will do just fine. If you want more control, and don't necessarily
want everything Microsoft thinks should be on your computer, choose Custom.
- Custom. If you chose custom, you will be given a window
to select those components you want installed. Go ahead and do that now.
- Startup Disk.The next window informs you that setup
will make a startup disk for you. If this is your first install and you
do not already have a Win98 system disk, I recommend you do this. Just
follow the prompts. If you don't want to make one, Microsoft doesn't really
give you an easy out. Just hit next. It will start compiling the data.
When it pops up with a window saying to put a floppy in drive A:, just
hit cancel and you will get away with not making a startup disk. Sneaky,
huh.
- Startup Disk. The next window just says that Windows
is ready to start copying files. Hit next.
- Finished. When it re-starts this time, it will go into
Windows and you are done.

Windows 2000, an upgrade to Windows NT, has
a sophisticated GUI operating system
with networking and multitasking capabilities. It was designed for client-server
networks.
Windows 2000 requires more disk space, memory, and a faster processor.
This Windows is mainly used for buiness and networking, so buy other Windows
if you are a home-user.
Just click on the link below to see its information.
- Setup Start. When starting setup, you will first see
a Windows 2000 Setup Wizard? Here you can select an upgrade or a clean
install.
- Product Key.Plug in the product key when asked.
- System. It will then ask whether you want to upgrade
your file system to NTFS. If you want increased compatibility or simply
want to dual-boot with Win98, then leave your file system as FAT32. If,
after understanding the ins and outs or NTFS, you still want to go with
it, then go ahead.
- Report. It will start to wind and grind, detect things,
and otherwise make noise. It will then spit out an upgrade report.
- Installation. It then gives you a message that you
are ready to install, that it will take 75 to 90 minutes, and that it
will restart 3 times. Yes, good, whatever?hit next.
- Wait. Sit back and watch the pretty pictures. You are
pretty much done, other than the wait.
- Finished. When it re-starts this time, it will go into
Windows and you are done.

Windows XP is Microsoft latest Windows creation.
It is the faster, most reliable Windows operating systems,
providing quicker startup, better performance
and a new, simplified visual look.
It is availble in two editions:
- Home Edition
- Professional Edition(thought to be better and more expensive than Home
Editon.)
Windows Xp provides simpler administration of users, multiple
language
interface and support for secured network access.
I definitely recommend this Windows because it is much better than the previous
Windows
and also crash rarely.
Just click on the link below to see its information.
- Setup. Insert the CD into the CD-ROM. Click Install
Windows. If your CD doesn't automatically run when inserted, then run
setup.exe manually on the CD.
- Installation. Choose the type of installation you want:
Upgrade or New Installation. Upgrade is recommended if you just want one
OS on your machine, but choose New Installation for an easier process.
- license. Agree to the license agreement and enter the
product key.
- Update. Choose whether or not to do Dynamic Update.
This will download the latest setup files from Microsoft before continuing.
You must have an active internet connection, and obviously a modem, set
up to do this.
- Directory. You will be prompted to tell the computer
what directory to install Windows to. The default is C:WINDOWS, and I
strongly recommend leaving this value at default
- Convert. You will be asked which file system to use.
You can convert to an NTFS file system or use FAT 32 or, the default,
which is to leave the file system as is, which I recommend.
- Select. You will be asked to select which partition
to install Windows XP to. It is best to install it to a different partition
than any other version of Windows, as Microsoft recommends it. But, you
have full control.
- Finished. Once these steps are done, you will sit back
and watch it copy all your files over and do its thing.