Installing
Windows 2000 Professional
To
install Windows 2000 Professional, follow these steps:
1.
Start the installation by using one of the following methods:
o
Start from
the Windows 2000 Professional installation CD-ROM. Make sure that the CD-ROM is
set to start before the hard disk starts. Insert the CD-ROM, and then when you
are prompted, press any key to start the Windows 2000 Professional Setup
program.
o
Start from
boot disks. Insert Disk 1, and then insert each of the remaining three floppy
disks when you are prompted to do so.
o
Start from
within a current operating system. Insert the CD-ROM, and then, at a command
prompt, type drive:\i386\winnt32.exe
and then press ENTER, or if this is an installation on a computer that has no
previous installation of Windows, type drive:\i386\winnt.exe
and then press ENTER, where drive is the letter of the CD-ROM drive.
1.
Setup inspects your computer's hardware configuration and then begins to
install the Setup and driver files. When the Microsoft Windows 2000
Professional screen appears, press ENTER to set up Windows 2000
Professional.
2.
Read the license agreement, and then press the F8 key to accept the terms
of the license agreement and continue the installation.
3.
When the Windows 2000 Professional Setup screen appears,
either press ENTER to set up Windows 2000 Professional on the selected
partition, or press C to create a partition in the unpartitioned space.
4.
If you choose to install Windows 2000 Professional on a file allocation
table (FAT) partition, specify whether you want to
o
leave the
current file system intact,
o
format the
partition as FAT16,
o
convert the
existing file system to the NTFS file system, or
o
format the
partition by using the NTFS file system.
Press
ENTER after you make your selection. Setup examines the existing hard disks and
then copies the files that are needed to complete the installation of Windows
2000 Professional. After the files are copied, the computer restarts.
5.
When the Windows 2000 GUI Mode Setup Wizard appears, click Next
to start the wizard. Setup detects and installs such devices as a specialized
mouse or keyboard.
6.
When the Regional Options dialog box appears, customize
your installation of Windows 2000 Professional for locale, number format,
currency, time, date, and language, if necessary. Click Next.
7.
In the Personalize Your Software dialog box, type your
name and the name of your organization, and then click Next.
8.
In the Product ID dialog box, type the 25-character
product key, and then click Next.
9.
In the Computer Name and Password dialog box, either
accept the default name that Setup generates or assign a different name for the
computer. When you are prompted for an administrative password, type a password
for the Administrator account. (You can leave the box blank; however, this is
not recommended.) Click Next.
10.
In the Date and Time Settings dialog box, set the
correct date and time for your computer. You can also specify which time zone
you are in and set the computer to automatically adjust the clock for daylight
saving time. Click Next.
11.
Setup installs the networking software and detects your network settings.
When the Network Settings dialog box appears, click either
o
Typical
to set default network settings such as File and Print Sharing for Microsoft
Networks, Client for Microsoft Networks, and TCP/IP protocol that uses Dynamic
Host Configuration Protocol (DHCP), or
o
Custom
to specify the network components that you require for your network environment,
and
then click Next.
12.
In the Workgroup or Computer Domain dialog box, specify
the workgroup or the domain to join. If you indicate that you are part of a
domain, specify your domain user name and password. Click Next.
Setup installs the networking components.
13.
During the final stage of installation, Setup installs Start menu items,
registers components, saves settings, and removes temporary files. When the Completing
the Windows 2000 Setup Wizard dialog box prompts you to do so, remove
the Windows 2000 CD-ROM, and then click Finish to restart the
computer.
14.
After the computer restarts, click Next in the Welcome
to the Network Identification Wizard dialog box.
15.
In the Users of This Computer dialog box, specify either
that users must enter a user name and password or that you want Windows 2000 to
automatically log on a specific user when the computer starts. Click Finish.
How to Install Windows NT Server
Installation of Windows NT Server
|
1. If you've set up your computer as suggested in the introduction, you should have these component icons when you open My Computer. You may have some minor differences, but at a minimum you should find floppy drive A:, hard disk C:, and CD ROM drive E: We've partitioned our hard disk so that we can install NT on drive D. If other letters are assigned to your hard disk or CD ROM, be sure to adjust accordingly for all setup choices. |
|

![]()
|
2. When you insert the Windows NT CD ROM, it will automatically bring up the setup window. If you don't see this, double click on the CD ROM. Press the Windows NT Setup button. |
|

![]()
|
3. You must confirm the location of your Windows NT setup files. On our machine, the CD Rom is in drive E. Press Enter to continue. |
|

![]()
|
4. Setup will take quite a while to copy files to your hard disk (Ten minutes or more). Once it is complete, press enter to leave setup and then restart your computer. |
|

![]()
|
5. When the computer restarts, you will be in a dual-boot configuration and it will allow you to select which system to start. Use the arrow keys to select Windows NT 4.0 Installation/Upgrade. |
|
![]()
|
6. The setup process will continue and you will be asked to confirm a number of hardware-related settings.
If you don't convert your hard disk partition to NTFS File System when you install Windows NT, you can do so at any time by using the CONVERT command. To make full use of your NT server, you will need to convert to NTFS. Such basic functions as security, file sharing, and Internet services will function only from an NTFS partition. Caution: converting to NTFS is a one-way process! DOS, Windows 3.1, and Windows 95 will not be able to run on or read a disk partition formatted with NTFS. This means you should plan accordingly, but do be sure to proceed with the conversion.
When you restart, the disk partition will be converted to NTFS without any intervention. After all the options are set, Windows NT setup will finish copying files and restart again. |
|


![]()
|
7. When the computer restarts, you will again be allowed to select which system to start. Use the arrow keys to select Windows NT Server Version 4.0 |
|
![]()
|
8. You will be placed in Windows NT Setup and asked to finish setting up the remainder of the Windows NT configuration. Part One is information about your computer.
Part Two is information about your network.
Part Three is the configuration of your computer.
Finally, setup will copy more files, complete the configuration, and ask you to restart your computer. Congratulations! You now have a working Windows NT Server! |
If you didn't install the Microsoft Internet Information Server (IIS) when you installed Windows NT, you can install it at a later time. The Windows NT Setup process will leave an Install Internet Information Server icon on the desktop. If the icon is not present, you can run D:\WINNT\System32\inetins.exe
Once you have NT installed and working, you might want to visit the Microsoft Internet Information Server Page to download and install the lastest version of the IIS and any available add-ons.
![]()
|
1.IIS Setup allows you to select which services to install. Select the options shown here and press OK. |
|

![]()
|
2. Setup will prompt you to create the root directory for the IIS services. Press Yes. |
|

![]()
|
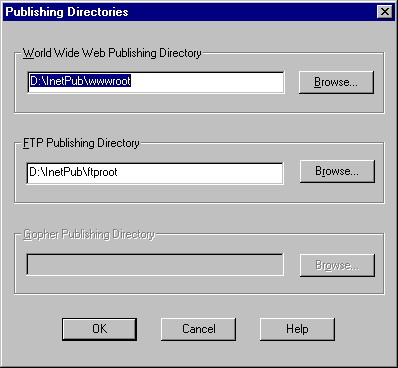
3. Setup will prompt you for the web and FTP publishing directories. We'll change these before too long, but for now just press OK. |
|
![]()
|
4. Setup will ask if you want to create these directories. Press Yes. |
|

![]()
|
5. Setup will copy and isntall all the required files for the selected services. |
|

![]()
|
6. Setup will allow you to install the SQL Server if you wish. Press OK. |
|

![]()
|
7. Setup will finish the installation and start the web and FTP servers. |
|

How to Install windows 2000 server
Windows 2000
Pro/Server Install
Introduction:
Windows 2000 installation can be simple and straightforward.
Unfortunately, our shared lab environment requires that we take additional steps to ensure that each student derives the maximum benefit from the installation lab. To achieve this end, we have assembled these directions to ensure successful installation.
Failure to adhere to these directions will likely result in a disaster of epic proportions
Keep in mind that the directions are not a substitute for thought, and as you follow them, you ought to ask your instructor to explain directions that are unclear or are not intuitive.
There may be differences in the directions depending on which OS you are installing (Windows 2000 Server or Windows 2000 Pro). The differences will be illustrated clearly.
1) Boot Windows 98
2) Click Start - Shutdown - Restart in MS-DOS Mode
3) When the system reboots, you will see a DOS prompt (c:\>)
4) At this prompt, type the following
if you are installing Windows 2000 Pro:
cd\w2kpro
dir *.exe
winnt /s c:\w2kpro
if you are installing Windows 2000 Server:
cd\w2kserv
dir *.exe
winnt /s c:\w2kserv
5) Follow the on screen instructions until you are prompted to restart the computer.
6) The computer will reboot and automatically enter the Windows 2000 setup. You will be prompted to "Press Enter to setup Windows 2000"
7) Press the 'F8' key to accept the End User License Agreement (EULA). This lab is licensed for 25 simultaneous copies of Windows 2000 Server and unlimited copies of Windows 2000 Pro. It is important that we do not abuse this license agreement by using the software outside the lab.
8) This step needs to be performed only if another instance of Windows 2000 is present on the machine.
If this is NOT the first Windows 2000 install on the machine, then you will be prompted to repair an install.
Press 'ESC' key to get the option to install in a different directory.
Choose 'Clean Install'.
9) You must now choose the partition that is reserved for your class for the installation.
Your answer will be dependent upon which instructor you have for NOS.
For example, if you are a student in Dave Clauss's NOS class, you will select the partition labeled 'Clauss'.
!!!!!!!!!!DO NOT INSTALL ON THE c:win95 PARTITION!!!!!!!!!!
10) Convert the partition to NTFS - Press 'C' to convert or ESC to change your mind.
Setup will now copy files to the correct install folders.
The computer will reboot when finished copying.
When the computer reboots, it will automatically load your installation of Windows 2000.
Upon boot, the computer will convert the file system to NTFS
11) Windows 2000 will now finish setting up. - Click 'Next' when prompted and allow Windows 2000 to detect and install devices.
12) Windows 2000 will prompt you for your Name and Company Name. If you want to get creative here, feel free, otherwise, enter 'Networking Lab' for name and 'TVI' for company.
13) When prompted for your product key, type the following
If you are installing Windows 2000 Pro:
WC3C6-37C3B-KJXKR-DBXCC-QT878
If you are installing Windows 2000 Server:
J6CVM-3GCQ2-PDCB3-WB8XY-C4WMG
14) When prompted for Computer Name, enter the first letter of your instructors name + the TVI Inventory number of the computer
(The label can be found on the right hand side of the Dell system).
For example, if your instructor is Vargas and the blue inventory label reads 738715, enter V738715 for Computer Name
For the password, enter the semester and four-digit year in lowercase letters.
Computers that do not conform to this standard WILL BE ERASED
For example, if you are taking NOS in the fall of 2001 enter 'fall2001' as your password.
15) If you are prompted for components to install (Windows 2000 Server), deselect IIS and Indexing Service. Leave all other settings unchanged and click 'next'.
16) Set Time Zone to Mountain. If this is a server install, select 5 as the number of client connections
17) Next, you will configure the network. Select 'Typical Settings'
(This option includes Client for Microsoft Networks, TCP/IP, and File and Printer Sharing).
18) When prompted for Workgroup or Computer Domain, Select, "No, this computer is not on the network, or is on a network without a domain controller.
Enter TVINORTH as your workgroup.
19) If you are installing Windows 2000 Server, do the following:
Wait while setup finishes installing. - Click finish when prompted.
20) If you are installing Windows 2000 Pro, do the following:
Select "Users must log into this machine" - next - finish
21) When the computer reboots, you must log in using the username 'Administrator' and the password '<season><four digit year>' that was entered previously.
22) Next, we will set the default OS back to Microsoft Windows.
To do this, right click on the 'My Computer' Icon and left click on the 'Properties' option.
In the new window that appears, click on the advanced tab.
Click the button labeled 'Startup and Recovery'.
Change Default OS value to "Microsoft Windows" using the pull down list.
Click OK - OK
23) This final set of steps are perhaps the most difficult, and the most important. In this step, our objective is to label our installation of Windows 2000 in the boot.ini file to avoid confusion among the many installs of Windows 2000 in various sections of NOS
To complete this step, do the following.
i. Click start - run
ii. type cmd and press enter
iii. In the DOS window, type the following:
1. c:
2. cd\
3. attrib -s -h -r boot.ini
4. edit boot.ini
24) At this point, you should be looking at a blue screen with the contents of your boot.ini file. If not, alert your instructor that you need help.
Once inside the editor, use the arrow keys to position your cursor before the text that reads "Microsoft Windows 2000 Server". Insert your instructors name and a dash at that point.
When finished, the text should read:
"Clauss - Microsoft Windows 2000 Server" if your instructor is Clauss,
"Hart - Microsoft Windows 2000 Server" if your instructor is Hart, or
"Vargas - Microsoft Windows 2000 Server" if your instructor is Vargas.
25) Once your instructor has verified the text, press the ALT + F key, then press S for Save.
Next, Press ALT + F, then press X for Exit.
26) Back at the dos prompt, type the following:
Attrib +s +h +r boot.ini
exit
26) Reboot the machine and select your installation (ie "Clauss - Microsoft Windows 2000 Pro") within 30 seconds after being prompted.
27) If the machine successfully boots, log in as administrator and have you instructor verify your installation.
how to install windows 98
Start your computer with the floppy disk drive in place, and with the
startup disk in the drive. When asked if you want to start with CD-ROM
support, select Start the computer without CD-ROM support. | |
You will eventually see the following prompt:A:\Above that, you should see a line reading "The diagnostic tools were successfully loaded to drive X:". Throughout this
document, replace X: with the drive letter specified above. At
this prompt, enter:format c: /s | |
This command will take a moment to complete, and at the end it will ask
you to specify a disk label. Enter an 11-character name or simply press Enter. | |
Once you are back at the A:\ prompt, enter:copy oakcd*.sys c: | |
When the A:\ prompt appears again, enter:X: | |
You should now see an X:\ prompt. Enter:copy mscdex.exe c: | |
Now enter edit . This will open the text editor in DOS.
Enter the following line:c:\mscdex /d:mscd001 | |
Press Alt-f and select Save As... .
Name this file c:\autoexec.bat . | |
Now press Alt-f again, and select New. | |
Type the following line:DEVICE = C:\oakcdrom.sys /d:mscd001 | |
Press Alt-f and select Save As... .
Name this file c:\config.sys . | |
Now turn off the laptop, insert the CD-ROM drive, and restart. The
computer will come back up with the A:\ prompt as before. Now,
enter D: . | |
Put the Windows CD in the CD-ROM drive, then enter Setup .
This should start Windows Setup. After that just follow the pop up menus. |
How to Install Windows XP Professional
1. Start your PC and place your Windows XP CD in your CD/DVD-ROM drive.
2. Your PC should automatically detect the CD and you will get a message saying "Press any key to boot from CD".
3. Press a key to boot from CD and Windows setup will begin. Windows will start copying preliminary setup files to your computer.
4. You will be asked if you want to perform a new installation, repair an existing installation, or quit. In this case, you will be performing a new installation.
5. You will be presented with the End User Licensing Agreement. Press F8 to accept and continue.
6. Select the partition where you want install windows. You will have the opportunity to create and/or delete partitions or just allocate the available disk space to one partition.
7. The next screen asks if you wish to use the NTFS file system. This is the recommended file system. If you choose to use FAT32, you will not have all the security and stability features of Windows XP.
8. Choose to format the partition to either FAT32 or NTFS. You'll also see two additional choices to perform a quick format of each option. Stick with doing a full format. When asked to start the format, press the "F" key. The formatting process may take quite a bit of time depending on the size of your HDD.
9. The setup program will automatically start copying files after the partition is formatted and you will see a setup progress bar.
10. After this is complete the computer will restart. Leave the XP CD in the drive but this time DO NOT press any key when the message "Press any key to boot from CD" is displayed. In few seconds setup will continue.
11. Windows XP Setup wizard will guide you through the setup process of gathering information about your computer.
12. Choose the region and language.
13. Type in your name and organization.
14. Enter your product license key.
15. Name the computer, and enter an Administrator password. Don't forget to write down your Administrator password.
16. Enter the correct date and time.
17. Choose workgroup or domain name.
18. Register Windows XP if you've installed all the current hardware on your machine.
19. Add users that will sign on to this computer.
20. Log in, to your PC for the first time. You now need to check the device manager to confirm that all the drivers has been loaded or if there are any conflicts. From the start menu select Start -> Settings -> Control Panel. Click on the System icon and then from the System Properties window select the Hardware tab, then click on Device Manager.
If there are any yellow exclamation mark "!" next to any of the listed device, it means that no drivers or incorrect drivers has been loaded for that device. Your hardware should come with manufacturer supplied drivers. You need to install these drivers using automatic setup program provided by the manufacturer or you need to manually install these drivers. If you do not have the drivers, check the manufacturers website to download them.
To install a driver manually use the following procedure:
(a) From the device manager double click on the device containing the exclamation mark.
(b) This would open a device properties window.
(c) Click on the Driver tab.
(d) Click Update Driver push button. The Wizard for updating device driver pops up.
If You Have any trouble following these Instructions